TRENDnet TEW-827DRU Users Guide - Page 52
Apply & Reboot., IP Address
 |
View all TRENDnet TEW-827DRU manuals
Add to My Manuals
Save this manual to your list of manuals |
Page 52 highlights
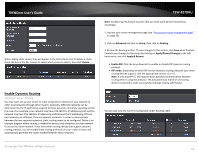
TRENDnet User's Guide Example: To forward TCP port 80 to your IP camera 1. Setup DynDNS service (see Identify Your Network section page 37). 2. Access TRENDnet IP Camera management page and forward Port 80 (see product documentation) 3. Make sure to configure your network/IP camera to use a static IP address. Note: You may need to reference your camera documentation on configuring a static IP address. 4. Log into your router management page (see "Access your router management page" on page 10). 5. Click on Advanced and click on Firewall, then click on Virtual Server 6. Check the Rule Enable option to enable the Virtual Server. 7. Next to IP Address, enter the IP address assigned to the camera. (e.g. 192.168.10.101) 8. Next to Protocol, make sure TCP is selected in the drop-down list. 10. The Private Port and Public Port, enter port number 80 is configured for both settings. 11. To save the changes, click Add. Commit your changes to the router by clicking on Apply/Discard Changes in the left-hand menu, and click Apply & Reboot. © Copyright 2016 TRENDnet. All Rights Reserved. TEW-827DRU 49
-
 1
1 -
2
-
3
-
4
-
5
-
6
-
7
-
8
-
9
-
10
-
11
-
12
-
13
-
14
-
15
-
16
-
17
-
18
-
19
-
20
-
21
-
22
-
23
-
24
-
25
-
26
-
27
-
28
-
29
-
30
-
31
-
32
-
33
-
34
-
35
-
36
-
37
-
38
-
39
-
40
-
41
-
42
-
43
-
44
-
45
-
46
-
 47
47 -
 48
48 -
 49
49 -
 50
50 -
 51
51 -
 52
52 -
 53
53 -
 54
54 -
 55
55 -
 56
56 -
 57
57 -
58
-
59
-
60
-
61
-
62
-
63
-
64
-
65
-
66
-
67
-
68
-
69
-
70
-
71
-
72
-
73
-
74
-
75
-
76
-
77
-
78
-
79
-
80
-
81
-
82
-
83
-
84
-
85
-
86
-
87
 |
 |
