Xerox 7300B Study Guide - Page 17
Power on the Printer - review
 |
UPC - 095205780079
View all Xerox 7300B manuals
Add to My Manuals
Save this manual to your list of manuals |
Page 17 highlights
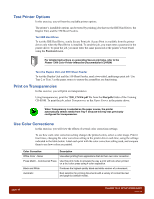
Power on the Printer In this exercise, you will connect the cables, power on the printer, and load media. Please refer to steps 12 and 13 of the Phaser 7300 Color Printer Setup Poster to complete this exercise. Review the Supported Papers section of the Phaser 7300 Color Printer Interactive Documentation CD-ROM for information on supported media and instructions to properly configure the universal media tray. Connect Cables To make a parallel connection to the printer, connect a standard IEEE-1284 compliant DB25-to-Centronics or USB cable between the computer and the printer. To connect the printer to a network, connect an Ethernet cable between the printer and the network hub. Turn the Printer on Plug the printer into an AC power source. Because the printer draws up to 1400 watts, it should never be plugged into a shared power strip. Refer to the General Information section of the Phaser 7300 Color Printer Service Manual for detailed specifications. Turn on the power switch, located on the front of the printer. After approximately 3 minutes, the Front Panel displays "Ready." Load Media To load the trays: 1. Place Xerox Phaser 35 Series Transparencies in Tray 1 When the Front Panel prompts for the Tray 1 Media Type, use the arrow buttons to select "Tray 1 Media Type = Transparencies". 2. If Tray 2 and Tray 3 are available, place laser bond paper in them When the Front Panel prompts for the Tray Media Type, use the arrow buttons to select "Tray x Media Type = Plain Paper". To avoid damage to the Fuser, use only Xerox Phaser 35 Series Transparencies. PHASER 7300 SETUP WORKSHEET version 1.0 page 13
-
 1
1 -
2
-
3
-
4
-
5
-
6
-
7
-
8
-
9
-
10
-
11
-
 12
12 -
 13
13 -
 14
14 -
 15
15 -
 16
16 -
 17
17 -
 18
18 -
 19
19 -
 20
20 -
 21
21 -
 22
22 -
23
-
24
-
25
-
26
-
27
-
28
-
29
-
30
-
31
-
32
-
33
-
34
-
35
-
36
-
37
-
38
-
39
-
40
-
41
-
42
-
43
-
44
-
45
-
46
-
47
-
48
-
49
-
50
-
51
-
52
-
53
-
54
-
55
-
56
-
57
-
58
-
59
-
60
-
61
-
62
-
63
-
64
-
65
-
66
-
67
-
68
 |
 |
