Xerox F110 User Manual - Page 20
Loading Letter-sized or Legal-sized Paper, Letter, Legal, Output, Document - troubleshooting
 |
UPC - 095205004762
View all Xerox F110 manuals
Add to My Manuals
Save this manual to your list of manuals |
Page 20 highlights
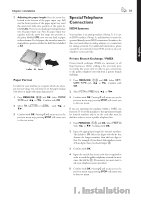
20 Chapter 1. Installation face down in the paper input tray, with the top of the page toward the rear. ÆDo not pull out the paper input tray while the machine is in the process of printing. is can lead to a paper jam. If a paper jam should occur, follow the suggestions set forth in the chapter entitled Troubleshooting / Paper Jam. ¡Forms that have been printed out by a laser printer are not suitable for further printing. is can lead to a paper jam. If a paper jam should occur, follow the suggestions set forth in the chapter entitled Troubleshooting / Paper Jam. 5 Press the paper down until the lever (A) snaps into place at the rear of the paper input tray. Loading Letter-sized or Legal-sized Paper In order for you to be able to load paper into the paper input tray in the letter or legal format, you must adjust the paper input tray to accommodate these formats. You can set the width of the paper with the two movable side guides located in the rear portion of the paper input tray. e length of the paper input tray can be set with the arrow key located at the bottom of the paper input tray. 1 Adjusting the paper width: Pull out both of the side side guides. Turn the side guides around so that the imprint LTR faces inward toward the paper. Insert the side side guides back into position; they must snap securely into place within the mountings. Always turn around both side side guides! 6 Place the cover back on the paper input tray. Push the paper input tray into the machine all the way to the stopping point. Now you can use letter-sized paper, as well as legal-sized paper since both formats have the same width. If you would like once again to use A4 paper, simply turn the side side guides back around so that the imprint A4 can be seen. If you would like to copy from a document page onto a different paper size or if you are expecting faxes in either letter or legal format, the table will show you the percentage value for the enlargement or reduction. For example, if you are going to receive a fax transmission in legal format that you would like to print out on paper size A4, then set the device to 83 percent. Output Document A4 Letter Legal A4 100 % 97 % 83 % Letter 94 % 100 % 78 % Legal 103 % 100 % 100 %
-
 1
1 -
2
-
3
-
4
-
5
-
6
-
7
-
8
-
9
-
10
-
11
-
12
-
13
-
14
-
 15
15 -
 16
16 -
 17
17 -
 18
18 -
 19
19 -
 20
20 -
 21
21 -
 22
22 -
 23
23 -
 24
24 -
 25
25 -
26
-
27
-
28
-
29
-
30
-
31
-
32
-
33
-
34
-
35
-
36
-
37
-
38
-
39
-
40
-
41
-
42
-
43
-
44
-
45
-
46
-
47
-
48
-
49
-
50
-
51
-
52
-
53
-
54
-
55
-
56
-
57
-
58
-
59
-
60
-
61
-
62
-
63
-
64
-
65
-
66
-
67
-
68
-
69
-
70
-
71
-
72
-
73
-
74
-
75
-
76
-
77
-
78
-
79
-
80
-
81
-
82
-
83
-
84
-
85
-
86
-
87
-
88
-
89
-
90
-
91
-
92
-
93
-
94
-
95
-
96
-
97
-
98
-
99
-
100
-
101
-
102
-
103
-
104
-
105
-
106
-
107
-
108
-
109
-
110
-
111
-
112
-
113
-
114
-
115
-
116
-
117
-
118
-
119
-
120
-
121
-
122
-
123
-
124
-
125
-
126
-
127
-
128
-
129
-
130
-
131
-
132
-
133
-
134
-
135
-
136
-
137
-
138
-
139
-
140
-
141
-
142
-
143
-
144
-
145
-
146
-
147
-
148
 |
 |
