Yamaha DTX502 Owner's Manual - Page 10
Component Names & Functions, Control Panel - sounds
 |
View all Yamaha DTX502 manuals
Add to My Manuals
Save this manual to your list of manuals |
Page 10 highlights
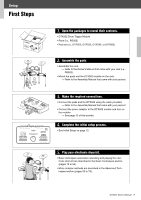
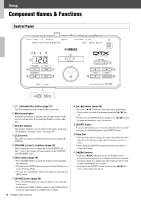
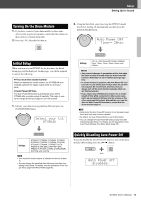
Setup Component Names & Functions Control Panel w e120 r wxyz{|} drums y u i o !0 !2 q t !1 !3 !4 !5 q [ ] (Standby/On) button (page 13) Use this button to turn the drum module on and off. w Metronome lights When the metronome is playing, the red light flashes on the start of each measure; the green light flashes on every other beat. e Number display The number display is used to indicate the tempo, mode-specific numbers, and timer values. (See page 74.) r LCD screen The LCD screen presents information needed to operate the DTX502. t VOLUME [+] and [-] buttons (page 15) These buttons are used to adjust the overall DTX502 volume-that is, the volume of sound output via the OUTPUT and [PHONES] jacks. y [KIT] button (page 19) • Press the [KIT] button to open the page for selecting different drum kits. • Hold down the [SHIFT] button and press the [KIT] button to access Training Mode. • You can also immediately silence all sounds by pressing the [KIT] button. u [SONG] button (page 26) • Press the [SONG] button to open the page for selecting different songs. • Hold down the [SHIFT] button and press the [SONG] button to put the drum module on standby for recording. 10 DTX502 Owner's Manual i[ ] button (page 26) • Press the [ ] button to start and stop song playback. • You can also start and stop training using the [ ] but- ton. • Hold down the [SHIFT] button and press the [ ] button to mute and unmute a song's drum parts. o [SHIFT] button To access the setting area or function indicated above any button, press it while holding down the [SHIFT] button. !0 Data Dial • Turn the Data Dial to change the value selected by the flashing cursor. To increase values, turn it clockwise and viceversa. • Hold down the [SHIFT] button and turn the Data Dial to change the tempo. !1 [] buttons • Press the [] buttons to move the flashing cursor between on-screen items. If a setting area has more parame- ters than will fit on a single page, these buttons can be used to move between the area's pages. • Hold down the [SHIFT] button and press the [] buttons to select the pad to be set.
-
 1
1 -
2
-
3
-
4
-
 5
5 -
 6
6 -
 7
7 -
 8
8 -
 9
9 -
 10
10 -
 11
11 -
 12
12 -
 13
13 -
 14
14 -
 15
15 -
16
-
17
-
18
-
19
-
20
-
21
-
22
-
23
-
24
-
25
-
26
-
27
-
28
-
29
-
30
-
31
-
32
-
33
-
34
-
35
-
36
-
37
-
38
-
39
-
40
-
41
-
42
-
43
-
44
-
45
-
46
-
47
-
48
-
49
-
50
-
51
-
52
-
53
-
54
-
55
-
56
-
57
-
58
-
59
-
60
-
61
-
62
-
63
-
64
-
65
-
66
-
67
-
68
-
69
-
70
-
71
-
72
-
73
-
74
-
75
-
76
-
77
-
78
-
79
-
80
-
81
-
82
-
83
-
84
-
85
-
86
-
87
-
88
-
89
-
90
-
91
-
92
 |
 |
