Yamaha DTX502 Owner's Manual - Page 64
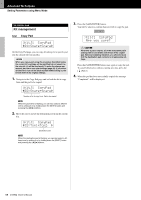
Kit management, >Ki, CopyPad, 01:Snare≥Snare, 02:tom1≥tom2, Are you sure?
 |
View all Yamaha DTX502 manuals
Add to My Manuals
Save this manual to your list of manuals |
Page 64 highlights
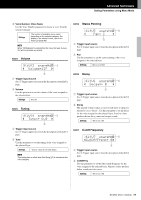
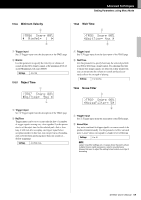
Advanced Techniques Setting Parameters using Menu Mode 04: KitJob Area Kit management KitJ1 Copy Pad >KitJ1 CopyPad "01:Snare≥Snare, On the Copy Pad page, you can copy all settings for a specific pad into the current kit from another. NOTICE When you copy a pad using the procedure described below, the current kit's settings will be modified but not saved (i.e., the asterisk (*) will be displayed). To make the change permanent, be sure to save your settings (page 25). If you select another kit or turn off the drum module without doing so, the kit will revert to its original settings. 1. Navigate to the Copy Pad page and set both the kit to copy from and the pad to be copied. >KitJ1 CopyPad "02:Snare≥Snare, Number of kit to copy from: Pad to be copied NOTE When the pad name is flashing, you can also select a different one by striking it or by holding down the [SHIFT] button and pressing the [] buttons. 2. Move the cursor and set the destination pad (from the current kit). >KitJ1 CopyPad "02:tom1≥tom2 , Destination pad NOTE When the destination pad is flashing, you can also select a different one by striking it or by holding down the [SHIFT] button and pressing the [] buttons. 3. Press the [SAVE/ENTER] button. You will be asked to confirm that you wish to copy the pad. >KitJ1 CopyPad Are you sure? CAUTION Whenever a pad is copied, all of the destination pad's settings will be overwritten with those of the copied pad. Before proceeding, therefore, you should ensure that the destination pad contains no irreplaceable settings. Press the [SAVE/ENTER] button once again to copy the pad. To cancel the process without copying any data, press the [ ] button. 4. When the pad has been successfully copied, the message "Completed." will be displayed. 64 DTX502 Owner's Manual
-
 1
1 -
2
-
3
-
4
-
5
-
6
-
7
-
8
-
9
-
10
-
11
-
12
-
13
-
14
-
15
-
16
-
17
-
18
-
19
-
20
-
21
-
22
-
23
-
24
-
25
-
26
-
27
-
28
-
29
-
30
-
31
-
32
-
33
-
34
-
35
-
36
-
37
-
38
-
39
-
40
-
41
-
42
-
43
-
44
-
45
-
46
-
47
-
48
-
49
-
50
-
51
-
52
-
53
-
54
-
55
-
56
-
57
-
58
-
 59
59 -
 60
60 -
 61
61 -
 62
62 -
 63
63 -
 64
64 -
 65
65 -
 66
66 -
 67
67 -
 68
68 -
 69
69 -
70
-
71
-
72
-
73
-
74
-
75
-
76
-
77
-
78
-
79
-
80
-
81
-
82
-
83
-
84
-
85
-
86
-
87
-
88
-
89
-
90
-
91
-
92
 |
 |
