Yamaha DTX502 Owner's Manual - Page 81
Troubleshooting - pdf manual
 |
View all Yamaha DTX502 manuals
Add to My Manuals
Save this manual to your list of manuals |
Page 81 highlights
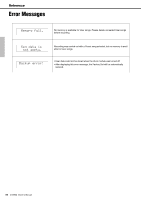
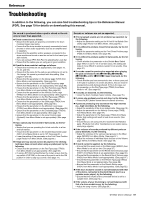
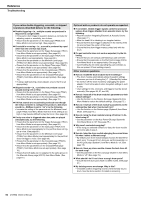
Reference Troubleshooting In addition to the following, you can also find troubleshooting tips in the Reference Manual (PDF). See page 79 for details on downloading this manual. No sound is produced when a pad is struck or the volume is lower than expected. Check connections as follows. • Ensure that the pads are properly connected to the drum module's trigger input jacks. • Ensure that the drum module is properly connected to headphones or other audio equipment, such as an amplifier and/ or speakers. • Ensure that the amplifier and/or speakers connected to the drum module are turned on and are not set to the lowest possible volume. • If you are using a KP65 Kick Pad, try adjusting its Level dial. • Ensure that the cables you are using are in good condition. Check the drum module's settings as follows. • Ensure that volumes are set appropriately. (See pages 15, 19, 24, and 59.) • Ensure that the voice for the pad you are striking is not set to "No Assign". No sound is produced with this setting. (See pages 21 and 59.) • Ensure that the parameter on the Decay page (KitV6) from Menu Mode is set appropriately. (See page 59.) • Ensure that the parameter on the Cutoff Frequency page (KitV7) from Menu Mode is set appropriately. (See page 59.) • Ensure that the parameter on the Pad Function page (Pad3) from Menu Mode is set appropriately. (See page 66.) • Ensure that the parameter on the Velocity Curve page (TRG2) from Menu Mode is set appropriately. (See page 67.) • Ensure that the parameter on the Pad Type page (TRG3) from Menu Mode is set appropriately. (See page 68.) • Ensure that the parameter on the Gain page (TRG4) from Menu Mode is set appropriately. (See page 68.) • Ensure that the parameter on the Minimum Level page (TRG5) from Menu Mode is set appropriately. (See page 68.) • Ensure that the parameter on the Crosstalk page (TRG10) from Menu Mode is set appropriately. (See page 70.) • Ensure that the parameter on the Local Control page (System5) from Menu Mode is set appropriately. (See page 74.) If you cannot play foot closed hi-hat sounds, try the following. • Ensure that you are operating the hi-hat controller in a firm and full manner. • Ensure that the parameter on the Double Bass Switch page (KitC1) from Menu Mode is set to "off". (See page 61.) • Lower the setting of the parameter on the Foot Close Position page (Pad2) from Menu Mode. (See page 65.) If edge and cup sounds cannot be played or the choking technique does not work when using a cymbal pad, try the following. • Ensure that the parameter on the Pad Type page (TRG3) from Menu Mode is set appropriately. (See page 68.) • If using a PCY100 Cymbal Pad as the hi-hat, ensure that the cup switch (CUP SW) on the rear of the pad is set to the ON position in order to play cup sounds. (See page 17.) Sounds or volumes are not as expected. If hi-hat splash sounds are not produced as expected, try the following. • Adjust the parameter setting on the Hi-hat Hi-hat Splash Sensitivity page (Pad1) from Menu Mode. (See page 65.) If it is difficult to produce closed hi-hat sounds, try the following. • Adjust the parameter setting on the Foot Close Position page (Pad2) from Menu Mode. (See page 65.) If it is difficult to produce quieter hi-hat sounds, try the following. • Check whether the parameter on the Double Bass Switch page (KitC1) is set to "on". In certain cases, this setting can make it more difficult to produce quieter hi-hat sounds. (See page 61.) If sounds cannot be produced as expected when playing the pads connected to the [wTOM1/!0], [eTOM2/!1], [rTOM3/!2], and/or [uKICK/i] trigger input jack, try the following. • Check whether you have connected a two- or three-zone pad to the jack in question. In certain situations, this can result in unexpected sounds being produced. If this is the case, set the parameter on the Pad Type page (TRG3) from Menu Mode to "off". (See page 68.) If sounds are distorted, try the following. • Lower the drum module's master volume. (See page 15.) If voices play endlessly and do not stop, try the following. • Press the [KIT] button several times to silence all voices. If pads are producing only sounds at very high volumes (i.e., high velocities), try the following. • Adjust the sensitivity of the drum module's kits. (See page 19.) • Adjust the parameter on the Velocity Curve page (TRG2) from Menu Mode. (See page 67.) • Adjust the parameter on the Gain page (TRG4) from Menu Mode. High settings will result in loud drum sounds. (See page 68.) • Ensure that you are using only the recommended Yamaha pads. (Products from other manufacturers can output excessively large signals.) If the volumes of sounds produced by different pads are poorly balanced, try the following. • Adjust the volumes of the various input groups on the Mixer page (MIXER) from Menu Mode. (See page 57.) • Adjust the volumes of individual input sources on the Volume page (KitV3) from Menu Mode. (See page 59.) If reverb cannot be applied, try the following. • Ensure that the reverb level on the Mixer page (MIXER) from Menu Mode is not set too low. (See page 57.) • Ensure that the parameter on the Reverb Send (Source) page (KitV11) from Menu Mode is set appropriately. (See page 60.) • Ensure that the parameter on the Reverb Send (Voices) page (KitC2) from Menu Mode is set appropriately. (See page 61.) • Ensure that the parameter on the Reverb Type page (KitC3) from Menu Mode is set appropriately. (See page 62.) • Ensure that the parameter on the Reverb Return page (KitC4) from Menu Mode is set appropriately. (See page 62.) If the drum module's volume is not well balanced with that of the device connected to the [AUX IN] jack (such as a portable music player), try the following. • Ensure that the volume of the connected device is set to a suitable level. (See page 12.) If the volume of your drumming is not well balanced with that of a drum-module song, try the following. • Adjust the song volume. (See page 26.) DTX502 Owner's Manual 81
-
 1
1 -
2
-
3
-
4
-
5
-
6
-
7
-
8
-
9
-
10
-
11
-
12
-
13
-
14
-
15
-
16
-
17
-
18
-
19
-
20
-
21
-
22
-
23
-
24
-
25
-
26
-
27
-
28
-
29
-
30
-
31
-
32
-
33
-
34
-
35
-
36
-
37
-
38
-
39
-
40
-
41
-
42
-
43
-
44
-
45
-
46
-
47
-
48
-
49
-
50
-
51
-
52
-
53
-
54
-
55
-
56
-
57
-
58
-
59
-
60
-
61
-
62
-
63
-
64
-
65
-
66
-
67
-
68
-
69
-
70
-
71
-
72
-
73
-
74
-
75
-
 76
76 -
 77
77 -
 78
78 -
 79
79 -
 80
80 -
 81
81 -
 82
82 -
 83
83 -
 84
84 -
 85
85 -
 86
86 -
87
-
88
-
89
-
90
-
91
-
92
 |
 |