Yamaha PM5D Owner's Manual - Page 119
Remote control, Specifying the type of message, Then use the MIDI CH, DATA 1, and DATA 2 boxes
 |
View all Yamaha PM5D manuals
Add to My Manuals
Save this manual to your list of manuals |
Page 119 highlights
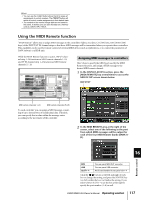
If you set a value to SW, ENC, or FAD, that value will be linked to the state of the controller. For example if you have made settings as shown in the following screen, the last value will be linked with the fader position, and will change in the range of 0-127. When you have finished inputting data in the MIDI REMOTE SETUP window, click the OK button. The hexadecimal values will be input in the MIDI message box of the MIDI REMOTE screen. When you click a box in which a hexadecimal value has been input, the range of values that can be interpreted as a valid MIDI message (including that box) will turn red. The lower part of the screen shows the MIDI channel (MIDI CH), message type (TYPE), and data values (DATA 1, DATA 2) for this MIDI message, letting you verify that the appropriate MIDI message has been input. Hexadecimal values that were input B Specifying the type of message In this method you specify the desired MIDI channel, type of message, and data value; these will be converted into the appropriate hexadecimal values. Access the MIDI REMOTE SETUP window in the same way as for method 1, and click the first box into which you want to input data. Next, click the / buttons at the left and right of the TYPE box to select the type of message. You can use the following buttons to input or edit the message in this window. buttons INS button DEL button CLEAR button PASTE button COPY button Move the highlighted area to left or right. Inserts a space (blank) at the highlighted position. Pressing the key of a PS/2 keyboard will produce the same result. Deletes the character at the highlighted position. Pressing the key of a PS/2 keyboard will produce the same result. Erases the entire message that was input in the MIDI message input boxes. Pastes the message that was copied to buffer memory by the COPY button. Copies the message from the MIDI message input box to temporary buffer memory. Use this in conjunction with the PASTE button to copy a message from one controller to another bank or controller. Type of message Then use the MIDI CH, DATA 1, and DATA 2 boxes to specify the MIDI channel and various values. The values that can be selected in the MIDI CH, DATA 1, and DATA 2 boxes will depend on the type of message you selected first. TYPE MIDI CH DATA 1 DATA 2 NOTE OFF Note-off velocity (0-127) NOTE ON Note number Note-on velocity (0-127) (0-127) KEY PRESSURE Pressure value (0-127) CONTROL CHANGE 1-16 Control num- Controller value ber (0-127) (0-127) PROGRAM CHANGE CHANNEL PRESSURE Program number - Pressure value (0-127) PITCH BEND Pitch bend Pitch bend LSB MSB (0-127) (0-127) EXCLUSIVE MESSAGE - If you set the DATA 1 or DATA 2 value to SWITCH, ENCODER (available only for encoders), or FADER (available only for faders), that value will be linked with the state of the controller. Remote control 16 PM5D/PM5D-RH Owner's Manual Operating section 119
-
 1
1 -
2
-
3
-
4
-
5
-
6
-
7
-
8
-
9
-
10
-
11
-
12
-
13
-
14
-
15
-
16
-
17
-
18
-
19
-
20
-
21
-
22
-
23
-
24
-
25
-
26
-
27
-
28
-
29
-
30
-
31
-
32
-
33
-
34
-
35
-
36
-
37
-
38
-
39
-
40
-
41
-
42
-
43
-
44
-
45
-
46
-
47
-
48
-
49
-
50
-
51
-
52
-
53
-
54
-
55
-
56
-
57
-
58
-
59
-
60
-
61
-
62
-
63
-
64
-
65
-
66
-
67
-
68
-
69
-
70
-
71
-
72
-
73
-
74
-
75
-
76
-
77
-
78
-
79
-
80
-
81
-
82
-
83
-
84
-
85
-
86
-
87
-
88
-
89
-
90
-
91
-
92
-
93
-
94
-
95
-
96
-
97
-
98
-
99
-
100
-
101
-
102
-
103
-
104
-
105
-
106
-
107
-
108
-
109
-
110
-
111
-
112
-
113
-
 114
114 -
 115
115 -
 116
116 -
 117
117 -
 118
118 -
 119
119 -
 120
120 -
 121
121 -
 122
122 -
 123
123 -
 124
124 -
125
-
126
-
127
-
128
-
129
-
130
-
131
-
132
-
133
-
134
-
135
-
136
-
137
-
138
-
139
-
140
-
141
-
142
-
143
-
144
-
145
-
146
-
147
-
148
-
149
-
150
-
151
-
152
-
153
-
154
-
155
-
156
-
157
-
158
-
159
-
160
-
161
-
162
-
163
-
164
-
165
-
166
-
167
-
168
-
169
-
170
-
171
-
172
-
173
-
174
-
175
-
176
-
177
-
178
-
179
-
180
-
181
-
182
-
183
-
184
-
185
-
186
-
187
-
188
-
189
-
190
-
191
-
192
-
193
-
194
-
195
-
196
-
197
-
198
-
199
-
200
-
201
-
202
-
203
-
204
-
205
-
206
-
207
-
208
-
209
-
210
-
211
-
212
-
213
-
214
-
215
-
216
-
217
-
218
-
219
-
220
-
221
-
222
-
223
-
224
-
225
-
226
-
227
-
228
-
229
-
230
-
231
-
232
-
233
-
234
-
235
-
236
-
237
-
238
-
239
-
240
-
241
-
242
-
243
-
244
-
245
-
246
-
247
-
248
-
249
-
250
-
251
-
252
-
253
-
254
-
255
-
256
-
257
-
258
-
259
-
260
-
261
-
262
-
263
-
264
-
265
-
266
-
267
-
268
-
269
-
270
-
271
-
272
-
273
-
274
-
275
-
276
-
277
-
278
-
279
-
280
-
281
-
282
-
283
-
284
-
285
-
286
-
287
-
288
-
289
-
290
-
291
-
292
-
293
-
294
-
295
-
296
-
297
-
298
-
299
-
300
-
301
-
302
-
303
-
304
-
305
-
306
-
307
-
308
-
309
-
310
-
311
-
312
-
313
-
314
-
315
-
316
-
317
-
318
-
319
-
320
-
321
-
322
-
323
-
324
-
325
-
326
-
327
-
328
-
329
-
330
-
331
-
332
-
333
-
334
-
335
-
336
-
337
-
338
-
339
-
340
-
341
-
342
-
343
-
344
-
345
-
346
-
347
-
348
-
349
-
350
-
351
-
352
-
353
-
354
-
355
-
356
-
357
-
358
-
359
-
360
-
361
-
362
-
363
-
364
-
365
-
366
-
367
 |
 |
