Yamaha PM5D Owner's Manual - Page 87
Using the Fade function, INPUT CH PANNING ENABLE/DISABLE button
 |
View all Yamaha PM5D manuals
Add to My Manuals
Save this manual to your list of manuals |
Page 87 highlights
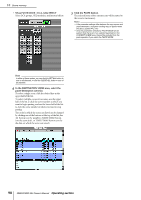
Using the Fade function "Fade" is a function that smoothly changes fader and pan to their new values over a specified duration when you recall a scene. The settings of the Fade function are made independently for each scene. 1 In the DISPLAY ACCESS section, press the [SCENE] key several times to access the FADE TIME screen shown below. In this screen you can select the channels that will use the Fade function, and specify the fade time and start offset time. FADING ENABLE/ DISABLE button FADE TIME FADE TIME button Fade time 2 In the upper left of the screen, click the FADING ENABLE/DISABLE button to select ENABLE. When the FADING ENABLE/DISABLE button is set to ENABLE, the Fade function will be enabled for the faders in the current scene. 3 In the upper right of the screen, make sure that the FADE TIME button is on. The FADE TIME/START OFFSET buttons in the upper right of the screen select the parameter that will be edited in the lower part of the FADE TIME screen. When this button is on, you can specify the fade time (the time over which fader and pan parameters will reach their new value) for each channel. 4 In the rows of buttons at the bottom of the screen, click to turn on the buttons of the channels for which you want to enable the Fade function. By clicking the SET ALL buttons located at the right of the screen, you can turn on the buttons of all input channels and all DCA groups, or the buttons of all output channels. By clicking the CLEAR ALL buttons located at the right of the screen, you can turn off the buttons of all input channels and all DCA groups, or the buttons of all output channels. 5 Move the cursor to the box located immediately below each button, and turn the [DATA] encoder to specify the fade time for that channel. (Alternatively, click the / buttons at the left and right of the box.) Hint If the numerical value is displayed in light blue when you perform the above actions, this indicates that an offset time has been specified for the corresponding channel. 6 In the same way, specify the fade time for other channels as well. If desired, you can easily copy the fade time setting of a channel to another channel (➥ p.167). 7 In the upper right of the screen, click the START OFFSET button to turn it on. When the START OFFSET button is on, you can specify an offset time for each channel (the time from when the scene is recalled until the fader or pan parameter begins to change). 8 As you did in steps 4-6, specify an offset time for each channel. 9 If you want to enable the Fade function not only for faders but also for the PAN (BALANCE) parameters of input channels, set the INPUT CH PANNING ENABLE/DISABLE button (located in the upper middle of the screen) to ENABLE. The FADING ENABLE/DISABLE button and INPUT CH PANNING ENABLE/DISABLE button can be set independently. Use the following two buttons to select the input channels to which this will apply. • When the ALL INPUT button is on The Fade function will apply to the pan (balance) parameter of all input channels. • When the SAME AS FADING button is on The Fade function will apply to the pan (balance) parameters of only the input channels selected in step 4. 10 When you have finished making settings, store the scene. The settings in the FADE TIME screen are saved independently for each scene. The Fade function will apply when you recall a scene for which this button is set to ENABLE. After recall, the fader and pan (balance) parameter values will begin changing when the specified Start Offset Time has elapsed, and will reach their new values over the specified Fade Time. Scene memory 10 PM5D/PM5D-RH Owner's Manual Operating section 87
-
 1
1 -
2
-
3
-
4
-
5
-
6
-
7
-
8
-
9
-
10
-
11
-
12
-
13
-
14
-
15
-
16
-
17
-
18
-
19
-
20
-
21
-
22
-
23
-
24
-
25
-
26
-
27
-
28
-
29
-
30
-
31
-
32
-
33
-
34
-
35
-
36
-
37
-
38
-
39
-
40
-
41
-
42
-
43
-
44
-
45
-
46
-
47
-
48
-
49
-
50
-
51
-
52
-
53
-
54
-
55
-
56
-
57
-
58
-
59
-
60
-
61
-
62
-
63
-
64
-
65
-
66
-
67
-
68
-
69
-
70
-
71
-
72
-
73
-
74
-
75
-
76
-
77
-
78
-
79
-
80
-
81
-
 82
82 -
 83
83 -
 84
84 -
 85
85 -
 86
86 -
 87
87 -
 88
88 -
 89
89 -
 90
90 -
 91
91 -
 92
92 -
93
-
94
-
95
-
96
-
97
-
98
-
99
-
100
-
101
-
102
-
103
-
104
-
105
-
106
-
107
-
108
-
109
-
110
-
111
-
112
-
113
-
114
-
115
-
116
-
117
-
118
-
119
-
120
-
121
-
122
-
123
-
124
-
125
-
126
-
127
-
128
-
129
-
130
-
131
-
132
-
133
-
134
-
135
-
136
-
137
-
138
-
139
-
140
-
141
-
142
-
143
-
144
-
145
-
146
-
147
-
148
-
149
-
150
-
151
-
152
-
153
-
154
-
155
-
156
-
157
-
158
-
159
-
160
-
161
-
162
-
163
-
164
-
165
-
166
-
167
-
168
-
169
-
170
-
171
-
172
-
173
-
174
-
175
-
176
-
177
-
178
-
179
-
180
-
181
-
182
-
183
-
184
-
185
-
186
-
187
-
188
-
189
-
190
-
191
-
192
-
193
-
194
-
195
-
196
-
197
-
198
-
199
-
200
-
201
-
202
-
203
-
204
-
205
-
206
-
207
-
208
-
209
-
210
-
211
-
212
-
213
-
214
-
215
-
216
-
217
-
218
-
219
-
220
-
221
-
222
-
223
-
224
-
225
-
226
-
227
-
228
-
229
-
230
-
231
-
232
-
233
-
234
-
235
-
236
-
237
-
238
-
239
-
240
-
241
-
242
-
243
-
244
-
245
-
246
-
247
-
248
-
249
-
250
-
251
-
252
-
253
-
254
-
255
-
256
-
257
-
258
-
259
-
260
-
261
-
262
-
263
-
264
-
265
-
266
-
267
-
268
-
269
-
270
-
271
-
272
-
273
-
274
-
275
-
276
-
277
-
278
-
279
-
280
-
281
-
282
-
283
-
284
-
285
-
286
-
287
-
288
-
289
-
290
-
291
-
292
-
293
-
294
-
295
-
296
-
297
-
298
-
299
-
300
-
301
-
302
-
303
-
304
-
305
-
306
-
307
-
308
-
309
-
310
-
311
-
312
-
313
-
314
-
315
-
316
-
317
-
318
-
319
-
320
-
321
-
322
-
323
-
324
-
325
-
326
-
327
-
328
-
329
-
330
-
331
-
332
-
333
-
334
-
335
-
336
-
337
-
338
-
339
-
340
-
341
-
342
-
343
-
344
-
345
-
346
-
347
-
348
-
349
-
350
-
351
-
352
-
353
-
354
-
355
-
356
-
357
-
358
-
359
-
360
-
361
-
362
-
363
-
364
-
365
-
366
-
367
 |
 |