Yamaha PM5D Owner's Manual - Page 25
Operating the buttons, Adjusting the setting of a knob or fader
 |
View all Yamaha PM5D manuals
Add to My Manuals
Save this manual to your list of manuals |
Page 25 highlights
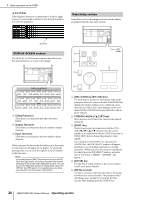
Operating the buttons Buttons in the display are used to switch parameters on/off or to select one of multiple choices. Adjusting the setting of a knob or fader Knobs and faders in the display are used to adjust the value of specific parameters. Adjust the 3 knob value Click Off ➠ On 1 Move the pointer to the desired button, and use the left/right buttons of the track pad (or mouse) to click the button. Adjust the fader value Basic operation on the PM5D The button will be switched on/off (or the corresponding button will be selected). Hint You can use the CURSOR keys and the [ENTER] key (or the arrow keys and key of a PS/2 keyboard) to perform the equivalent operation. Hint When using the track pad, you can also click by tapping the track pad if you have enabled tapping in the PREFERENCE 2 screen (UTILITY function ➥ p.188). In this case, the result will be the same as if you pressed the left button of the track pad (or mouse). 1 Move the pointer to the desired knob/fader, and use the left/right buttons of the track pad (or mouse) to click the knob/fader. The cursor will move to that location. 2 To increase or decrease the value in steps of 1, click the right button or left button of the track pad (or mouse). Clicking the right button will raise the value by one step, and clicking the left button will lower the value by one step. 3 To raise or lower the value continuously, use the track pad (or mouse) to drag the knob/ fader. The value will change as you drag the knob or fader left/right or up/down. For a parameter whose knob has a wide range of adjustment, holding down the right button of the track pad (or mouse) as you drag will produce a larger range of change than when using the left button. Hint You can also adjust the value by using the [DEC/CANCEL]/ [INC/OK] keys, the [DATA] encoder, or the / keys of a PS/2 keyboard. When adjusting a parameter that has a wide range of adjustment, you can increase the rate of change by holding down the [SHIFT] key while you press the [DEC/CANCEL]/[INC/OK] keys (or turn the [DATA] encoder). PM5D/PM5D-RH Owner's Manual Operating section 25
-
 1
1 -
2
-
3
-
4
-
5
-
6
-
7
-
8
-
9
-
10
-
11
-
12
-
13
-
14
-
15
-
16
-
17
-
18
-
19
-
 20
20 -
 21
21 -
 22
22 -
 23
23 -
 24
24 -
 25
25 -
 26
26 -
 27
27 -
 28
28 -
 29
29 -
 30
30 -
31
-
32
-
33
-
34
-
35
-
36
-
37
-
38
-
39
-
40
-
41
-
42
-
43
-
44
-
45
-
46
-
47
-
48
-
49
-
50
-
51
-
52
-
53
-
54
-
55
-
56
-
57
-
58
-
59
-
60
-
61
-
62
-
63
-
64
-
65
-
66
-
67
-
68
-
69
-
70
-
71
-
72
-
73
-
74
-
75
-
76
-
77
-
78
-
79
-
80
-
81
-
82
-
83
-
84
-
85
-
86
-
87
-
88
-
89
-
90
-
91
-
92
-
93
-
94
-
95
-
96
-
97
-
98
-
99
-
100
-
101
-
102
-
103
-
104
-
105
-
106
-
107
-
108
-
109
-
110
-
111
-
112
-
113
-
114
-
115
-
116
-
117
-
118
-
119
-
120
-
121
-
122
-
123
-
124
-
125
-
126
-
127
-
128
-
129
-
130
-
131
-
132
-
133
-
134
-
135
-
136
-
137
-
138
-
139
-
140
-
141
-
142
-
143
-
144
-
145
-
146
-
147
-
148
-
149
-
150
-
151
-
152
-
153
-
154
-
155
-
156
-
157
-
158
-
159
-
160
-
161
-
162
-
163
-
164
-
165
-
166
-
167
-
168
-
169
-
170
-
171
-
172
-
173
-
174
-
175
-
176
-
177
-
178
-
179
-
180
-
181
-
182
-
183
-
184
-
185
-
186
-
187
-
188
-
189
-
190
-
191
-
192
-
193
-
194
-
195
-
196
-
197
-
198
-
199
-
200
-
201
-
202
-
203
-
204
-
205
-
206
-
207
-
208
-
209
-
210
-
211
-
212
-
213
-
214
-
215
-
216
-
217
-
218
-
219
-
220
-
221
-
222
-
223
-
224
-
225
-
226
-
227
-
228
-
229
-
230
-
231
-
232
-
233
-
234
-
235
-
236
-
237
-
238
-
239
-
240
-
241
-
242
-
243
-
244
-
245
-
246
-
247
-
248
-
249
-
250
-
251
-
252
-
253
-
254
-
255
-
256
-
257
-
258
-
259
-
260
-
261
-
262
-
263
-
264
-
265
-
266
-
267
-
268
-
269
-
270
-
271
-
272
-
273
-
274
-
275
-
276
-
277
-
278
-
279
-
280
-
281
-
282
-
283
-
284
-
285
-
286
-
287
-
288
-
289
-
290
-
291
-
292
-
293
-
294
-
295
-
296
-
297
-
298
-
299
-
300
-
301
-
302
-
303
-
304
-
305
-
306
-
307
-
308
-
309
-
310
-
311
-
312
-
313
-
314
-
315
-
316
-
317
-
318
-
319
-
320
-
321
-
322
-
323
-
324
-
325
-
326
-
327
-
328
-
329
-
330
-
331
-
332
-
333
-
334
-
335
-
336
-
337
-
338
-
339
-
340
-
341
-
342
-
343
-
344
-
345
-
346
-
347
-
348
-
349
-
350
-
351
-
352
-
353
-
354
-
355
-
356
-
357
-
358
-
359
-
360
-
361
-
362
-
363
-
364
-
365
-
366
-
367
 |
 |
