Yamaha RX-A830 RX-A830 Owners Manual - Page 102
Configuring the system settings (ADVANCED SETUP menu), ADVANCED SETUP menu items
 |
View all Yamaha RX-A830 manuals
Add to My Manuals
Save this manual to your list of manuals |
Page 102 highlights
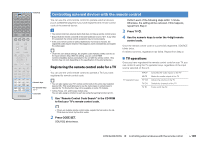
Configuring the system settings (ADVANCED SETUP menu) Configure the system settings of the unit while viewing the front display. 1 Set the unit to standby mode. 2 While holding down STRAIGHT on the front panel, press MAIN ZONE z. MAIN ZONE z Changing the speaker impedance setting (SP IMP.) SP IMP. 8 MIN Change the unit's speaker impedance settings depending on the impedance of the speakers connected. Settings 6 Ω MIN 8 Ω MIN (default) Select this option when you connect 6-ohm speakers to the unit. You can also use 4-ohm speakers as the front speakers. Select this option when you connect 8-ohm or higher speakers to the unit. PROGRAM STRAIGHT 3 Press PROGRAM to select an item. 4 Press STRAIGHT to select a setting. 5 Press MAIN ZONE z to set the unit to standby mode and turn it on again. The new settings take effect. ADVANCED SETUP menu items Item SP IMP. REMOTE ID TU TV FORMAT MON.CHK INIT UPDATE VERSION Function Changes the speaker impedance setting. Selects the unit's remote control ID. (Asia and General models only) Changes the FM/AM tuning frequency setting. Switches the video signal type. Removes the limitation on HDMI video output. Restores the default settings. Updates the firmware. Checks the version of firmware currently installed on the unit. Page 102 102 103 103 103 103 104 104 Selecting the remote control ID (REMOTE ID) REMOTE ID ID1 Change the unit's remote control ID so that it matches the remote control's ID (default: ID1). When using multiple Yamaha AV receivers, you can set each remote control with a unique remote control ID for its corresponding receiver. Settings ID1 (default), ID2 ■ Changing the remote control ID of the remote control Perform each of the following steps within 1 minute. Otherwise, the setting will be automatically canceled. 1 Press CODE SET on the remote control. 2 Press RECEIVER. 3 Use the numeric keys to enter "5019" (ID1) or "5020" (ID2). Once the remote control ID is registered successfully, SOURCE blinks twice. If it blinks six times, registration failed. Repeat from Step 1. • The registered remote control codes (p.105) are not cleared even if you change the remote control ID. CONFIGURATIONS ➤ Configuring the system settings (ADVANCED SETUP menu) En 102
-
 1
1 -
2
-
3
-
4
-
5
-
6
-
7
-
8
-
9
-
10
-
11
-
12
-
13
-
14
-
15
-
16
-
17
-
18
-
19
-
20
-
21
-
22
-
23
-
24
-
25
-
26
-
27
-
28
-
29
-
30
-
31
-
32
-
33
-
34
-
35
-
36
-
37
-
38
-
39
-
40
-
41
-
42
-
43
-
44
-
45
-
46
-
47
-
48
-
49
-
50
-
51
-
52
-
53
-
54
-
55
-
56
-
57
-
58
-
59
-
60
-
61
-
62
-
63
-
64
-
65
-
66
-
67
-
68
-
69
-
70
-
71
-
72
-
73
-
74
-
75
-
76
-
77
-
78
-
79
-
80
-
81
-
82
-
83
-
84
-
85
-
86
-
87
-
88
-
89
-
90
-
91
-
92
-
93
-
94
-
95
-
96
-
 97
97 -
 98
98 -
 99
99 -
 100
100 -
 101
101 -
 102
102 -
 103
103 -
 104
104 -
 105
105 -
 106
106 -
 107
107 -
108
-
109
-
110
-
111
-
112
-
113
-
114
-
115
-
116
-
117
-
118
-
119
-
120
-
121
-
122
-
123
-
124
-
125
-
126
-
127
-
128
-
129
-
130
-
131
-
132
-
133
-
134
-
135
-
136
 |
 |
