Yamaha RX-A830 RX-A830 Owners Manual - Page 23
Connection Method 2 HDMI Control-compatible TV
 |
View all Yamaha RX-A830 manuals
Add to My Manuals
Save this manual to your list of manuals |
Page 23 highlights
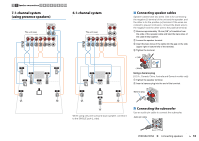
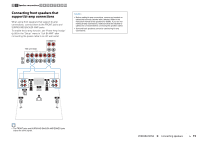
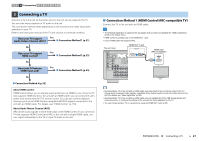
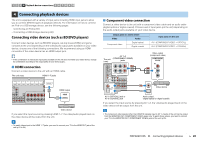
1 2 3 TV connection 4 5 6 7 8 9 10 ■ Connection Method 2 (HDMI Control-compatible TV) Connect the TV to the unit with an HDMI cable and a digital optical cable. • The following explanation is based on the assumption that you have not changed the "HDMI" parameters (p.93) in the "Setup" menu. • HDMI Control is available only on the HDMI OUT 1 jack. HDMI OUT 1 jack The unit (rear) HDMI OUT TRIGGER OUT 12V 0.1A DC OUT NETWORK 5V 0.5A (NET) IN OUT HDMI OUT 1 2 ARC 1 ARC H (BD 2 HDMI HDMI input HDMI REMOTE OPTICAL (TV) AV4 COAXIAL VIDEO AV3 Y PB PR OPTICAL AV2 OPTICAL (TV) AV4 AV 1 COMPONENT VIDEO VIDEO O AM FM HDMI (RADIO) ANTENNA AV 4 (OPTICAL) jack VIDE MO OPTICAL AUDIO 1 AUDIO 2 AV 5 AV 6 ZONE AV OUT ZONE O O TV Audio output (digital optical) ❑ Necessary settings To use HDMI Control, you need to configure the following settings. For details on settings and operating your TV, refer to the instruction manual for the TV. 1 After connecting external devices (such as a TV and playback devices) and power cable of the unit, turn on the unit, TV, and playback devices. 2 Configure the settings of the unit. a Switch the TV input to display video from the unit. b Press ON SCREEN. ON SCREEN ENTER OPTION RETURN DISPLAY ON SCREEN Cursor keys ENTER c Use the cursor keys to select "Setup" and press ENTER. • By connecting a TV to the unit with an HDMI cable, any video input to the unit can be output to the TV (except some component video signals), regardless of the method used to connect the video device to the unit. For details, see "Video signal flow" (p.123). • By connecting a TV to the unit with an HDMI cable, you can navigate the iPod, USB storage device and network sources, or configure the settings of the unit with the menu displayed on the TV. • You can connect another TV or a projector by using the HDMI OUT 2 jack (p.25). d Use the cursor keys (e/r) to select "HDMI". e Use the cursor keys (q/w) to select "HDMI Control" and press ENTER. f Use the cursor keys to select "On". g Press ON SCREEN. PREPARATIONS ➤ Connecting a TV En 23
-
 1
1 -
2
-
3
-
4
-
5
-
6
-
7
-
8
-
9
-
10
-
11
-
12
-
13
-
14
-
15
-
16
-
17
-
 18
18 -
 19
19 -
 20
20 -
 21
21 -
 22
22 -
 23
23 -
 24
24 -
 25
25 -
 26
26 -
 27
27 -
 28
28 -
29
-
30
-
31
-
32
-
33
-
34
-
35
-
36
-
37
-
38
-
39
-
40
-
41
-
42
-
43
-
44
-
45
-
46
-
47
-
48
-
49
-
50
-
51
-
52
-
53
-
54
-
55
-
56
-
57
-
58
-
59
-
60
-
61
-
62
-
63
-
64
-
65
-
66
-
67
-
68
-
69
-
70
-
71
-
72
-
73
-
74
-
75
-
76
-
77
-
78
-
79
-
80
-
81
-
82
-
83
-
84
-
85
-
86
-
87
-
88
-
89
-
90
-
91
-
92
-
93
-
94
-
95
-
96
-
97
-
98
-
99
-
100
-
101
-
102
-
103
-
104
-
105
-
106
-
107
-
108
-
109
-
110
-
111
-
112
-
113
-
114
-
115
-
116
-
117
-
118
-
119
-
120
-
121
-
122
-
123
-
124
-
125
-
126
-
127
-
128
-
129
-
130
-
131
-
132
-
133
-
134
-
135
-
136
 |
 |
