Yamaha RX-A830 RX-A830 Owners Manual - Page 31
Connecting the FM/AM antennas, Connecting to a network, FM/AM antenna connections, Network connections - service manual
 |
View all Yamaha RX-A830 manuals
Add to My Manuals
Save this manual to your list of manuals |
Page 31 highlights
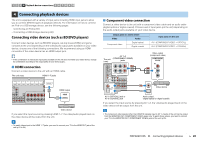
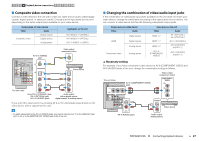
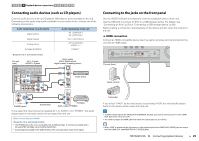
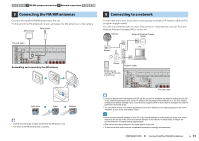
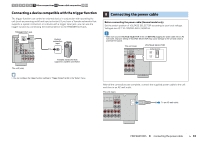
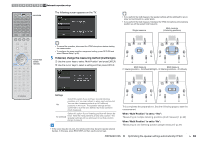
1 2 3 4 5 FM/AM antenna connections 6 Network connections 7 8 9 10 5 Connecting the FM/AM antennas Connect the supplied FM/AM antennas to the unit. Fix the end of the FM antenna to a wall, and place the AM antenna on a flat surface. AM antenna FM antenna The unit (rear) TRIGGER OUT 12V 0.1A DC OUT NETWORK 5V 0.5A (NET) IN OUT REMOTE OPTICAL (TV) AV4 COAXIAL VIDEO AV3 Y PB PR AV2 OPTICAL AV 1 COMPONENT VIDEO HDMI OUT 1 2 ARC HDMI 1 (BD/DVD) HDMI 2 VIDEO AM FM (RADIO) ANTENNA COMPONENT VIDEO PR PB VIDEO Y MONITOR OUT HDMI 3 HDMI 4 HDMI 5 HDMI 6 HDMI 7 CENTER FRONT SPEAKERS CENTER SURROUND Assembling and connecting the AM antenna 6 Connecting to a network Connect the unit to your router with a commercially-available STP network cable (CAT-5 or higher straight cable). You can enjoy Internet radio or music files stored on media servers, such as PCs and Network Attached Storage (NAS), on the unit. Internet Network Attached Storage (NAS) WAN PC LAN Modem Router Network cable Mobile device (such as iPod touch and iPhone) TRIGGER OUT 12V 0.1A DC OUT NETWORK 5V 0.5A (NET) IN OUT REMOTE OPTICAL (TV) AV4 COAXIAL VIDEO AV3 Y PB PR AV2 OPTICAL AV 1 COMPONENT VIDEO HDMI OUT 1 2 ARC HDMI 1 (BD/DVD) HDMI 2 HDMI 3 HDMI 4 HDMI 5 HDMI 6 AM FM (RADIO) ANTENNA COMPONENT VIDEO PR VIDEO PB VIDEO Y CENTER FRONT SPEAKERS CENTER MONITOR OUT SINGLE The unit (rear) Hold down Insert Release • Unwind only the length of cable needed from the AM antenna unit. • The wires of the AM antenna have no polarity. • If you are using a router that supports DHCP, you do not need to configure any network settings for the unit, as the network parameters (such as the IP address) will be assigned automatically to it. You only need to configure the network settings if your router does not support DHCP or if you want to configure the network parameters manually (p.95). • You can check whether the network parameters (such as IP address) are properly assigned to the unit in "Network" (p.101) in the "Information" menu. • Some security software installed on your PC or the firewall settings of network devices (such as a router) may block the access of the unit to the network devices or the Internet. In these cases, configure the security software or firewall settings appropriately. • Each server must be connected to the same subnet as the unit. • To use the service via the Internet, broadband connection is strongly recommended. PREPARATIONS ➤ Connecting the FM/AM antennas En 31
-
 1
1 -
2
-
3
-
4
-
5
-
6
-
7
-
8
-
9
-
10
-
11
-
12
-
13
-
14
-
15
-
16
-
17
-
18
-
19
-
20
-
21
-
22
-
23
-
24
-
25
-
 26
26 -
 27
27 -
 28
28 -
 29
29 -
 30
30 -
 31
31 -
 32
32 -
 33
33 -
 34
34 -
 35
35 -
 36
36 -
37
-
38
-
39
-
40
-
41
-
42
-
43
-
44
-
45
-
46
-
47
-
48
-
49
-
50
-
51
-
52
-
53
-
54
-
55
-
56
-
57
-
58
-
59
-
60
-
61
-
62
-
63
-
64
-
65
-
66
-
67
-
68
-
69
-
70
-
71
-
72
-
73
-
74
-
75
-
76
-
77
-
78
-
79
-
80
-
81
-
82
-
83
-
84
-
85
-
86
-
87
-
88
-
89
-
90
-
91
-
92
-
93
-
94
-
95
-
96
-
97
-
98
-
99
-
100
-
101
-
102
-
103
-
104
-
105
-
106
-
107
-
108
-
109
-
110
-
111
-
112
-
113
-
114
-
115
-
116
-
117
-
118
-
119
-
120
-
121
-
122
-
123
-
124
-
125
-
126
-
127
-
128
-
129
-
130
-
131
-
132
-
133
-
134
-
135
-
136
 |
 |
