Yamaha RX-A830 RX-A830 Owners Manual - Page 44
Selecting the input source and favorite settings with one touch (SCENE), Configuring scene assignments
 |
View all Yamaha RX-A830 manuals
Add to My Manuals
Save this manual to your list of manuals |
Page 44 highlights
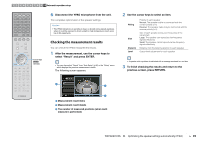
SOURCE RECEIVER HDMI 1 2 3 4 5 6 7 V-AUX AV 1 2 3 4 AUDIO 5 6 1 2 TUNER USB MAIN ZONE 2 NET PARTY HDMI OUT BD DVD SCENE TV NET RADIO PROGRAM MUTE VOLUME TOP MENU ON SCREEN POP-UP/MENU OPTION ENTER RETURN MODE TUNING DISPLAY BAND PRESET MOVIE INFO SUR. DECODE STRAIGHT MUSIC SLEEP ENHANCER PURE DIRECT 1 2 3 4 5 9 INPUT MUTE 6 7 MEMORY 0 10 TV 8 ENT TV VOL TV CH CODE SET SOURCE Selecting the input source and favorite settings with one touch (SCENE) Input selection keys The SCENE function allows you to select the assigned input source, sound program, Compressed Music Enhancer on/off, and HDMI output jack with just one touch. SCENE 1 Press SCENE. The input source and settings registered to the corresponding scene are selected. The unit turns on automatically when it is in standby mode. By default, the following settings are registered for each scene. SCENE Input BD/DVD HDMI 1 TV NET AV 4 NET RADIO RADIO TUNER Sound program Compressed Music Enhancer HDMI output jack MOVIE (Sci-Fi) Off HDMI OUT 1+2 STRAIGHT On HDMI OUT 1+2 MUSIC (7ch Stereo) On HDMI OUT 1+2 MUSIC (7ch Stereo) On HDMI OUT 1+2 Configuring scene assignments 1 Perform the following operations to prepare the settings you want to assign to a scene. • Select an input source (p.43) • Select a sound program (p.45) • Enable/disable Compressed Music Enhancer (p.50) • Selecting an HDMI output jack (p.43) 2 Hold down the desired SCENE key until "SET Complete" appears on the front display. VOL. SET Complete SW L CR SL SR SBL SBR 3 If you want to control the corresponding playback device after selecting the scene, hold down the corresponding SCENE key and input selection key together for more than 3 seconds. Once the setting is completed successfully, SOURCE blinks twice. • If you have not registered the remote control code of the playback device yet, see "Registering the remote control codes for playback devices" (p.106) to register it. • You can also configure scene assignments in the "Scene" menu (p.80). • The SCENE link playback function allows you to start playback of an external device connected to the unit via HDMI. To enable SCENE link playback, specify the device type in "Device Control" (p.81) in the "Scene" menu. PLAYBACK ➤ Selecting the input source and favorite settings with one touch (SCENE) En 44
-
 1
1 -
2
-
3
-
4
-
5
-
6
-
7
-
8
-
9
-
10
-
11
-
12
-
13
-
14
-
15
-
16
-
17
-
18
-
19
-
20
-
21
-
22
-
23
-
24
-
25
-
26
-
27
-
28
-
29
-
30
-
31
-
32
-
33
-
34
-
35
-
36
-
37
-
38
-
 39
39 -
 40
40 -
 41
41 -
 42
42 -
 43
43 -
 44
44 -
 45
45 -
 46
46 -
 47
47 -
 48
48 -
 49
49 -
50
-
51
-
52
-
53
-
54
-
55
-
56
-
57
-
58
-
59
-
60
-
61
-
62
-
63
-
64
-
65
-
66
-
67
-
68
-
69
-
70
-
71
-
72
-
73
-
74
-
75
-
76
-
77
-
78
-
79
-
80
-
81
-
82
-
83
-
84
-
85
-
86
-
87
-
88
-
89
-
90
-
91
-
92
-
93
-
94
-
95
-
96
-
97
-
98
-
99
-
100
-
101
-
102
-
103
-
104
-
105
-
106
-
107
-
108
-
109
-
110
-
111
-
112
-
113
-
114
-
115
-
116
-
117
-
118
-
119
-
120
-
121
-
122
-
123
-
124
-
125
-
126
-
127
-
128
-
129
-
130
-
131
-
132
-
133
-
134
-
135
-
136
 |
 |
