Yamaha RX-A830 RX-A830 Owners Manual - Page 24
Connection Method 3 TV with HDMI input jacks, Con the settings for HDMI Control.
 |
View all Yamaha RX-A830 manuals
Add to My Manuals
Save this manual to your list of manuals |
Page 24 highlights
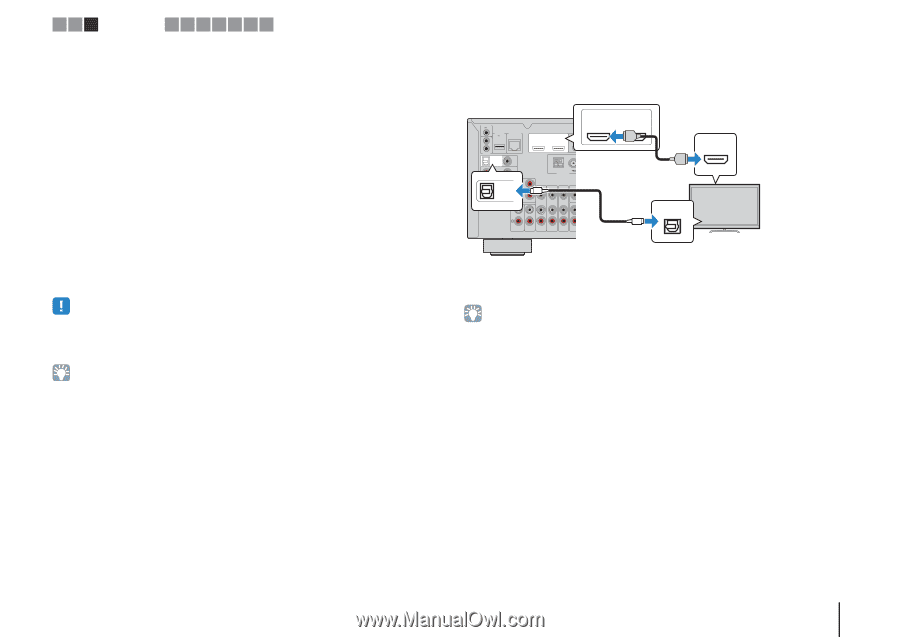
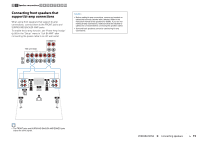
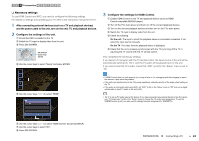
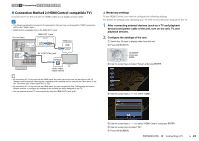
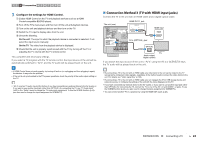
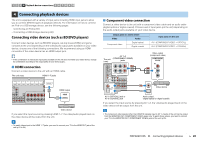
1 2 3 TV connection 4 5 6 7 8 9 10 3 Configure the settings for HDMI Control. a Enable HDMI Control on the TV and playback devices (such as a HDMI Control-compatible BD/DVD player). b Turn off the TV's main power and then turn off the unit and playback devices. c Turn on the unit and playback devices and then turn on the TV. d Switch the TV input to display video from the unit. e Check the following. On the unit: The input to which the playback device is connected is selected. If not, select the input source manually. On the TV: The video from the playback device is displayed. f Check that the unit is properly synchronized with the TV by turning off the TV or adjusting the TV volume with the TV remote control. This completes the necessary settings. If you select a TV program with the TV remote control, the input source of the unit will be automatically switched to "AV 4" and the TV audio will be played back on the unit. • If HDMI Control does not work properly, try turning off and on (or unplugging and then plugging in again) the devices. It may solve the problem. • If the unit is not synchronized to the TV's power operations, check the priority of the audio output setting on the TV. • "AV 4" is set as TV audio input at the factory. If you have connected any external device to the AV 4 jacks or if you want to use another input jack (other than OPTICAL) for connecting the TV, use "TV Audio Input" (p.93) in the "Setup" menu to change the TV audio input assignment. To use the SCENE function (p.44), you also need to change the input assignment for SCENE(TV). ■ Connection Method 3 (TV with HDMI input jacks) Connect the TV to the unit with an HDMI cable and a digital optical cable. HDMI OUT 1 jack The unit (rear) HDMI OUT TRIGGER OUT 12V 0.1A DC OUT NETWORK 5V 0.5A (NET) IN OUT HDMI OUT 1 2 ARC 1 ARC H (BD 2 HDMI HDMI input HDMI REMOTE OPTICAL (TV) AV4 COAXIAL VIDEO AV3 Y PB PR OPTICAL AV2 OPTICAL (TV) AV4 AV 1 COMPONENT VIDEO VIDEO O AM FM HDMI (RADIO) ANTENNA AV 4 (OPTICAL) jack VIDE MO OPTICAL AUDIO 1 AUDIO 2 AV 5 AV 6 ZONE AV OUT ZONE O O TV Audio output (digital optical) If you switch the input source of the unit to "AV 4" using the AV 4 or SCENE(TV) keys, the TV audio will be played back on the unit. • By connecting a TV to the unit with an HDMI cable, any video input to the unit can be output to the TV (except some component video signals), regardless of the method used to connect the video device to the unit. For details, see "Video signal flow" (p.123). • By connecting a TV to the unit with an HDMI cable, you can navigate the iPod, USB storage device and network sources, or configure the settings of the unit with the menu displayed on the TV. • If you have connected any external device to the AV 4 jacks or if you want to use another input jack (other than OPTICAL) for connecting the TV, connect the TV to one of the AV 1-6 and AUDIO 1-2 jacks. To use the SCENE function (p.44), you also need to change the input assignment for SCENE(TV). • You can connect another TV or a projector by using the HDMI OUT 2 jack (p.25). PREPARATIONS ➤ Connecting a TV En 24
-
 1
1 -
2
-
3
-
4
-
5
-
6
-
7
-
8
-
9
-
10
-
11
-
12
-
13
-
14
-
15
-
16
-
17
-
18
-
 19
19 -
 20
20 -
 21
21 -
 22
22 -
 23
23 -
 24
24 -
 25
25 -
 26
26 -
 27
27 -
 28
28 -
 29
29 -
30
-
31
-
32
-
33
-
34
-
35
-
36
-
37
-
38
-
39
-
40
-
41
-
42
-
43
-
44
-
45
-
46
-
47
-
48
-
49
-
50
-
51
-
52
-
53
-
54
-
55
-
56
-
57
-
58
-
59
-
60
-
61
-
62
-
63
-
64
-
65
-
66
-
67
-
68
-
69
-
70
-
71
-
72
-
73
-
74
-
75
-
76
-
77
-
78
-
79
-
80
-
81
-
82
-
83
-
84
-
85
-
86
-
87
-
88
-
89
-
90
-
91
-
92
-
93
-
94
-
95
-
96
-
97
-
98
-
99
-
100
-
101
-
102
-
103
-
104
-
105
-
106
-
107
-
108
-
109
-
110
-
111
-
112
-
113
-
114
-
115
-
116
-
117
-
118
-
119
-
120
-
121
-
122
-
123
-
124
-
125
-
126
-
127
-
128
-
129
-
130
-
131
-
132
-
133
-
134
-
135
-
136
 |
 |