ZyXEL GS-1548 User Guide - Page 132
RMON Event: Overview
 |
View all ZyXEL GS-1548 manuals
Add to My Manuals
Save this manual to your list of manuals |
Page 132 highlights
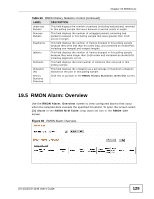
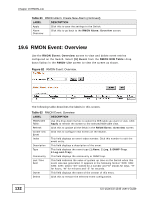
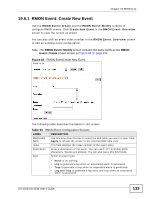
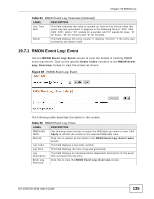
Chapter 19 RMON-Lite Table 61 RMON Alarm: Create New Alarm (continued) LABEL DESCRIPTION Apply Click this to save the settings to the Switch. Alarm Overview Click this to go back to the RMON Alarm: Overview screen. 19.6 RMON Event: Overview Use the RMON Event: Overview screen to view and delete event entries configured on the Switch. Select [9] Event from the RMON MIB Table: drop down listbox in the RMON-Lite screen to view the screen as shown. Figure 82 RMON Event: Overview. 132 The following table describes the labels in this screen. Table 62 RMON Event: Overview LABEL DESCRIPTION RMON MIB Table: Use this drop down list box to select the MIB table you want to view. Click Apply to refresh the screen to the selected MIB table view. Refresh Click this to update all the fields in the RMON Event: Overview screen. Create new Event Click this to configure new events on the Switch. Index This field displays an event index number. Click this number to edit the event entry. Description This field displays a description of the event. Type This field displays the event type (1:None, 2:Log, 3:SNMP-Trap, 4:Log-and-Trap). Community This field displays the community or SNMP trap. Last Time Sent This field indicates the value of system up time on the Switch when this event was last generated. It appears in the following format "XXD: XXH: XXM: XXS", where "XX" stands for a number and "D" stands for days, "H" for hours, "M" for minutes and "S" for seconds. Owner This field displays the name of the creator of this entry. Delete Click this to remove the selected event configuration. GS-1524/GS-1548 User's Guide
-
 1
1 -
2
-
3
-
4
-
5
-
6
-
7
-
8
-
9
-
10
-
11
-
12
-
13
-
14
-
15
-
16
-
17
-
18
-
19
-
20
-
21
-
22
-
23
-
24
-
25
-
26
-
27
-
28
-
29
-
30
-
31
-
32
-
33
-
34
-
35
-
36
-
37
-
38
-
39
-
40
-
41
-
42
-
43
-
44
-
45
-
46
-
47
-
48
-
49
-
50
-
51
-
52
-
53
-
54
-
55
-
56
-
57
-
58
-
59
-
60
-
61
-
62
-
63
-
64
-
65
-
66
-
67
-
68
-
69
-
70
-
71
-
72
-
73
-
74
-
75
-
76
-
77
-
78
-
79
-
80
-
81
-
82
-
83
-
84
-
85
-
86
-
87
-
88
-
89
-
90
-
91
-
92
-
93
-
94
-
95
-
96
-
97
-
98
-
99
-
100
-
101
-
102
-
103
-
104
-
105
-
106
-
107
-
108
-
109
-
110
-
111
-
112
-
113
-
114
-
115
-
116
-
117
-
118
-
119
-
120
-
121
-
122
-
123
-
124
-
125
-
126
-
 127
127 -
 128
128 -
 129
129 -
 130
130 -
 131
131 -
 132
132 -
 133
133 -
 134
134 -
 135
135 -
 136
136 -
 137
137 -
138
-
139
-
140
-
141
-
142
-
143
-
144
-
145
-
146
-
147
-
148
-
149
-
150
-
151
-
152
-
153
-
154
-
155
-
156
-
157
-
158
-
159
-
160
-
161
-
162
-
163
-
164
-
165
-
166
-
167
-
168
-
169
-
170
 |
 |