ZyXEL GS-1548 User Guide - Page 39
Change Your Password, 4.4 Saving Your Configuration - default ip address
 |
View all ZyXEL GS-1548 manuals
Add to My Manuals
Save this manual to your list of manuals |
Page 39 highlights
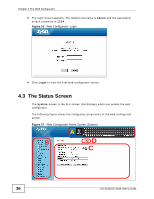
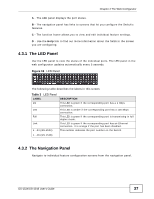
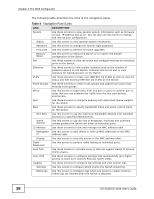
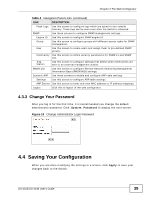
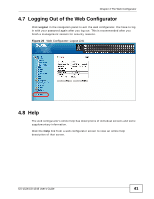
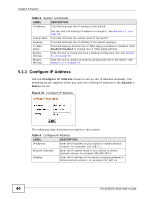
Chapter 4 The Web Configurator Table 4 Navigation Panel Links (continued) LINK DESCRIPTION Flash Logs Use this screen to configure logs which are saved to non-volatile memory. These logs can be seen even after the Switch is rebooted. SNMP Use these screens to configure SNMP management settings. Engine ID Use this screen to configure SNMP engine ID. Group Use this screen to configure groups with different access rights for SNMP management. User Use this screen to create users and assign them to pre-defined SNMP groups. Community Use this screen to define security parameters for SNMP v1 and SNMP v2c. Trap Station Use this screen to configure settings that define when notifications are sent to an external management station. RMON-Lite Use this screen to configure Remote Network Monitoring Management Information Base (RMON MIB) settings. Dynamic ARP Use these screens to enable and configure ARP table settings. Settings Use this screen to configure ARP table settings. ARP Entries Use this screen to enter and view MAC address to IP address mappings. Logout Click this to logout of the web configurator. 4.3.3 Change Your Password After you log in for the first time, it is recommended you change the default administrator password. Click System, Password to display the next screen. Figure 19 Change Administrator Login Password 4.4 Saving Your Configuration When you are done modifying the settings in a screen, click Apply to save your changes back to the Switch. GS-1524/GS-1548 User's Guide 39
-
 1
1 -
2
-
3
-
4
-
5
-
6
-
7
-
8
-
9
-
10
-
11
-
12
-
13
-
14
-
15
-
16
-
17
-
18
-
19
-
20
-
21
-
22
-
23
-
24
-
25
-
26
-
27
-
28
-
29
-
30
-
31
-
32
-
33
-
 34
34 -
 35
35 -
 36
36 -
 37
37 -
 38
38 -
 39
39 -
 40
40 -
 41
41 -
 42
42 -
 43
43 -
 44
44 -
45
-
46
-
47
-
48
-
49
-
50
-
51
-
52
-
53
-
54
-
55
-
56
-
57
-
58
-
59
-
60
-
61
-
62
-
63
-
64
-
65
-
66
-
67
-
68
-
69
-
70
-
71
-
72
-
73
-
74
-
75
-
76
-
77
-
78
-
79
-
80
-
81
-
82
-
83
-
84
-
85
-
86
-
87
-
88
-
89
-
90
-
91
-
92
-
93
-
94
-
95
-
96
-
97
-
98
-
99
-
100
-
101
-
102
-
103
-
104
-
105
-
106
-
107
-
108
-
109
-
110
-
111
-
112
-
113
-
114
-
115
-
116
-
117
-
118
-
119
-
120
-
121
-
122
-
123
-
124
-
125
-
126
-
127
-
128
-
129
-
130
-
131
-
132
-
133
-
134
-
135
-
136
-
137
-
138
-
139
-
140
-
141
-
142
-
143
-
144
-
145
-
146
-
147
-
148
-
149
-
150
-
151
-
152
-
153
-
154
-
155
-
156
-
157
-
158
-
159
-
160
-
161
-
162
-
163
-
164
-
165
-
166
-
167
-
168
-
169
-
170
 |
 |
