ZyXEL GS-1548 User Guide - Page 60
Edit IEEE 802.1Q VLAN Screen, Table 13
 |
View all ZyXEL GS-1548 manuals
Add to My Manuals
Save this manual to your list of manuals |
Page 60 highlights
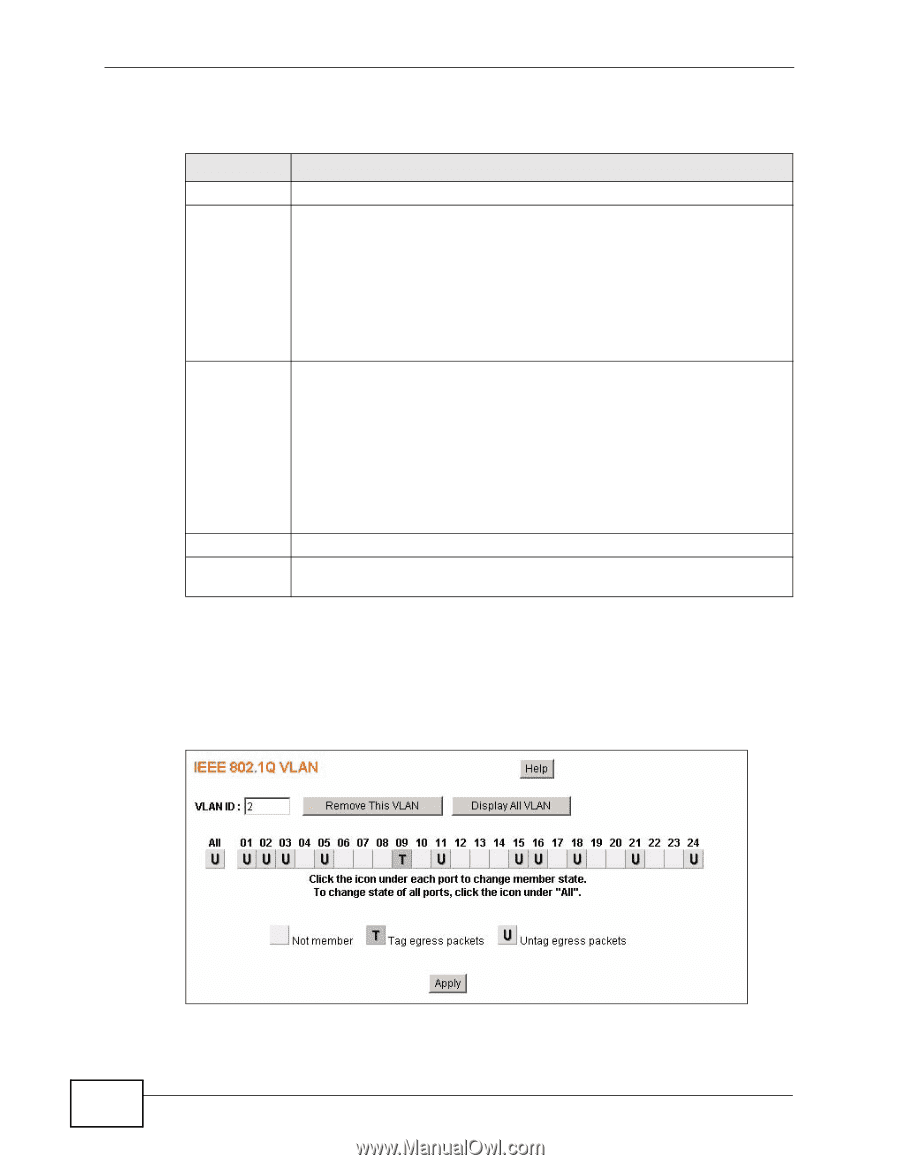
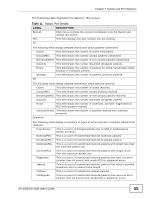
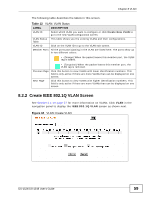
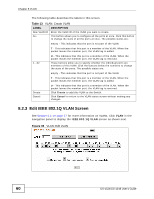
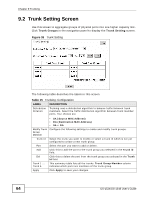
Chapter 8 VLAN The following table describes the labels in this screen. Table 13 VLAN: Create VLAN LABEL DESCRIPTION New VLAN ID Enter the VLAN ID of the VLAN you want to create. ALL This button allows you to configure all the ports at once. Click this button to change the state of all the ports at once. The possible states are: empty - This indicates that the port is not part of the VLAN. T - This indicates that this port is a member of the VLAN. When the packet leaves the member port, the VLAN tag is added. 1...52 U - This indicates that this port is a member of the VLAN. When the packet leaves the member port, the VLAN tag is removed. These buttons allow you to specify whether the individual ports are members of this VLAN. Click the buttons below the numbers to change the state of the ports. The possible states are: empty - This indicates that the port is not part of the VLAN. T - This indicates that this port is a member of the VLAN. When the packet leaves the member port, the VLAN tag is added. Create Cancel U - This indicates that this port is a member of the VLAN. When the packet leaves the member port, the VLAN tag is removed. Click Create to add this VLAN to the Switch. Click Cancel to return to the VLAN status screen without making any changes. 8.2.3 Edit IEEE 802.1Q VLAN Screen See Section 8.1 on page 57 for more information on VLANs. Click VLAN in the navigation panel to display the IEEE 802.1Q VLAN screen as shown next. Figure 35 VLAN: Edit VLAN 60 GS-1524/GS-1548 User's Guide
-
 1
1 -
2
-
3
-
4
-
5
-
6
-
7
-
8
-
9
-
10
-
11
-
12
-
13
-
14
-
15
-
16
-
17
-
18
-
19
-
20
-
21
-
22
-
23
-
24
-
25
-
26
-
27
-
28
-
29
-
30
-
31
-
32
-
33
-
34
-
35
-
36
-
37
-
38
-
39
-
40
-
41
-
42
-
43
-
44
-
45
-
46
-
47
-
48
-
49
-
50
-
51
-
52
-
53
-
54
-
 55
55 -
 56
56 -
 57
57 -
 58
58 -
 59
59 -
 60
60 -
 61
61 -
 62
62 -
 63
63 -
 64
64 -
 65
65 -
66
-
67
-
68
-
69
-
70
-
71
-
72
-
73
-
74
-
75
-
76
-
77
-
78
-
79
-
80
-
81
-
82
-
83
-
84
-
85
-
86
-
87
-
88
-
89
-
90
-
91
-
92
-
93
-
94
-
95
-
96
-
97
-
98
-
99
-
100
-
101
-
102
-
103
-
104
-
105
-
106
-
107
-
108
-
109
-
110
-
111
-
112
-
113
-
114
-
115
-
116
-
117
-
118
-
119
-
120
-
121
-
122
-
123
-
124
-
125
-
126
-
127
-
128
-
129
-
130
-
131
-
132
-
133
-
134
-
135
-
136
-
137
-
138
-
139
-
140
-
141
-
142
-
143
-
144
-
145
-
146
-
147
-
148
-
149
-
150
-
151
-
152
-
153
-
154
-
155
-
156
-
157
-
158
-
159
-
160
-
161
-
162
-
163
-
164
-
165
-
166
-
167
-
168
-
169
-
170
 |
 |