ZyXEL GS1910-24 User Guide - Page 27
Table 3, CONFIGURATION, MONITOR, DIAGNOSTICS, MAINTENANCE, DESCRIPTION, The Web Configurator - management
 |
View all ZyXEL GS1910-24 manuals
Add to My Manuals
Save this manual to your list of manuals |
Page 27 highlights
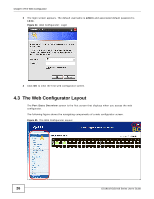
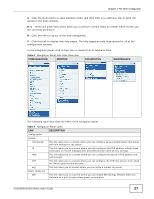
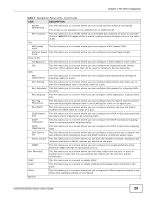
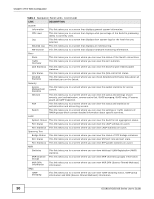
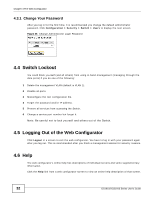
Chapter 4 The Web Configurator A - Click the menu items to open submenu links, and then click on a submenu link to open the screen in the main window. B, C - These are quick links which allow you to perform certain tasks no matter which screen you are currently working in. B - Click this link to log out of the web configurator. C - Click this link to display web help pages. The help pages provide descriptions for all of the configuration screens. In the navigation panel, click a main link to reveal a list of submenu links. Table 3 Navigation Panel Sub-links Overview CONFIGURATION MONITOR DIAGNOSTICS MAINTENANCE The following table describes the links in the navigation panel. Table 4 Navigation Panel Links LINK DESCRIPTION Configuration System Information This link takes you to a screen where you can configure general identification information and time settings for the Switch. IP This link takes you to a screen where you can configure the IPv4 address, subnet mask (necessary for Switch management) and DNS (domain name server) settings. IPv6 This link takes you to a screen where you can configure the Switch's IPv6 address and prefix length. NTP This link takes you to a screen where you can configure the NTP time servers from which the Switch gets the time and date. Log This link takes you to screens where you can setup a system log server. Power Reduction EEE This link takes you to a screen where you can enable EEE (Energy Efficient Ethernet) standard on a port to help reduce power consumption. GS1910/XGS1910 Series User's Guide 27
-
 1
1 -
2
-
3
-
4
-
5
-
6
-
7
-
8
-
9
-
10
-
11
-
12
-
13
-
14
-
15
-
16
-
17
-
18
-
19
-
20
-
21
-
 22
22 -
 23
23 -
 24
24 -
 25
25 -
 26
26 -
 27
27 -
 28
28 -
 29
29 -
 30
30 -
 31
31 -
 32
32 -
33
-
34
-
35
-
36
-
37
-
38
-
39
-
40
-
41
-
42
-
43
-
44
-
45
-
46
-
47
-
48
-
49
-
50
-
51
-
52
-
53
-
54
-
55
-
56
-
57
-
58
-
59
-
60
-
61
-
62
-
63
-
64
-
65
-
66
-
67
-
68
-
69
-
70
-
71
-
72
-
73
-
74
-
75
-
76
 |
 |