ZyXEL GS1910-24 User Guide - Page 49
Creating a VLAN, 5.8.2 Configuring DHCP Relay, VLAN 102
 |
View all ZyXEL GS1910-24 manuals
Add to My Manuals
Save this manual to your list of manuals |
Page 49 highlights
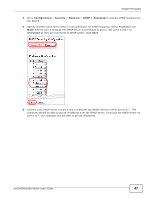
Chapter 5 Tutorials ID, VLAN ID and port number in the DHCP request. Client A connects to the Switch's port 2 in VLAN 102. DHCP Server 192.168.2.3 Port 2 PVID=102 A VLAN 102 172.16.1.18 5.8.1 Creating a VLAN 1 Access the web configurator through the Switch's port which is in VLAN 1. 2 Configure port 2 as a member of VLAN 102. See Section 5.4 on page 38 for how to create a VLAN and configure ports to join the VLAN. 5.8.2 Configuring DHCP Relay 1 Click Configuration > Security > Network > DHCP > Relay. 2 Select Enabled in the Relay Mode field to enable DHCP relay on the Switch. 3 Enter the DHCP server's IP address (192.168.2.3 in this example) in the Relay Server field. 4 Select Enabled in the Relay Information Mode field to allow the Switch to add relay agent information (such as the VLAN ID) to DHCP requests. 5 Select Replace in the Relay Information Policy field to have the Switch remove the original DHCP relay agent information (if any) and add new information in the DHCP requests. 6 Click Save to save your changes back to the Switch. GS1910/XGS1910 Series User's Guide 49
-
 1
1 -
2
-
3
-
4
-
5
-
6
-
7
-
8
-
9
-
10
-
11
-
12
-
13
-
14
-
15
-
16
-
17
-
18
-
19
-
20
-
21
-
22
-
23
-
24
-
25
-
26
-
27
-
28
-
29
-
30
-
31
-
32
-
33
-
34
-
35
-
36
-
37
-
38
-
39
-
40
-
41
-
42
-
43
-
 44
44 -
 45
45 -
 46
46 -
 47
47 -
 48
48 -
 49
49 -
 50
50 -
 51
51 -
 52
52 -
 53
53 -
 54
54 -
55
-
56
-
57
-
58
-
59
-
60
-
61
-
62
-
63
-
64
-
65
-
66
-
67
-
68
-
69
-
70
-
71
-
72
-
73
-
74
-
75
-
76
 |
 |
