ZyXEL GS1910-24 User Guide - Page 61
In fast leave mode, the Switch removes an IGMP snooping membership entry immediately from
 |
View all ZyXEL GS1910-24 manuals
Add to My Manuals
Save this manual to your list of manuals |
Page 61 highlights
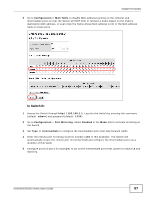
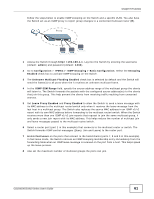
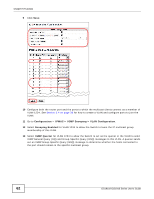
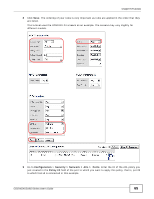
Chapter 5 Tutorials Follow the steps below to enable IGMP snooping on the Switch and a specific VLAN. You also have the Switch act as an IGMP proxy to report group changes to a connected multicast router (R). Proxy R 1 Access the Switch through http://192.168.1.1. Log into the Switch by entering the username (default: admin) and password (default: 1234). 2 Go to Configuration > IPMAC > IGMP Snooping > Basic Configuration. Select the Snooping Enabled check box to activate IGMP snooping on the Switch. 3 The Unknown Multicast Flooding Enabled check box is selected by default and the Switch will send the frame(s) to all ports when the it receives an unknown multicast frame. 4 In the IGMP SSM Range field, specify the source address range of the multicast group the clients will listen to. The Switch forwards the packets with the configured source address(es) to the clients that join this group. This help prevent the clients from receiving traffic resulting from unwanted sources. 5 Set Leave Proxy Enabled and Proxy Enabled to allow the Switch to send a leave message with its MAC address to the multicast router/switch only when it receives the leave message from the last host in a multicast group. The Switch also replaces the source MAC address in an IGMP v1/v2 report with its own MAC address before forwarding to the multicast router/switch. When the Switch receives more than one IGMP v1/v2 join reports that request to join the same multicast group, it only sends a new join report with its MAC address. This helps reduce the number of multicast join and leave messages passed to the multicast router/switch. 6 Select a router port (port 1 in this example) that connects to the multicast router or switch. The Switch forwards IGMP control messages (Query, Join and Leave) to the router port. 7 Enable Fast Leave on the ports that connect to the hosts/clients (ports 7, 8 and 9 in this example). In fast leave mode, the Switch removes an IGMP snooping membership entry immediately from the forwarding table when an IGMP leave message is received on the port from a host. This helps speed up the leave process. 8 Also set the maximum number of multicast groups the ports can join. GS1910/XGS1910 Series User's Guide 61
-
 1
1 -
2
-
3
-
4
-
5
-
6
-
7
-
8
-
9
-
10
-
11
-
12
-
13
-
14
-
15
-
16
-
17
-
18
-
19
-
20
-
21
-
22
-
23
-
24
-
25
-
26
-
27
-
28
-
29
-
30
-
31
-
32
-
33
-
34
-
35
-
36
-
37
-
38
-
39
-
40
-
41
-
42
-
43
-
44
-
45
-
46
-
47
-
48
-
49
-
50
-
51
-
52
-
53
-
54
-
55
-
 56
56 -
 57
57 -
 58
58 -
 59
59 -
 60
60 -
 61
61 -
 62
62 -
 63
63 -
 64
64 -
 65
65 -
 66
66 -
67
-
68
-
69
-
70
-
71
-
72
-
73
-
74
-
75
-
76
 |
 |
