Canon PowerShot S10 User Guide for ZoomBrowser EX version 4.6 - Page 121
Setting up Slide Shows on the Camera
 |
View all Canon PowerShot S10 manuals
Add to My Manuals
Save this manual to your list of manuals |
Page 121 highlights
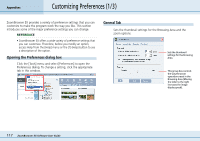
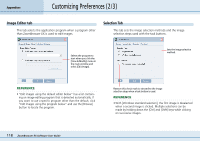
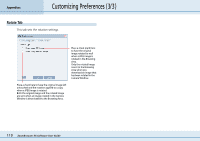
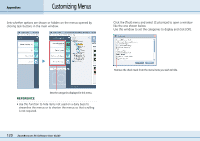
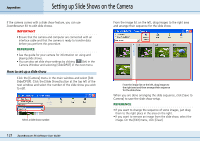
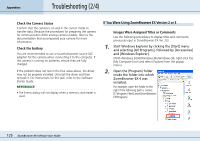
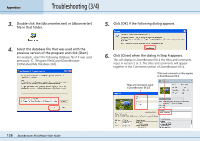
Appendices Setting up Slide Shows on the Camera If the camera comes with a slide show feature, you can use ZoomBrowser EX to edit slide shows. IMPORTANT • Ensure that the camera and computer are connected with an interface cable and that the camera is ready to transfer data before you perform this procedure. REFERENCE • See the guide for your camera for information on using and playing slide shows. • You can also set slide show settings by clicking (Set) in the Camera Window and selecting [Slide/DPOF] in the next menu. How to set up a slide show Click the [Camera] menu in the main window and select [Edit Slide/DPOF]. Click the [Slide Show] button at the top left of the next window and select the number of the slide show you wish to edit. Select a slide show number. From the image list on the left, drag images to the right area and arrange their sequence for the slide show. From the image list on the left, drag images to the right area and then arrange their sequence for the slide show. When you are done arranging the slide sequence, click [Save to Camera] to save the slide show setup. REFERENCE • If you want to change the sequence of some images, just drag them to the right place in the area on the right. • If you want to remove an image from the slide show, select the image. On the [Edit] menu, click [Clear]. 121 ZoomBrowser EX Software User Guide
-
 1
1 -
2
-
3
-
4
-
5
-
6
-
7
-
8
-
9
-
10
-
11
-
12
-
13
-
14
-
15
-
16
-
17
-
18
-
19
-
20
-
21
-
22
-
23
-
24
-
25
-
26
-
27
-
28
-
29
-
30
-
31
-
32
-
33
-
34
-
35
-
36
-
37
-
38
-
39
-
40
-
41
-
42
-
43
-
44
-
45
-
46
-
47
-
48
-
49
-
50
-
51
-
52
-
53
-
54
-
55
-
56
-
57
-
58
-
59
-
60
-
61
-
62
-
63
-
64
-
65
-
66
-
67
-
68
-
69
-
70
-
71
-
72
-
73
-
74
-
75
-
76
-
77
-
78
-
79
-
80
-
81
-
82
-
83
-
84
-
85
-
86
-
87
-
88
-
89
-
90
-
91
-
92
-
93
-
94
-
95
-
96
-
97
-
98
-
99
-
100
-
101
-
102
-
103
-
104
-
105
-
106
-
107
-
108
-
109
-
110
-
111
-
112
-
113
-
114
-
115
-
 116
116 -
 117
117 -
 118
118 -
 119
119 -
 120
120 -
 121
121 -
 122
122 -
 123
123 -
 124
124 -
 125
125 -
 126
126 -
127
-
128
-
129
-
130
-
131
 |
 |
