Canon imageCLASS D880 imageCLASS D880 Fax Guide - Page 38
Canceling Sending
 |
View all Canon imageCLASS D880 manuals
Add to My Manuals
Save this manual to your list of manuals |
Page 38 highlights
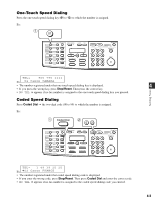
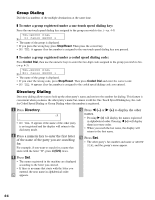
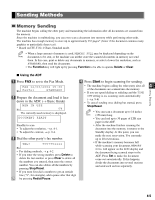
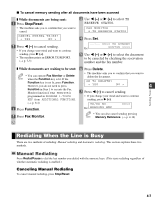
■ Using the platen glass • You need to remove documents in the ADF in advance, in order to fax from the platen glass. NOTE • You can operate Book Sending, Delete or Clear when the Function key is lit. If the Function key is not lit, press Function. However, you do not need to press Function in Step 3 to execute the Book Sending mode if BOOK SENDING is programmed in PROGRAM 1-TOUCH KEY from ADDTIONAL FUNCTIONS. (→ p. 9-4) 1 Press FAX to set to the Fax Mode. FAX 12/03/2004 15:30 Ex: F a x T e l STANDARD 2 Prepare the document and place it face down on the platen glass. (→ Basic Guide) • To adjust the resolution, → p. 4-1. • To adjust the contrast, → p. 9-4. 3 Press Function. 4 Press Book Sending. 5 Press 4 (-) or e (+) to select the document size. BOOK TX SCAN SIZE Ex: LTR 6 Press Set. 7 Dial the other party's fax number. TEL= 9057951111 Ex: • For dialing methods, → p. 4-2. • If you enter the wrong number, press Delete to delete the last number or press Clear to clear your entire entry, then enter the correct number. You can also delete all the numbers by pressing Stop/Reset. • If you must first dial a number to get an outside line ("9", for example), add a pause after that number by pressing Redial/Pause. 8 Press Start to begin scanning. NEXT PAGE :[START] FINISH SCAN :[SET] 9 Place the next document on the platen glass and press Start to begin scanning. • Repeat for other documents. 10 After all of the documents have been scanned, press Set to begin sending. • To cancel sending after dialing has started, press Stop/Reset then press 4 (-). (→ p. 4-7) • You can scan up to approximately 255 NOTE pages* for memory sending. * Based on ITU-T No.1 Chart, Standard mode. • The Function key will light up by pressing Function to be able to operate Delete or Clear. • If the machine's memory becomes full while scanning your document, MEMORY FULL will appear on the LCD display. If this happens, divide the documents into several sections and send each section separately. Canceling Sending Canceling memory sending ■ To cancel memory sending while documents are being scanned using the ADF 1 Press Stop/Reset. 2 Press Set. • Scanning is canceled. • The document will come out automatically. STOP KEY PRESSED PRESS SET KEY 4-6
-
 1
1 -
2
-
3
-
4
-
5
-
6
-
7
-
8
-
9
-
10
-
11
-
12
-
13
-
14
-
15
-
16
-
17
-
18
-
19
-
20
-
21
-
22
-
23
-
24
-
25
-
26
-
27
-
28
-
29
-
30
-
31
-
32
-
 33
33 -
 34
34 -
 35
35 -
 36
36 -
 37
37 -
 38
38 -
 39
39 -
 40
40 -
 41
41 -
 42
42 -
 43
43 -
44
-
45
-
46
-
47
-
48
-
49
-
50
-
51
-
52
-
53
-
54
-
55
-
56
-
57
-
58
-
59
-
60
-
61
-
62
-
63
-
64
-
65
-
66
-
67
-
68
-
69
-
70
-
71
-
72
-
73
-
74
-
75
-
76
-
77
-
78
-
79
-
80
-
81
-
82
-
83
-
84
-
85
 |
 |