Compaq Evo n610c Compaq Evo Notebook N410c Series and Evo Notebook N610c Serie - Page 71
Select the Begin Testing button., Check All button.
 |
View all Compaq Evo n610c manuals
Add to My Manuals
Save this manual to your list of manuals |
Page 71 highlights
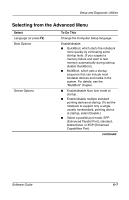
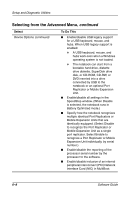
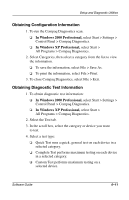
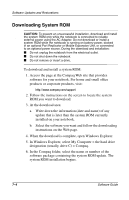
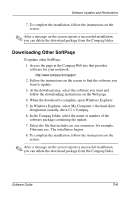
Setup and Diagnostic Utilities ◆ To run all tests for your selected device, select the Check All button. ◆ To run only the tests you select, select the Uncheck All button, then select the check box for each test you want to run. 5. Select a test mode: ❏ Interactive Mode provides maximum control over the testing process. You determine whether the test has been passed or failed. You may be prompted to insert or remove devices. ❏ Unattended Mode does not display prompts. If errors are found, they are displayed when testing is complete. 6. Select the Begin Testing button. 7. To view a test report after a test has run, select a tab: ❏ The Status tab summarizes the tests that have been run, passed, and failed during the current testing session. ❏ The Log tab lists the tests that have been run on the system, the number of times each test has run, the number of errors found on each test, and the total run time of each test. ❏ The Error tab lists all errors found on the notebook with their error codes. 8. To save a test report: ❏ Select the Log tab Save button to save a Log tab report. ❏ Select the Error tab Save button to save an Error tab report. 9. To print a test report: ❏ If the report is on the Log tab, select File > Save As, then print the file from your folder. ❏ If the report is on the Error tab, select the Error tab Print button. 6-12 Software Guide
-
 1
1 -
2
-
3
-
4
-
5
-
6
-
7
-
8
-
9
-
10
-
11
-
12
-
13
-
14
-
15
-
16
-
17
-
18
-
19
-
20
-
21
-
22
-
23
-
24
-
25
-
26
-
27
-
28
-
29
-
30
-
31
-
32
-
33
-
34
-
35
-
36
-
37
-
38
-
39
-
40
-
41
-
42
-
43
-
44
-
45
-
46
-
47
-
48
-
49
-
50
-
51
-
52
-
53
-
54
-
55
-
56
-
57
-
58
-
59
-
60
-
61
-
62
-
63
-
64
-
65
-
 66
66 -
 67
67 -
 68
68 -
 69
69 -
 70
70 -
 71
71 -
 72
72 -
 73
73 -
 74
74 -
 75
75 -
 76
76 -
77
-
78
-
79
-
80
-
81
-
82
-
83
-
84
-
85
 |
 |