Dell 964 Owner's Manual - Page 87
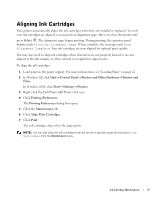
Aligning Ink Cartridges
 |
UPC - 940356014026
View all Dell 964 manuals
Add to My Manuals
Save this manual to your list of manuals |
Page 87 highlights
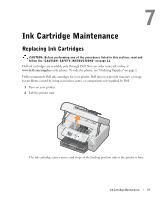
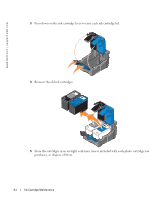
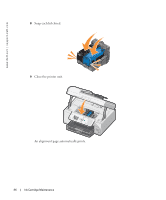
Aligning Ink Cartridges Your printer automatically aligns the ink cartridges when they are installed or replaced. To verify your ink cartridges are aligned, you can print an alignment page. After you close the printer unit, press Select . The alignment page begins printing. During printing, the operator panel display reads Printing alignment page. When complete, the message reads Auto Alignment Complete. Your ink cartridges are now aligned for optimal print quality. You may also need to align ink cartridges when characters are not properly formed or are not aligned at the left margin, or when vertical or straight lines appear wavy. To align the ink cartridges: 1 Load paper in the paper support. For more information, see "Loading Paper" on page 22. 2 In Windows XP, click Start→ Control Panel→ Printers and Other Hardware→ Printers and Faxes. In Windows 2000, click Start→ Settings→ Printers. 3 Right-click the Dell Photo AIO Printer 964 icon. 4 Click Printing Preferences. The Printing Preferences dialog box opens. 5 Click the Maintenance tab. 6 Click Align Print Cartridges. 7 Click Print. The ink cartridges align when the page prints. NOTE: You can also align the ink cartridges from the printer's operator panel by selecting Align Cartridges from the Maintenance menu. Ink Cartridge Maintenance 87
-
 1
1 -
2
-
3
-
4
-
5
-
6
-
7
-
8
-
9
-
10
-
11
-
12
-
13
-
14
-
15
-
16
-
17
-
18
-
19
-
20
-
21
-
22
-
23
-
24
-
25
-
26
-
27
-
28
-
29
-
30
-
31
-
32
-
33
-
34
-
35
-
36
-
37
-
38
-
39
-
40
-
41
-
42
-
43
-
44
-
45
-
46
-
47
-
48
-
49
-
50
-
51
-
52
-
53
-
54
-
55
-
56
-
57
-
58
-
59
-
60
-
61
-
62
-
63
-
64
-
65
-
66
-
67
-
68
-
69
-
70
-
71
-
72
-
73
-
74
-
75
-
76
-
77
-
78
-
79
-
80
-
81
-
 82
82 -
 83
83 -
 84
84 -
 85
85 -
 86
86 -
 87
87 -
 88
88 -
 89
89 -
 90
90 -
 91
91 -
 92
92 -
93
-
94
-
95
-
96
-
97
-
98
-
99
-
100
-
101
-
102
-
103
-
104
-
105
-
106
-
107
-
108
-
109
-
110
-
111
-
112
-
113
-
114
-
115
-
116
-
117
-
118
-
119
-
120
-
121
-
122
-
123
-
124
-
125
-
126
-
127
-
128
-
129
-
130
-
131
-
132
-
133
-
134
-
135
-
136
 |
 |