Dell B1265dfw Dell Users Guide - Page 137
Printer Connection Type, Set IP Address
 |
View all Dell B1265dfw manuals
Add to My Manuals
Save this manual to your list of manuals |
Page 137 highlights
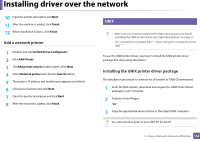
Wired network setup 9 Enter the password and click OK. 10 Select Network Connection on the Printer Connection Type and click Set IP Address button. 11 Click the icon (third from the left) in the SetIP window to open the TCP/IP configuration window. 12 Enter the machine's new information into the configuration window. In a corporate intranet, you may need to have this information assigned by a network manager before proceeding. Find the machine's MAC address from the Network Configuration Report (see "Printing a network configuration report" on page 135) and enter it without the colons. For example, 00:15:99:29:51:A8 becomes 0015992951A8. 13 Click Apply, and then click OK. The machine will automatically print the Network Configuration Report. Confirm that all the settings are correct. IPv4 configuration using SetIP (Linux) Before using the SetIP program, disable the computer firewall from System Preferences or Administrator. The following instructions may vary from your model or operating systems. 1 Open /opt/Dell/mfp/share/utils/. 2 Double-click the SetIPApplet.html file. 3 Click to open the TCP/IP configuration window. 4 Enter the machine's new information into the configuration window. In a corporate intranet, you may need to have this information assigned by a network manager before proceeding. Find the machine's MAC address from the Network Configuration Report (see "Printing a network configuration report" on page 135) and enter it without the colons. For example, 00:15:99:29:51:A8 becomes 0015992951A8. 5 The machine will automatically print the Network Configuration Report. 2. Using a Network-Connected Machine 137
-
 1
1 -
2
-
3
-
4
-
5
-
6
-
7
-
8
-
9
-
10
-
11
-
12
-
13
-
14
-
15
-
16
-
17
-
18
-
19
-
20
-
21
-
22
-
23
-
24
-
25
-
26
-
27
-
28
-
29
-
30
-
31
-
32
-
33
-
34
-
35
-
36
-
37
-
38
-
39
-
40
-
41
-
42
-
43
-
44
-
45
-
46
-
47
-
48
-
49
-
50
-
51
-
52
-
53
-
54
-
55
-
56
-
57
-
58
-
59
-
60
-
61
-
62
-
63
-
64
-
65
-
66
-
67
-
68
-
69
-
70
-
71
-
72
-
73
-
74
-
75
-
76
-
77
-
78
-
79
-
80
-
81
-
82
-
83
-
84
-
85
-
86
-
87
-
88
-
89
-
90
-
91
-
92
-
93
-
94
-
95
-
96
-
97
-
98
-
99
-
100
-
101
-
102
-
103
-
104
-
105
-
106
-
107
-
108
-
109
-
110
-
111
-
112
-
113
-
114
-
115
-
116
-
117
-
118
-
119
-
120
-
121
-
122
-
123
-
124
-
125
-
126
-
127
-
128
-
129
-
130
-
131
-
 132
132 -
 133
133 -
 134
134 -
 135
135 -
 136
136 -
 137
137 -
 138
138 -
 139
139 -
 140
140 -
 141
141 -
 142
142 -
143
-
144
-
145
-
146
-
147
-
148
-
149
-
150
-
151
-
152
-
153
-
154
-
155
-
156
-
157
-
158
-
159
-
160
-
161
-
162
-
163
-
164
-
165
-
166
-
167
-
168
-
169
-
170
-
171
-
172
-
173
-
174
-
175
-
176
-
177
-
178
-
179
-
180
-
181
-
182
-
183
-
184
-
185
-
186
-
187
-
188
-
189
-
190
-
191
-
192
-
193
-
194
-
195
-
196
-
197
-
198
-
199
-
200
-
201
-
202
-
203
-
204
-
205
-
206
-
207
-
208
-
209
-
210
-
211
-
212
-
213
-
214
-
215
-
216
-
217
-
218
-
219
-
220
-
221
-
222
-
223
-
224
-
225
-
226
-
227
-
228
-
229
-
230
-
231
-
232
-
233
-
234
-
235
-
236
-
237
-
238
-
239
-
240
-
241
-
242
-
243
-
244
-
245
-
246
-
247
-
248
-
249
-
250
-
251
-
252
-
253
-
254
-
255
-
256
-
257
-
258
-
259
-
260
-
261
-
262
-
263
-
264
-
265
-
266
-
267
-
268
-
269
-
270
-
271
-
272
-
273
-
274
-
275
-
276
-
277
-
278
-
279
-
280
-
281
-
282
-
283
-
284
 |
 |
