Dell B1265dfw Dell Users Guide - Page 142
Add a network printer, Installing the UNIX printer driver package, Finish, Unified Driver Configurator
 |
View all Dell B1265dfw manuals
Add to My Manuals
Save this manual to your list of manuals |
Page 142 highlights
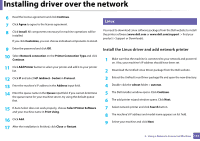
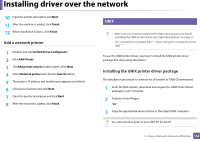
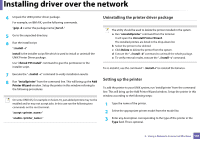
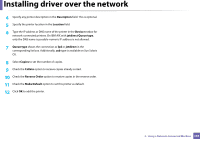
Installing driver over the network 10 Input the printer description and Next. 11 After the machine is added, click Finish. 12 When installation is done, click Finish. Add a network printer 1 Double-click the Unified Driver Configurator. 2 Click Add Printer. 3 The Add printer wizard window opens. Click Next. 4 Select Network printer and click the Search button. 5 The printer's IP address and model name appears on list field. 6 Select your machine and click Next. 7 Enter the printer description and click Next. 8 After the machine is added, click Finish. 8 UNIX • Make sure your machine supports the UNIX operating system before installing the UNIX printer driver (see "Operating System" on page 7). • The commands are marked with "", when typing the commands, do not type "". To use the UNIX printer driver, you have to install the UNIX printer driver package first, then setup the printer. Installing the UNIX printer driver package The installation procedure is common for all variants of UNIX OS mentioned. 1 From the Dell website, download and unpack the UNIX Printer Driver package to your computer. 2 Acquire root privileges. "su -" 3 Copy the appropriate driver archive to the target UNIX computer. See administration guide of your UNIX OS for details. 2. Using a Network-Connected Machine 142
-
 1
1 -
2
-
3
-
4
-
5
-
6
-
7
-
8
-
9
-
10
-
11
-
12
-
13
-
14
-
15
-
16
-
17
-
18
-
19
-
20
-
21
-
22
-
23
-
24
-
25
-
26
-
27
-
28
-
29
-
30
-
31
-
32
-
33
-
34
-
35
-
36
-
37
-
38
-
39
-
40
-
41
-
42
-
43
-
44
-
45
-
46
-
47
-
48
-
49
-
50
-
51
-
52
-
53
-
54
-
55
-
56
-
57
-
58
-
59
-
60
-
61
-
62
-
63
-
64
-
65
-
66
-
67
-
68
-
69
-
70
-
71
-
72
-
73
-
74
-
75
-
76
-
77
-
78
-
79
-
80
-
81
-
82
-
83
-
84
-
85
-
86
-
87
-
88
-
89
-
90
-
91
-
92
-
93
-
94
-
95
-
96
-
97
-
98
-
99
-
100
-
101
-
102
-
103
-
104
-
105
-
106
-
107
-
108
-
109
-
110
-
111
-
112
-
113
-
114
-
115
-
116
-
117
-
118
-
119
-
120
-
121
-
122
-
123
-
124
-
125
-
126
-
127
-
128
-
129
-
130
-
131
-
132
-
133
-
134
-
135
-
136
-
 137
137 -
 138
138 -
 139
139 -
 140
140 -
 141
141 -
 142
142 -
 143
143 -
 144
144 -
 145
145 -
 146
146 -
 147
147 -
148
-
149
-
150
-
151
-
152
-
153
-
154
-
155
-
156
-
157
-
158
-
159
-
160
-
161
-
162
-
163
-
164
-
165
-
166
-
167
-
168
-
169
-
170
-
171
-
172
-
173
-
174
-
175
-
176
-
177
-
178
-
179
-
180
-
181
-
182
-
183
-
184
-
185
-
186
-
187
-
188
-
189
-
190
-
191
-
192
-
193
-
194
-
195
-
196
-
197
-
198
-
199
-
200
-
201
-
202
-
203
-
204
-
205
-
206
-
207
-
208
-
209
-
210
-
211
-
212
-
213
-
214
-
215
-
216
-
217
-
218
-
219
-
220
-
221
-
222
-
223
-
224
-
225
-
226
-
227
-
228
-
229
-
230
-
231
-
232
-
233
-
234
-
235
-
236
-
237
-
238
-
239
-
240
-
241
-
242
-
243
-
244
-
245
-
246
-
247
-
248
-
249
-
250
-
251
-
252
-
253
-
254
-
255
-
256
-
257
-
258
-
259
-
260
-
261
-
262
-
263
-
264
-
265
-
266
-
267
-
268
-
269
-
270
-
271
-
272
-
273
-
274
-
275
-
276
-
277
-
278
-
279
-
280
-
281
-
282
-
283
-
284
 |
 |
