Dell PowerVault 130T DLT Service Manual - Page 48
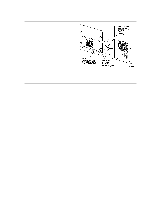
Install the two bottom Keps nuts., Tighten the top two Keps nuts.
 |
View all Dell PowerVault 130T DLT manuals
Add to My Manuals
Save this manual to your list of manuals |
Page 48 highlights
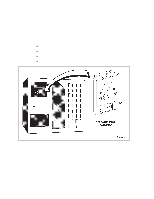
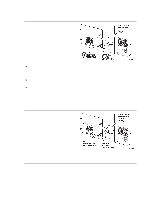
CYO Card 5. Connect P1 power cable. 6. Connect P240 connector on the ribbon cable. 7. Align the op panel cover flanges with the top two screw holes on the library frame. CAUTION: Do not pinch the cables when replacing the operator panel cover. 8. Align the two bottom holes on the op panel cover with the library frame. 9. Tighten the top two Keps nuts. 10. Install the two bottom Keps nuts. 11. Carefully close the library door to check for alignment. NOTE: Adjust the four mounting Keps nuts as necessary for alignment. 12. Proceed to the checkout procedures on page 3-43. PowerVault 130T Service Manual 3-12 4473D
-
 1
1 -
2
-
3
-
4
-
5
-
6
-
7
-
8
-
9
-
10
-
11
-
12
-
13
-
14
-
15
-
16
-
17
-
18
-
19
-
20
-
21
-
22
-
23
-
24
-
25
-
26
-
27
-
28
-
29
-
30
-
31
-
32
-
33
-
34
-
35
-
36
-
37
-
38
-
39
-
40
-
41
-
42
-
 43
43 -
 44
44 -
 45
45 -
 46
46 -
 47
47 -
 48
48 -
 49
49 -
 50
50 -
 51
51 -
 52
52 -
 53
53 -
54
-
55
-
56
-
57
-
58
-
59
-
60
-
61
-
62
-
63
-
64
-
65
-
66
-
67
-
68
-
69
-
70
-
71
-
72
-
73
-
74
-
75
-
76
-
77
-
78
-
79
-
80
-
81
-
82
-
83
-
84
-
85
-
86
-
87
-
88
-
89
-
90
-
91
-
92
-
93
-
94
-
95
-
96
 |
 |

CYO Card
PowerVault 130T Service Manual
3–12
4473D
5.
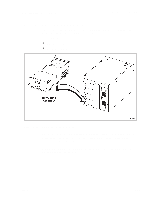
Connect P1 power cable.
6.
Connect P240 connector on the ribbon
cable.
7.
Align the op panel cover flanges with the
top two screw holes on the library frame.
CAUTION: Do not pinch the cables
when replacing the operator panel
cover.
8.
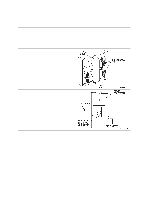
Align the two bottom holes on the op
panel cover with the library frame.
9.
Tighten the top two Keps nuts.
10. Install the two bottom Keps nuts.
11. Carefully close the library door to check
for alignment.
NOTE:
Adjust the four mounting Keps
nuts as necessary for alignment.
12. Proceed to the checkout procedures on
page 3–43.