Epson PowerLite 715c User Manual - Page 50
caution, Creating Presentations for Your Projector
 |
View all Epson PowerLite 715c manuals
Add to My Manuals
Save this manual to your list of manuals |
Page 50 highlights
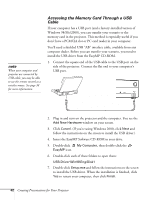
2. Press the button again. The memory card is released, and you can remove it from the slot in the projector. caution Press the button carefully to avoid breaking it. Make sure the button is pressed in before you store the projector in a carrying case or box. 3. Press the button to insert it in the slot. 4. Insert the card in your computer's PCMCIA slot or card reader. See your computer documentation if you need instructions. Continue with the steps on page 43 to install EasyMP so you can create a scenario and transfer it to the card. If you need additional memory cards, you can use any of the following standard type II memory cards. Most require a PC card adapter: s CompactFlash™ s Memory Stick™ s SmartMedia™ s Microdrive™ s ATA flash (does not require a PC card adapter) If you need to remove the memory card from the adapter, simply pull it out as shown: This side faces the back of the projector Creating Presentations for Your Projector 41
-
 1
1 -
2
-
3
-
4
-
5
-
6
-
7
-
8
-
9
-
10
-
11
-
12
-
13
-
14
-
15
-
16
-
17
-
18
-
19
-
20
-
21
-
22
-
23
-
24
-
25
-
26
-
27
-
28
-
29
-
30
-
31
-
32
-
33
-
34
-
35
-
36
-
37
-
38
-
39
-
40
-
41
-
42
-
43
-
44
-
 45
45 -
 46
46 -
 47
47 -
 48
48 -
 49
49 -
 50
50 -
 51
51 -
 52
52 -
 53
53 -
 54
54 -
 55
55 -
56
-
57
-
58
-
59
-
60
-
61
-
62
-
63
-
64
-
65
-
66
-
67
-
68
-
69
-
70
-
71
-
72
-
73
-
74
-
75
-
76
-
77
-
78
-
79
-
80
-
81
-
82
-
83
-
84
-
85
-
86
-
87
-
88
-
89
-
90
-
91
-
92
-
93
-
94
-
95
-
96
-
97
-
98
-
99
-
100
-
101
-
102
-
103
-
104
-
105
-
106
-
107
-
108
-
109
-
110
-
111
-
112
-
113
-
114
-
115
-
116
-
117
-
118
-
119
-
120
-
121
-
122
-
123
-
124
-
125
-
126
-
127
-
128
-
129
-
130
-
131
-
132
-
133
-
134
-
135
-
136
-
137
-
138
-
139
-
140
-
141
 |
 |
