Epson PowerLite 715c User Manual - Page 74
Capturing Images, Saving Images on the Memory Card
 |
View all Epson PowerLite 715c manuals
Add to My Manuals
Save this manual to your list of manuals |
Page 74 highlights
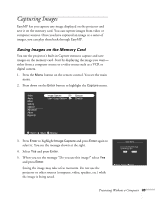
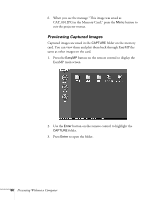
Capturing Images EasyMP lets you capture any image displayed on the projector and save it on the memory card. You can capture images from video or computer sources. Once you have captured an image or a series of images, you can play them back through EasyMP. Saving Images on the Memory Card You use the projector's built-in Capture menu to capture and save images on the memory card. Start by displaying the image you want- either from a computer source or a video source such as a VCR or digital camera. 1. Press the Menu button on the remote control. You see the main menu. 2. Press down on the Enter button to highlight the Capture menu. Video Audio Effect Setting Capture Advanced About Reset All Image Capture User's Logo Capture Execute Execute :Return :Select :Execute 3. Press Enter to highlight Image Capture and press Enter again to select it. You see the message shown at the right. 4. Select Yes and press Enter. 5. When you see the message "Do you use this image?" select Yes and press Enter. Saving the image may take a few moments. Do not use the projector or other sources (computer, video, speaker, etc.) while the image is being saved. Image Capture Do you save the present image to the Memory Card? Yes No :Return :Select :Execute Presenting Without a Computer 65
-
 1
1 -
2
-
3
-
4
-
5
-
6
-
7
-
8
-
9
-
10
-
11
-
12
-
13
-
14
-
15
-
16
-
17
-
18
-
19
-
20
-
21
-
22
-
23
-
24
-
25
-
26
-
27
-
28
-
29
-
30
-
31
-
32
-
33
-
34
-
35
-
36
-
37
-
38
-
39
-
40
-
41
-
42
-
43
-
44
-
45
-
46
-
47
-
48
-
49
-
50
-
51
-
52
-
53
-
54
-
55
-
56
-
57
-
58
-
59
-
60
-
61
-
62
-
63
-
64
-
65
-
66
-
67
-
68
-
 69
69 -
 70
70 -
 71
71 -
 72
72 -
 73
73 -
 74
74 -
 75
75 -
 76
76 -
 77
77 -
 78
78 -
 79
79 -
80
-
81
-
82
-
83
-
84
-
85
-
86
-
87
-
88
-
89
-
90
-
91
-
92
-
93
-
94
-
95
-
96
-
97
-
98
-
99
-
100
-
101
-
102
-
103
-
104
-
105
-
106
-
107
-
108
-
109
-
110
-
111
-
112
-
113
-
114
-
115
-
116
-
117
-
118
-
119
-
120
-
121
-
122
-
123
-
124
-
125
-
126
-
127
-
128
-
129
-
130
-
131
-
132
-
133
-
134
-
135
-
136
-
137
-
138
-
139
-
140
-
141
 |
 |