Epson PowerLite Pro Z8150NL User Manual - Page 158
Adjusting the Projected Image
 |
View all Epson PowerLite Pro Z8150NL manuals
Add to My Manuals
Save this manual to your list of manuals |
Page 158 highlights
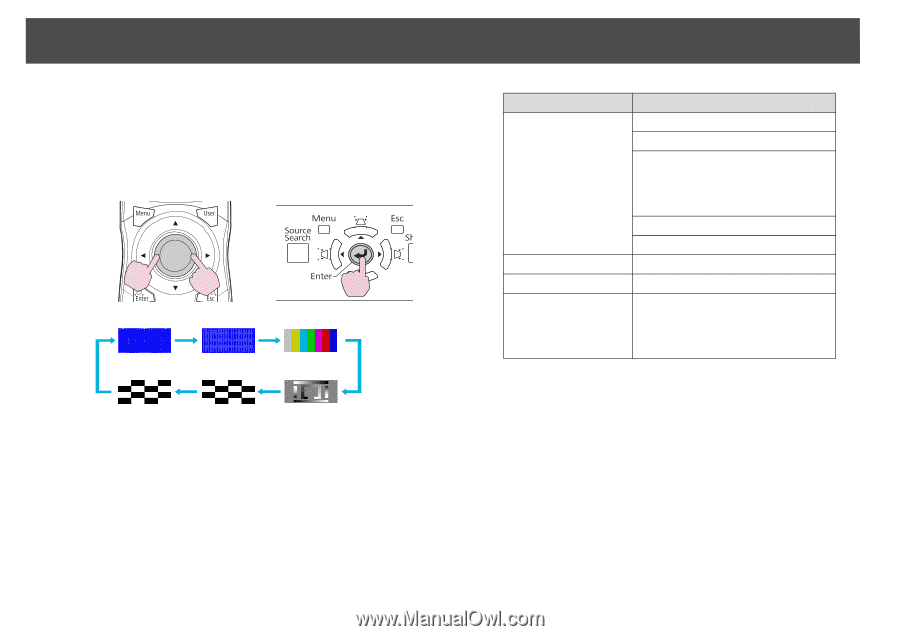
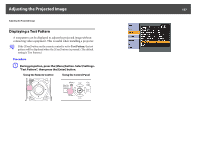
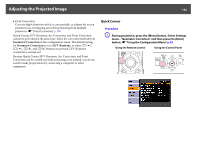
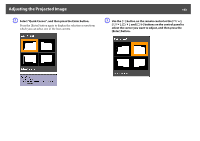
Adjusting the Projected Image 158 B Press the [h] button on the remote control in the [r] direction or press the [Enter] button on the control panel to switch the test pattern. To display the previous image, press the [h] button on the remote control in the [l] direction. Using the Remote Control Using the Control Panel The following adjustments can be made while the test pattern is being displayed. Top Menu Image menu Signal menu Settings menu Extended menu Sub Menu/Items Color Mode s p.34 Abs. Color Temp. Advanced - Gamma*1 s p.169 - RGB - RGBCMY s p.169 Auto Iris Reset Auto Setup Geometric Correction s p.161 Multi-Projection - Brightness Level*2 - Edge Blending s p.178 - Multi-screen s p.180 *1 Except for custom settings of gamma *2 Not available on PowerLite Pro Z8150NL q To set menu items that cannot be set while the test pattern is being displayed or to fine-tune the projected image, project an image from the connected device. C Press the [Esc] button to end the test pattern.
-
 1
1 -
2
-
3
-
4
-
5
-
6
-
7
-
8
-
9
-
10
-
11
-
12
-
13
-
14
-
15
-
16
-
17
-
18
-
19
-
20
-
21
-
22
-
23
-
24
-
25
-
26
-
27
-
28
-
29
-
30
-
31
-
32
-
33
-
34
-
35
-
36
-
37
-
38
-
39
-
40
-
41
-
42
-
43
-
44
-
45
-
46
-
47
-
48
-
49
-
50
-
51
-
52
-
53
-
54
-
55
-
56
-
57
-
58
-
59
-
60
-
61
-
62
-
63
-
64
-
65
-
66
-
67
-
68
-
69
-
70
-
71
-
72
-
73
-
74
-
75
-
76
-
77
-
78
-
79
-
80
-
81
-
82
-
83
-
84
-
85
-
86
-
87
-
88
-
89
-
90
-
91
-
92
-
93
-
94
-
95
-
96
-
97
-
98
-
99
-
100
-
101
-
102
-
103
-
104
-
105
-
106
-
107
-
108
-
109
-
110
-
111
-
112
-
113
-
114
-
115
-
116
-
117
-
118
-
119
-
120
-
121
-
122
-
123
-
124
-
125
-
126
-
127
-
128
-
129
-
130
-
131
-
132
-
133
-
134
-
135
-
136
-
137
-
138
-
139
-
140
-
141
-
142
-
143
-
144
-
145
-
146
-
147
-
148
-
149
-
150
-
151
-
152
-
 153
153 -
 154
154 -
 155
155 -
 156
156 -
 157
157 -
 158
158 -
 159
159 -
 160
160 -
 161
161 -
 162
162 -
 163
163 -
164
-
165
-
166
-
167
-
168
-
169
-
170
-
171
-
172
-
173
-
174
-
175
-
176
-
177
-
178
-
179
-
180
-
181
-
182
-
183
-
184
-
185
-
186
-
187
-
188
-
189
-
190
-
191
-
192
-
193
-
194
-
195
-
196
-
197
-
198
-
199
-
200
-
201
-
202
-
203
-
204
-
205
-
206
-
207
-
208
-
209
-
210
-
211
-
212
-
213
-
214
-
215
-
216
-
217
-
218
-
219
-
220
-
221
-
222
-
223
-
224
-
225
-
226
-
227
-
228
-
229
-
230
-
231
-
232
-
233
-
234
-
235
-
236
-
237
-
238
-
239
-
240
-
241
-
242
-
243
-
244
-
245
-
246
-
247
-
248
-
249
-
250
-
251
-
252
-
253
-
254
 |
 |