Epson PowerLite Pro Z8150NL User Manual - Page 87
SNMP menu, Sub Menu, Function, Trap IP Address 1/Trap IP, Address 2, Community Name
 |
View all Epson PowerLite Pro Z8150NL manuals
Add to My Manuals
Save this manual to your list of manuals |
Page 87 highlights
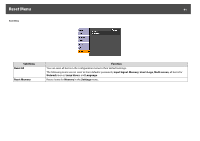
Network Menu 87 SNMP menu To use SNMP to monitor the projector, you need to install the SNMP manager program on your computer. SNMP should be managed by a network administrator. Sub Menu SNMP Trap IP Address 1/Trap IP Address 2 Community Name Function Set this parameter to On when using SNMPg to monitor the projector. When SNMP is set to On, you can set up to two IP addresses as SNMP trap notification destinations. You can input a number from 0 to 255 in each field of the address. However, the following IP addresses cannot be used. 127.x.x.x, 224.0.0.0 to 255.255.255.255 (where x is a number from 0 to 255) Set the community name of SNMP. You can enter up to 32 single-byte alphanumeric characters.
-
 1
1 -
2
-
3
-
4
-
5
-
6
-
7
-
8
-
9
-
10
-
11
-
12
-
13
-
14
-
15
-
16
-
17
-
18
-
19
-
20
-
21
-
22
-
23
-
24
-
25
-
26
-
27
-
28
-
29
-
30
-
31
-
32
-
33
-
34
-
35
-
36
-
37
-
38
-
39
-
40
-
41
-
42
-
43
-
44
-
45
-
46
-
47
-
48
-
49
-
50
-
51
-
52
-
53
-
54
-
55
-
56
-
57
-
58
-
59
-
60
-
61
-
62
-
63
-
64
-
65
-
66
-
67
-
68
-
69
-
70
-
71
-
72
-
73
-
74
-
75
-
76
-
77
-
78
-
79
-
80
-
81
-
 82
82 -
 83
83 -
 84
84 -
 85
85 -
 86
86 -
 87
87 -
 88
88 -
 89
89 -
 90
90 -
 91
91 -
 92
92 -
93
-
94
-
95
-
96
-
97
-
98
-
99
-
100
-
101
-
102
-
103
-
104
-
105
-
106
-
107
-
108
-
109
-
110
-
111
-
112
-
113
-
114
-
115
-
116
-
117
-
118
-
119
-
120
-
121
-
122
-
123
-
124
-
125
-
126
-
127
-
128
-
129
-
130
-
131
-
132
-
133
-
134
-
135
-
136
-
137
-
138
-
139
-
140
-
141
-
142
-
143
-
144
-
145
-
146
-
147
-
148
-
149
-
150
-
151
-
152
-
153
-
154
-
155
-
156
-
157
-
158
-
159
-
160
-
161
-
162
-
163
-
164
-
165
-
166
-
167
-
168
-
169
-
170
-
171
-
172
-
173
-
174
-
175
-
176
-
177
-
178
-
179
-
180
-
181
-
182
-
183
-
184
-
185
-
186
-
187
-
188
-
189
-
190
-
191
-
192
-
193
-
194
-
195
-
196
-
197
-
198
-
199
-
200
-
201
-
202
-
203
-
204
-
205
-
206
-
207
-
208
-
209
-
210
-
211
-
212
-
213
-
214
-
215
-
216
-
217
-
218
-
219
-
220
-
221
-
222
-
223
-
224
-
225
-
226
-
227
-
228
-
229
-
230
-
231
-
232
-
233
-
234
-
235
-
236
-
237
-
238
-
239
-
240
-
241
-
242
-
243
-
244
-
245
-
246
-
247
-
248
-
249
-
250
-
251
-
252
-
253
-
254
 |
 |

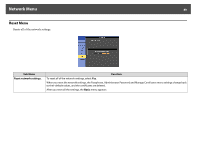
Network Menu
87
SNMP menu
To use SNMP to monitor the projector, you need to install the SNMP manager program on your computer. SNMP should be managed by a network
administrator.
Sub Menu
Function
SNMP
Set this parameter to
On
when using SNMP
g
to monitor the projector.
Trap IP Address 1/Trap IP
Address 2
When
SNMP
is set to
On
, you can set up to two IP addresses as SNMP trap notification destinations.
You can input a number from 0 to 255 in each field of the address.
However, the following IP addresses cannot be used.
127.x.x.x, 224.0.0.0 to 255.255.255.255 (where x is a number from 0 to 255)
Community Name
Set the community name of SNMP. You can enter up to 32 single-byte alphanumeric characters.