Epson PowerLite Pro Z8150NL User Manual - Page 176
Adjusting the Position of the Projected Image
 |
View all Epson PowerLite Pro Z8150NL manuals
Add to My Manuals
Save this manual to your list of manuals |
Page 176 highlights
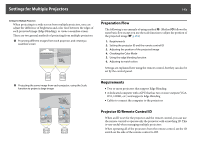
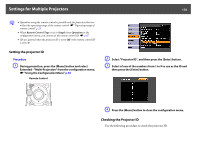
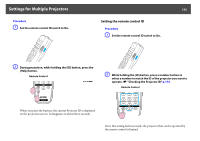
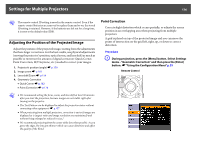
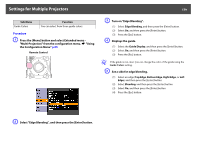
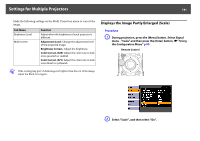
Settings for Multiple Projectors 176 q The remote control ID setting is saved in the remote control. Even if the remote control batteries are removed to replace them and so on, the stored ID setting is retained. However, if the batteries are left out for a long time, it is reset to the default value (ID0). Adjusting the Position of the Projected Image Adjust the position of the projected image, starting from the adjustments that have larger corrections. For the best results, use physical adjustments (moving the projector's position, optical zoom, and lens shift) as much as possible to minimize the amount of digital correction (Quick Corner, Point Correction, H/V keystone, etc.) needed to correct your images. 1. Projector's position (angle) s p.150 2. Image zoom s p.160 3. Lens shift/Zoom s p.159 4. Geometric Correction • Quick Corner s p.162 • Point Correction s p.176 q • We recommend setting the focus, zoom, and lens shift at least 30 minutes after you start the projection, because images are not stable right after turning on the projector. • The Test Pattern can be displayed to adjust the projection status without connecting video equipment. s p.157 • When projecting from multiple projectors, correction is easier if images are displayed as is (aspect ratio and image resolution are maintained) and without being enlarged or reduced in size.] • We recommend projecting from the center of the lens when possible. As you get to the edges, the lens gets thinner which can cause distortion and affect the quality of the blend. Point Correction Corrects slight distortion which occurs partially, or adjusts the screen position in an overlapping area when projecting from multiple projectors. A grid is placed on top of the projected image and you can move the points of intersection on the grid left, right, up, or down to correct distortion. Procedure A During projection, press the [Menu] button. Select Settings menu - "Geometric Correction" and then press the [Enter] button. s "Using the Configuration Menu" p.55 Remote Control
-
 1
1 -
2
-
3
-
4
-
5
-
6
-
7
-
8
-
9
-
10
-
11
-
12
-
13
-
14
-
15
-
16
-
17
-
18
-
19
-
20
-
21
-
22
-
23
-
24
-
25
-
26
-
27
-
28
-
29
-
30
-
31
-
32
-
33
-
34
-
35
-
36
-
37
-
38
-
39
-
40
-
41
-
42
-
43
-
44
-
45
-
46
-
47
-
48
-
49
-
50
-
51
-
52
-
53
-
54
-
55
-
56
-
57
-
58
-
59
-
60
-
61
-
62
-
63
-
64
-
65
-
66
-
67
-
68
-
69
-
70
-
71
-
72
-
73
-
74
-
75
-
76
-
77
-
78
-
79
-
80
-
81
-
82
-
83
-
84
-
85
-
86
-
87
-
88
-
89
-
90
-
91
-
92
-
93
-
94
-
95
-
96
-
97
-
98
-
99
-
100
-
101
-
102
-
103
-
104
-
105
-
106
-
107
-
108
-
109
-
110
-
111
-
112
-
113
-
114
-
115
-
116
-
117
-
118
-
119
-
120
-
121
-
122
-
123
-
124
-
125
-
126
-
127
-
128
-
129
-
130
-
131
-
132
-
133
-
134
-
135
-
136
-
137
-
138
-
139
-
140
-
141
-
142
-
143
-
144
-
145
-
146
-
147
-
148
-
149
-
150
-
151
-
152
-
153
-
154
-
155
-
156
-
157
-
158
-
159
-
160
-
161
-
162
-
163
-
164
-
165
-
166
-
167
-
168
-
169
-
170
-
 171
171 -
 172
172 -
 173
173 -
 174
174 -
 175
175 -
 176
176 -
 177
177 -
 178
178 -
 179
179 -
 180
180 -
 181
181 -
182
-
183
-
184
-
185
-
186
-
187
-
188
-
189
-
190
-
191
-
192
-
193
-
194
-
195
-
196
-
197
-
198
-
199
-
200
-
201
-
202
-
203
-
204
-
205
-
206
-
207
-
208
-
209
-
210
-
211
-
212
-
213
-
214
-
215
-
216
-
217
-
218
-
219
-
220
-
221
-
222
-
223
-
224
-
225
-
226
-
227
-
228
-
229
-
230
-
231
-
232
-
233
-
234
-
235
-
236
-
237
-
238
-
239
-
240
-
241
-
242
-
243
-
244
-
245
-
246
-
247
-
248
-
249
-
250
-
251
-
252
-
253
-
254
 |
 |