Epson PowerLite Pro Z8150NL User Manual - Page 18
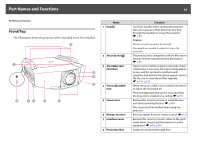
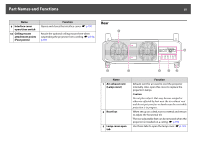
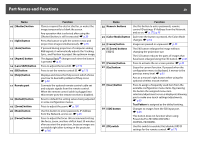
Control Panel, Function, button, Lens] button, Source Search], Enter] button
 |
View all Epson PowerLite Pro Z8150NL manuals
Add to My Manuals
Save this manual to your list of manuals |
Page 18 highlights
Part Names and Functions 18 Control Panel Name 1 [t] button 2 [Lens] button 3 [Source Search] button 4 [Enter] button Function Turns the projector power On or Off. Press this button to cycle through the focus, zoom, and lens shift settings to adjust the lens. Changes to the next input source that is connected to the projector and is sending an image. s p.25 If pressed during projection of computer analog RGB signals, it automatically adjusts the Tracking, Sync., and Position to project the optimum image. When the configuration menu or a Help screen is displayed, it accepts and enters the current selection and moves to the next level. s p.55 Name 5 [w/ ][v/ ] button 6 [Shutter] button 7 [Esc] button 8 [/ ] button 9 [Menu] button Function Corrects vertical keystone distortion. s p.164 If pressed while the configuration menu or a Help screen is displayed, these buttons only have the [ ] and [ ] functions which select menu items and setting values. s p.55 When projecting using "Connect to a Network Projector", these buttons function only as [ ] and [ ] buttons. Closes or opens the electric shutter, or mutes the image temporarily to dim the screen. Any operation that is selected after using the [Shutter] button, is still executed. s p.39 Stops the current function. If pressed when the configuration menu is displayed, it moves to the previous menu level. s p.55 Corrects horizontal keystone distortion. s p.164 If pressed while the configuration menu or a Help screen is displayed, these buttons only have the [ ] and [ ] functions which select menu items and setting values. s p.55 When projecting using "Connect to a Network Projector", these buttons function only as [ ] and [ ] buttons. Displays and closes the configuration menu. s p.55
-
 1
1 -
2
-
3
-
4
-
5
-
6
-
7
-
8
-
9
-
10
-
11
-
12
-
 13
13 -
 14
14 -
 15
15 -
 16
16 -
 17
17 -
 18
18 -
 19
19 -
 20
20 -
 21
21 -
 22
22 -
 23
23 -
24
-
25
-
26
-
27
-
28
-
29
-
30
-
31
-
32
-
33
-
34
-
35
-
36
-
37
-
38
-
39
-
40
-
41
-
42
-
43
-
44
-
45
-
46
-
47
-
48
-
49
-
50
-
51
-
52
-
53
-
54
-
55
-
56
-
57
-
58
-
59
-
60
-
61
-
62
-
63
-
64
-
65
-
66
-
67
-
68
-
69
-
70
-
71
-
72
-
73
-
74
-
75
-
76
-
77
-
78
-
79
-
80
-
81
-
82
-
83
-
84
-
85
-
86
-
87
-
88
-
89
-
90
-
91
-
92
-
93
-
94
-
95
-
96
-
97
-
98
-
99
-
100
-
101
-
102
-
103
-
104
-
105
-
106
-
107
-
108
-
109
-
110
-
111
-
112
-
113
-
114
-
115
-
116
-
117
-
118
-
119
-
120
-
121
-
122
-
123
-
124
-
125
-
126
-
127
-
128
-
129
-
130
-
131
-
132
-
133
-
134
-
135
-
136
-
137
-
138
-
139
-
140
-
141
-
142
-
143
-
144
-
145
-
146
-
147
-
148
-
149
-
150
-
151
-
152
-
153
-
154
-
155
-
156
-
157
-
158
-
159
-
160
-
161
-
162
-
163
-
164
-
165
-
166
-
167
-
168
-
169
-
170
-
171
-
172
-
173
-
174
-
175
-
176
-
177
-
178
-
179
-
180
-
181
-
182
-
183
-
184
-
185
-
186
-
187
-
188
-
189
-
190
-
191
-
192
-
193
-
194
-
195
-
196
-
197
-
198
-
199
-
200
-
201
-
202
-
203
-
204
-
205
-
206
-
207
-
208
-
209
-
210
-
211
-
212
-
213
-
214
-
215
-
216
-
217
-
218
-
219
-
220
-
221
-
222
-
223
-
224
-
225
-
226
-
227
-
228
-
229
-
230
-
231
-
232
-
233
-
234
-
235
-
236
-
237
-
238
-
239
-
240
-
241
-
242
-
243
-
244
-
245
-
246
-
247
-
248
-
249
-
250
-
251
-
252
-
253
-
254
 |
 |