Epson PowerLite Pro Z8150NL User Manual - Page 167
button on the remote, control or
 |
View all Epson PowerLite Pro Z8150NL manuals
Add to My Manuals
Save this manual to your list of manuals |
Page 167 highlights
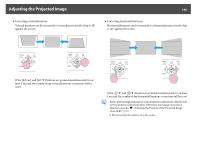
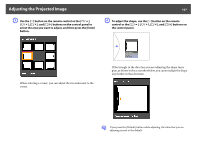
Adjusting the Projected Image C Use the [h] button on the remote control or the [w/ ], [v/ ], [/ ] buttons on the control panel to select the area you want to adjust, and then press the [Enter] button. 167 D To adjust the shape, use the [h] button on the remote control or the [w/ ], [v/ ], [/ ] buttons on the control panel. When selecting a corner, you can adjust the two sides next to the corner. If the triangle in the direction you are adjusting the shape turns gray, as shown in the screenshot below, you cannot adjust the shape any further in that direction. q If you press the [Default] button while adjusting, the value that you are adjusting is reset to the default.
-
 1
1 -
2
-
3
-
4
-
5
-
6
-
7
-
8
-
9
-
10
-
11
-
12
-
13
-
14
-
15
-
16
-
17
-
18
-
19
-
20
-
21
-
22
-
23
-
24
-
25
-
26
-
27
-
28
-
29
-
30
-
31
-
32
-
33
-
34
-
35
-
36
-
37
-
38
-
39
-
40
-
41
-
42
-
43
-
44
-
45
-
46
-
47
-
48
-
49
-
50
-
51
-
52
-
53
-
54
-
55
-
56
-
57
-
58
-
59
-
60
-
61
-
62
-
63
-
64
-
65
-
66
-
67
-
68
-
69
-
70
-
71
-
72
-
73
-
74
-
75
-
76
-
77
-
78
-
79
-
80
-
81
-
82
-
83
-
84
-
85
-
86
-
87
-
88
-
89
-
90
-
91
-
92
-
93
-
94
-
95
-
96
-
97
-
98
-
99
-
100
-
101
-
102
-
103
-
104
-
105
-
106
-
107
-
108
-
109
-
110
-
111
-
112
-
113
-
114
-
115
-
116
-
117
-
118
-
119
-
120
-
121
-
122
-
123
-
124
-
125
-
126
-
127
-
128
-
129
-
130
-
131
-
132
-
133
-
134
-
135
-
136
-
137
-
138
-
139
-
140
-
141
-
142
-
143
-
144
-
145
-
146
-
147
-
148
-
149
-
150
-
151
-
152
-
153
-
154
-
155
-
156
-
157
-
158
-
159
-
160
-
161
-
 162
162 -
 163
163 -
 164
164 -
 165
165 -
 166
166 -
 167
167 -
 168
168 -
 169
169 -
 170
170 -
 171
171 -
 172
172 -
173
-
174
-
175
-
176
-
177
-
178
-
179
-
180
-
181
-
182
-
183
-
184
-
185
-
186
-
187
-
188
-
189
-
190
-
191
-
192
-
193
-
194
-
195
-
196
-
197
-
198
-
199
-
200
-
201
-
202
-
203
-
204
-
205
-
206
-
207
-
208
-
209
-
210
-
211
-
212
-
213
-
214
-
215
-
216
-
217
-
218
-
219
-
220
-
221
-
222
-
223
-
224
-
225
-
226
-
227
-
228
-
229
-
230
-
231
-
232
-
233
-
234
-
235
-
236
-
237
-
238
-
239
-
240
-
241
-
242
-
243
-
244
-
245
-
246
-
247
-
248
-
249
-
250
-
251
-
252
-
253
-
254
 |
 |
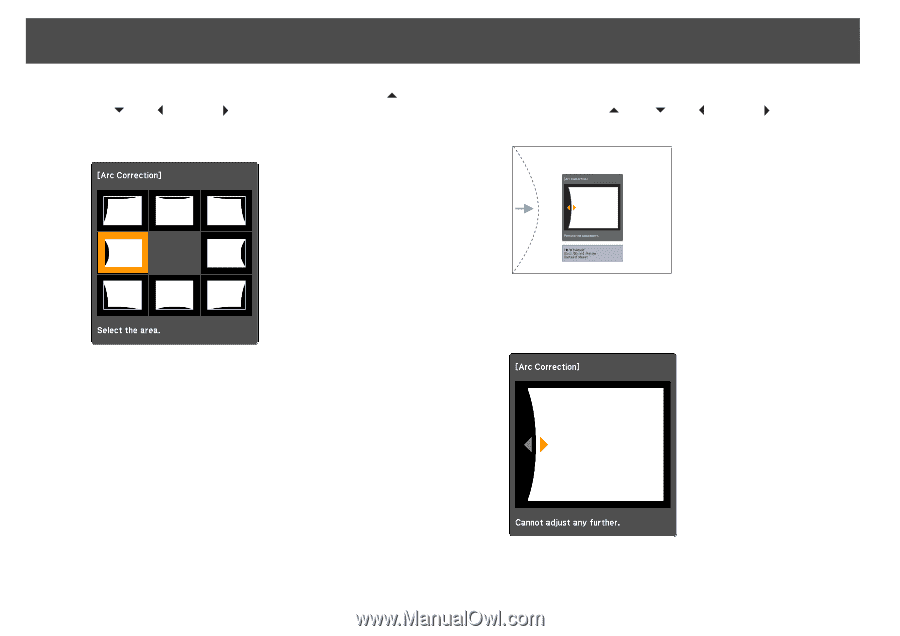
Adjusting the Projected Image
167
C
Use the [
h
] button on the remote control or the [
w
/
],
[
v
/
], [
<
/
], and [
>
/
] buttons on the control panel to
select the area you want to adjust, and then press the [Enter]
button.
When selecting a corner, you can adjust the two sides next to the
corner.
D
To adjust the shape, use the [
h
] button on the remote
control or the [
w
/
], [
v
/
], [
<
/
], and [
>
/
] buttons on
the control panel.
If the triangle in the direction you are adjusting the shape turns
gray, as shown in the screenshot below, you cannot adjust the shape
any further in that direction.
q
If you press the [Default] button while adjusting, the value that you are
adjusting is reset to the default.