Epson PowerLite Pro Z8150NL User Manual - Page 164
H/V-Keystone, Quick Corner, Geometric Correction, Geometric, Correction
 |
View all Epson PowerLite Pro Z8150NL manuals
Add to My Manuals
Save this manual to your list of manuals |
Page 164 highlights
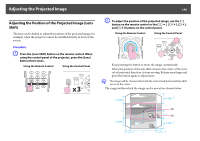
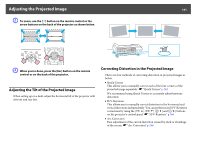
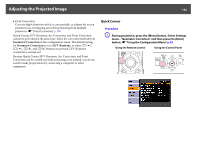
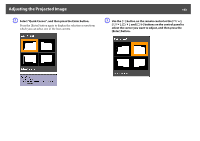
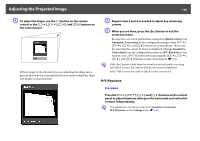
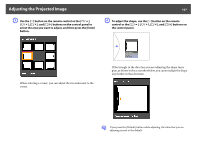
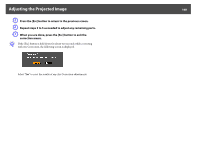
Adjusting the Projected Image 164 D To adjust the shape, use the [h] button on the remote control or the [w/ ], [v/ ], [/ ] buttons on the control panel. If the triangle in the direction you are adjusting the shape turns gray, as shown in the screenshot below, you cannot adjust the shape any further in that direction. E Repeat steps 3 and 4 as needed to adjust any remaining corners. F When you are done, press the [Esc] button to exit the correction menu. Because the correction method was changed to Quick Corner from Geometric Correction in the configuration menu, when [w/ ], [v/ ], [/ ] buttons are pressed later, the screen for selecting the corner in step 2 is displayed. Change Geometric Correction from the configuration menu to H/V-Keystone if you want to correct H/V-Keystone when pressing the [w/ ], [v/ ], [/ ] buttons on the control panel. s p.65 q If the [Esc] button is held down for about two seconds while correcting with Quick Corner, the confirm default reset screen is displayed. Select "Yes" to reset the result of Quick Corner corrections. H/V-Keystone Procedure Press the [w/ ], [v/ ], [/ ] buttons on the control panel to adjust keystone settings in the horizontal and vertical directions independently. q This adjustment can also be made from Geometric Correction H/V-Keystone on the Settings menu. s p.65
-
 1
1 -
2
-
3
-
4
-
5
-
6
-
7
-
8
-
9
-
10
-
11
-
12
-
13
-
14
-
15
-
16
-
17
-
18
-
19
-
20
-
21
-
22
-
23
-
24
-
25
-
26
-
27
-
28
-
29
-
30
-
31
-
32
-
33
-
34
-
35
-
36
-
37
-
38
-
39
-
40
-
41
-
42
-
43
-
44
-
45
-
46
-
47
-
48
-
49
-
50
-
51
-
52
-
53
-
54
-
55
-
56
-
57
-
58
-
59
-
60
-
61
-
62
-
63
-
64
-
65
-
66
-
67
-
68
-
69
-
70
-
71
-
72
-
73
-
74
-
75
-
76
-
77
-
78
-
79
-
80
-
81
-
82
-
83
-
84
-
85
-
86
-
87
-
88
-
89
-
90
-
91
-
92
-
93
-
94
-
95
-
96
-
97
-
98
-
99
-
100
-
101
-
102
-
103
-
104
-
105
-
106
-
107
-
108
-
109
-
110
-
111
-
112
-
113
-
114
-
115
-
116
-
117
-
118
-
119
-
120
-
121
-
122
-
123
-
124
-
125
-
126
-
127
-
128
-
129
-
130
-
131
-
132
-
133
-
134
-
135
-
136
-
137
-
138
-
139
-
140
-
141
-
142
-
143
-
144
-
145
-
146
-
147
-
148
-
149
-
150
-
151
-
152
-
153
-
154
-
155
-
156
-
157
-
158
-
 159
159 -
 160
160 -
 161
161 -
 162
162 -
 163
163 -
 164
164 -
 165
165 -
 166
166 -
 167
167 -
 168
168 -
 169
169 -
170
-
171
-
172
-
173
-
174
-
175
-
176
-
177
-
178
-
179
-
180
-
181
-
182
-
183
-
184
-
185
-
186
-
187
-
188
-
189
-
190
-
191
-
192
-
193
-
194
-
195
-
196
-
197
-
198
-
199
-
200
-
201
-
202
-
203
-
204
-
205
-
206
-
207
-
208
-
209
-
210
-
211
-
212
-
213
-
214
-
215
-
216
-
217
-
218
-
219
-
220
-
221
-
222
-
223
-
224
-
225
-
226
-
227
-
228
-
229
-
230
-
231
-
232
-
233
-
234
-
235
-
236
-
237
-
238
-
239
-
240
-
241
-
242
-
243
-
244
-
245
-
246
-
247
-
248
-
249
-
250
-
251
-
252
-
253
-
254
 |
 |
