Epson PowerLite Pro Z8150NL User Manual - Page 190
Installing the Wireless LAN Unit (V12H418P12), Attaching, Reading the wireless LAN indicators
 |
View all Epson PowerLite Pro Z8150NL manuals
Add to My Manuals
Save this manual to your list of manuals |
Page 190 highlights
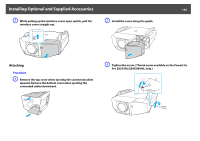
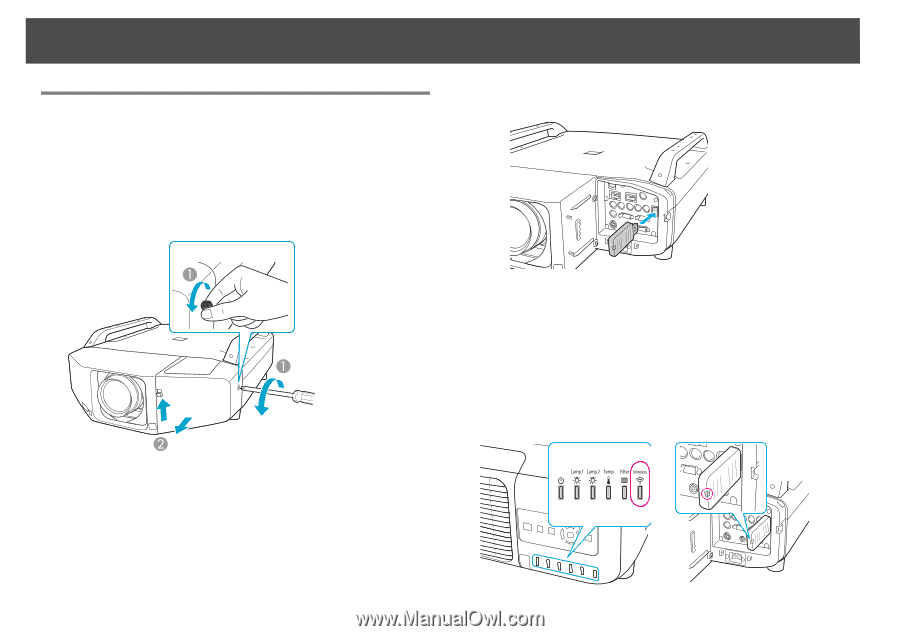
Installing Optional and Supplied Accessories 190 Installing the Wireless LAN Unit (V12H418P12) B Install the Wireless LAN unit. Attaching Procedure A Remove the interface cover. After connecting the wireless LAN module to the projector, set the Wireless LAN Power setting on the Wireless LAN menu to On. (The default setting is On.)s p.74 Reading the wireless LAN indicators There are two wireless LAN indicators, one on the projector and one on the Wireless LAN unit. A Loosen the screw. (Thumb screw available on the PowerLite Pro Z8255NL/Z8455WUNL only.) B While pulling up the interface cover open switch, pull the interface cover straight out.
-
 1
1 -
2
-
3
-
4
-
5
-
6
-
7
-
8
-
9
-
10
-
11
-
12
-
13
-
14
-
15
-
16
-
17
-
18
-
19
-
20
-
21
-
22
-
23
-
24
-
25
-
26
-
27
-
28
-
29
-
30
-
31
-
32
-
33
-
34
-
35
-
36
-
37
-
38
-
39
-
40
-
41
-
42
-
43
-
44
-
45
-
46
-
47
-
48
-
49
-
50
-
51
-
52
-
53
-
54
-
55
-
56
-
57
-
58
-
59
-
60
-
61
-
62
-
63
-
64
-
65
-
66
-
67
-
68
-
69
-
70
-
71
-
72
-
73
-
74
-
75
-
76
-
77
-
78
-
79
-
80
-
81
-
82
-
83
-
84
-
85
-
86
-
87
-
88
-
89
-
90
-
91
-
92
-
93
-
94
-
95
-
96
-
97
-
98
-
99
-
100
-
101
-
102
-
103
-
104
-
105
-
106
-
107
-
108
-
109
-
110
-
111
-
112
-
113
-
114
-
115
-
116
-
117
-
118
-
119
-
120
-
121
-
122
-
123
-
124
-
125
-
126
-
127
-
128
-
129
-
130
-
131
-
132
-
133
-
134
-
135
-
136
-
137
-
138
-
139
-
140
-
141
-
142
-
143
-
144
-
145
-
146
-
147
-
148
-
149
-
150
-
151
-
152
-
153
-
154
-
155
-
156
-
157
-
158
-
159
-
160
-
161
-
162
-
163
-
164
-
165
-
166
-
167
-
168
-
169
-
170
-
171
-
172
-
173
-
174
-
175
-
176
-
177
-
178
-
179
-
180
-
181
-
182
-
183
-
184
-
 185
185 -
 186
186 -
 187
187 -
 188
188 -
 189
189 -
 190
190 -
 191
191 -
 192
192 -
 193
193 -
 194
194 -
 195
195 -
196
-
197
-
198
-
199
-
200
-
201
-
202
-
203
-
204
-
205
-
206
-
207
-
208
-
209
-
210
-
211
-
212
-
213
-
214
-
215
-
216
-
217
-
218
-
219
-
220
-
221
-
222
-
223
-
224
-
225
-
226
-
227
-
228
-
229
-
230
-
231
-
232
-
233
-
234
-
235
-
236
-
237
-
238
-
239
-
240
-
241
-
242
-
243
-
244
-
245
-
246
-
247
-
248
-
249
-
250
-
251
-
252
-
253
-
254
 |
 |
Installing Optional and Supplied Accessories
190
Installing the Wireless LAN Unit (V12H418P12)
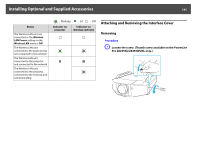
Attaching
Procedure
A
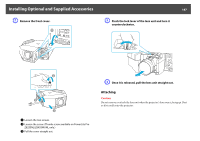
Remove the interface cover.
B
Install the Wireless LAN unit.
After connecting the wireless LAN module to the projector, set the
Wireless LAN Power
setting on the
Wireless LAN
menu to
On
. (The
default setting is
On
.)
s
p.74
Reading the wireless LAN indicators
There are two wireless LAN indicators, one on the projector and one on
the Wireless LAN unit.
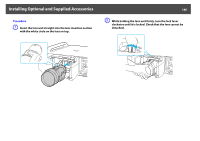
A
Loosen the screw. (Thumb screw available on the PowerLite Pro
Z8255NL/Z8455WUNL only.)
B
While pulling up the interface cover open switch, pull the
interface cover straight out.