Garmin iQue M5 Operating Instructions - Page 22
Using the Summary Screen, Creating Meeting Requests, Beam Appointment, Tools, Options
 |
UPC - 753759047276
View all Garmin iQue M5 manuals
Add to My Manuals
Save this manual to your list of manuals |
Page 22 highlights
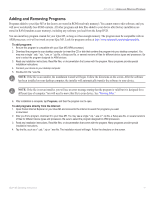
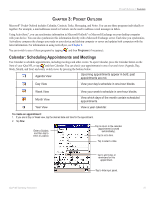
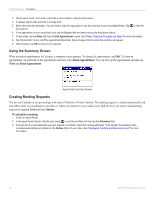
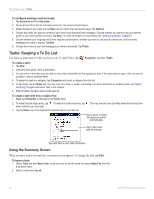
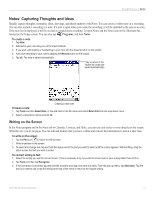
POCKET OUTLOOK > CALENDAR 3. Tap to select a field. Then enter a description and a location using the input panel. 4. If needed, tap the date and time to change them. 5. Enter other desired information. You will need to hide the input panel or use the scroll bar to see all available fields. (Tap to hide the input panel.) 6. If this appointment occurs more than once, tap the Occurs field and select among the drop-down options. 7. To add notes, tap the Notes tab from the Edit Appointment screen. See "Notes: Capturing Thoughts and Ideas" for more information. 8. Tap "Remind Me" to turn on/off the appointment Reminder. Tap to change the time when the reminder will appear. 9. When finished, tap OK to return to the calendar. Using the Summary Screen When you tap an appointment in Calendar, a summary screen appears. To change the appointment, tap Edit. To beam an appointment, tap and hold on the appointment and then select Beam Appointment. You can also tap the appointment and then tap Tools and Beam Appointment. Appointment Summary Screen Creating Meeting Requests You can use Calendar to set up meetings with users of Outlook or Pocket Outlook. The meeting request is created automatically and sent either when you synchronize your Inbox or when you connect to your e-mail server. Indicate how you want to send meeting requests by tapping Tools and then Options. To schedule a meeting: 1. Create an appointment. 2. In the appointment details, hide the input panel or use the scrollbar and then tap the Attendees field. 3. From the list of e-mail addresses you have entered in Contacts, select the meeting attendees. Then tap ok. The meeting notice is created automatically and placed in the Outbox folder of your Inbox. See "Messaging: Sending and Receiving E-mail" for more information. 16 iQue® M5 Operating Instructions
-
 1
1 -
2
-
3
-
4
-
5
-
6
-
7
-
8
-
9
-
10
-
11
-
12
-
13
-
14
-
15
-
16
-
 17
17 -
 18
18 -
 19
19 -
 20
20 -
 21
21 -
 22
22 -
 23
23 -
 24
24 -
 25
25 -
 26
26 -
 27
27 -
28
-
29
-
30
-
31
-
32
-
33
-
34
-
35
-
36
-
37
-
38
-
39
-
40
-
41
-
42
-
43
-
44
-
45
-
46
-
47
-
48
-
49
-
50
-
51
-
52
-
53
-
54
-
55
-
56
-
57
-
58
-
59
-
60
-
61
-
62
-
63
-
64
-
65
-
66
-
67
-
68
-
69
-
70
-
71
-
72
-
73
-
74
-
75
 |
 |