HP BL25/35/45p HP ProLiant Network Adapter Software and Configuration Guide - Page 29
HP NC-Series Broadcom 10 GbE adapter diagnostics
 |
View all HP BL25/35/45p manuals
Add to My Manuals
Save this manual to your list of manuals |
Page 29 highlights
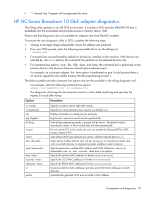
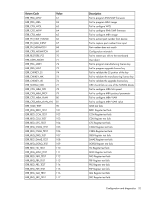
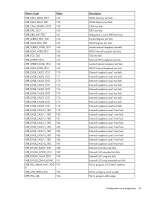
• *1 Internal Use. Program will not generate this error. HP NC-Series Broadcom 10 GbE adapter diagnostics The eDiag utility operates in an MS-DOS environment. It includes a DOS extender (PMODE/W) that is embedded into the executable and provides access to memory above 1MB. Please note that diagnostics are not available for adapters that have FlexNIC enabled. To execute the user diagnostic utility in DOS, complete the following steps: 1. Change to the apps\diags\ediag folder where the softpaq was extracted. 2. From your DOS prompt, enter the following executable file to run the eDiag tool: uediag.exe • Command lines are performed by default on all devices installed on the machine. If the devices are selected by -dev or -c options, the command line performs on the selected devices only. • For command line options -fnvm, -fbc, -fl2b, -fipmi, and -fump, the command line is performed on the primary devices only because these are shared options between ports. For example, on a two-port adapter, the -fnvm option is performed on port 0 only because there is no need to repeat the non-volatile memory (NVM) programming on port 1. The following table provides command line options that are the available in the eDiag diagnostic tool. For example, enter the following command line options: eDiag -log results.log -rc regress.tcl The diagnostic utility logs the test execution results in a file called results.log and specifies the regress.tcl script after startup. Options Description -rc -I -ver -log -b10eng -no_pci -noinit -dev -pwd -mac -iscsimac -rdmamac -m -autom Specify a script to source right after startup. Specify how many iterations tests need to run (Default is 1). Display information on eDiag version and exits. Log the tests' execution results into the specified file. Enter eDiag engineering mode, a prompt will be shown. The default mode is manufacture mode, in which nictest tests will start automatically. Do not use the PCI. In this mode, the user can enable the Debug UART for GRC access instead of PCI. Start eDiag without pre-selecting any device. (Default selected device is 1) Select device number that the tests will be running on. In manufacture mode, tests will run on both devices. In engineering mode, enables to select a device. Specify password to update MAC address and NVM. Otherwise, user is not authorized to use -m, -mac, -iscsimac, -rdma and -nvm options. Specify the primary MAC address (in format xx:xx:xx:xx:xx:xx) Specify the iSCSI MAC address (in format xx:xx:xx:xx:xx:xx) Specify the RDMA MAC address (in format xx:xx:xx:xx:xx:xx) Interactive add the MAC addresses (primary and iSCSI MAC addresses for both devices). Automatically generate iSCSI and secondary MAC address. Configuration and diagnostics 29
-
 1
1 -
2
-
3
-
4
-
5
-
6
-
7
-
8
-
9
-
10
-
11
-
12
-
13
-
14
-
15
-
16
-
17
-
18
-
19
-
20
-
21
-
22
-
23
-
 24
24 -
 25
25 -
 26
26 -
 27
27 -
 28
28 -
 29
29 -
 30
30 -
 31
31 -
 32
32 -
 33
33 -
 34
34 -
35
-
36
-
37
-
38
-
39
-
40
-
41
-
42
-
43
-
44
-
45
-
46
-
47
-
48
-
49
-
50
-
51
-
52
-
53
-
54
-
55
-
56
-
57
-
58
-
59
-
60
-
61
-
62
-
63
-
64
-
65
-
66
-
67
-
68
-
69
-
70
-
71
-
72
-
73
-
74
-
75
-
76
-
77
-
78
-
79
-
80
-
81
-
82
 |
 |
