HP C7769B Service Manual - Page 20
Using the Power Switch LED to Troubleshoot, Replace the Power Supply Unit - firmware
 |
View all HP C7769B manuals
Add to My Manuals
Save this manual to your list of manuals |
Page 20 highlights
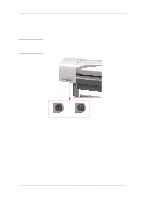
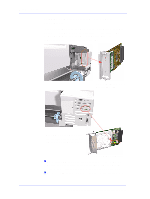
Troubleshooting NOTE Using the Power Switch LED to Troubleshoot In certain circumstances the LED located in the power switch (located on the left hand side of the Printer) can help to troubleshoot the Printer. The LED can be OFF, ON or flashing and using different combinations can indicate different problems. You should only use the LED to troubleshoot when the Printer does not Power up completely. The LED may flash in other circumstances which are completely normal and this does not mean that there is a problem with the Printer. LED OFF LED ON LED is OFF - This indicates that the Power Supply Unit is completely dead. Try the following: 1 Check that power cord is connected correctly to the Printer and to the Power Socket. Also make sure that you firmly press the Power Switch to the ON position. 2 Replace the Power Supply Unit ⇒ Page 8-27. LED is ON (all the time) - This indicates that the Main PCA is completely dead. Replace the Electronics Module ⇒ Page 8-24. LED is Flashing continuously - A problem has been detected with the previous firmware upgrade. Try resending the firmware upgrade file. LED Flashes twice every few seconds - The Printer cannot detect 1-10 HP DesignJets 500 and 800 Series Printers Service Manual
-
 1
1 -
2
-
3
-
4
-
5
-
6
-
7
-
8
-
9
-
10
-
11
-
12
-
13
-
14
-
 15
15 -
 16
16 -
 17
17 -
 18
18 -
 19
19 -
 20
20 -
 21
21 -
 22
22 -
 23
23 -
 24
24 -
 25
25 -
26
-
27
-
28
-
29
-
30
-
31
-
32
-
33
-
34
-
35
-
36
-
37
-
38
-
39
-
40
-
41
-
42
-
43
-
44
-
45
-
46
-
47
-
48
-
49
-
50
-
51
-
52
-
53
-
54
-
55
-
56
-
57
-
58
-
59
-
60
-
61
-
62
-
63
-
64
-
65
-
66
-
67
-
68
-
69
-
70
-
71
-
72
-
73
-
74
-
75
-
76
-
77
-
78
-
79
-
80
-
81
-
82
-
83
-
84
-
85
-
86
-
87
-
88
-
89
-
90
-
91
-
92
-
93
-
94
-
95
-
96
-
97
-
98
-
99
-
100
-
101
-
102
-
103
-
104
-
105
-
106
-
107
-
108
-
109
-
110
-
111
-
112
-
113
-
114
-
115
-
116
-
117
-
118
-
119
-
120
-
121
-
122
-
123
-
124
-
125
-
126
-
127
-
128
-
129
-
130
-
131
-
132
-
133
-
134
-
135
-
136
-
137
-
138
-
139
-
140
-
141
-
142
-
143
-
144
-
145
-
146
-
147
-
148
-
149
-
150
-
151
-
152
-
153
-
154
-
155
-
156
-
157
-
158
-
159
-
160
-
161
-
162
-
163
-
164
-
165
-
166
-
167
-
168
-
169
-
170
-
171
-
172
-
173
-
174
-
175
-
176
-
177
-
178
-
179
-
180
-
181
-
182
-
183
-
184
-
185
-
186
-
187
-
188
-
189
-
190
-
191
-
192
-
193
-
194
-
195
-
196
-
197
-
198
-
199
-
200
-
201
-
202
-
203
-
204
-
205
-
206
-
207
-
208
-
209
-
210
-
211
-
212
-
213
-
214
-
215
-
216
-
217
-
218
-
219
-
220
-
221
-
222
-
223
-
224
-
225
-
226
-
227
-
228
-
229
-
230
-
231
-
232
-
233
-
234
-
235
-
236
-
237
-
238
-
239
-
240
-
241
-
242
-
243
-
244
-
245
-
246
-
247
-
248
-
249
-
250
-
251
-
252
-
253
-
254
-
255
-
256
-
257
-
258
-
259
-
260
-
261
-
262
-
263
-
264
-
265
-
266
-
267
-
268
-
269
-
270
-
271
-
272
-
273
-
274
-
275
-
276
-
277
-
278
-
279
-
280
-
281
-
282
-
283
-
284
-
285
-
286
 |
 |
