HP C7769B Service Manual - Page 92
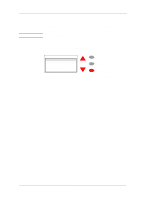
Once the utility starts, the printer will begin to unlock the Carriage
 |
View all HP C7769B manuals
Add to My Manuals
Save this manual to your list of manuals |
Page 92 highlights
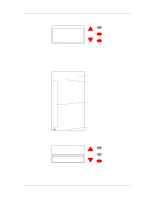
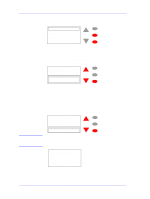
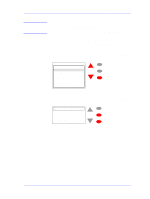
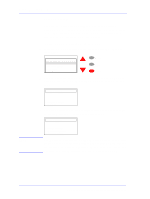
Service Tests and Utilities Unlock Carriage The purpose of this Service Utility is to unlock the Carriage Assembly which is normally locked by the Service Station in order to cap the Printheads. Once unlocked, the Carriage Assembly can then be moved freely along the Printer by hand. Perform the Unlock Carriage utility as follows: 1 In the Service Utilities submenu, scroll to "Unlock Carriage" and press Enter. Service utilities Change ink tubes Unlock Carriage Turn Drive Roller Prime tubes EEROM Setup Menu Back Enter 2 Once the utility starts, the printer will begin to unlock the Carriage Assembly and the following message will be displayed on the front panel. Unlock Carriage NOTE Unlocking Carriage Please wait... 3 Once the Carriage is unlocked (Printheads have been uncapped) the following message will appear on the front panel: Unlock Carriage Carriage unlocked Power off the printer to start the repair The Carriage will remain uncapped until another action (e.g. loading paper or replacing Printheads) is selected which returns the Printer to normal operation. Make sure you leave the Carriage in a locked position once the repair is completed. 4-22 HP DesignJets 500 and 800 Series Printers Service Manual
-
 1
1 -
2
-
3
-
4
-
5
-
6
-
7
-
8
-
9
-
10
-
11
-
12
-
13
-
14
-
15
-
16
-
17
-
18
-
19
-
20
-
21
-
22
-
23
-
24
-
25
-
26
-
27
-
28
-
29
-
30
-
31
-
32
-
33
-
34
-
35
-
36
-
37
-
38
-
39
-
40
-
41
-
42
-
43
-
44
-
45
-
46
-
47
-
48
-
49
-
50
-
51
-
52
-
53
-
54
-
55
-
56
-
57
-
58
-
59
-
60
-
61
-
62
-
63
-
64
-
65
-
66
-
67
-
68
-
69
-
70
-
71
-
72
-
73
-
74
-
75
-
76
-
77
-
78
-
79
-
80
-
81
-
82
-
83
-
84
-
85
-
86
-
 87
87 -
 88
88 -
 89
89 -
 90
90 -
 91
91 -
 92
92 -
 93
93 -
 94
94 -
 95
95 -
 96
96 -
 97
97 -
98
-
99
-
100
-
101
-
102
-
103
-
104
-
105
-
106
-
107
-
108
-
109
-
110
-
111
-
112
-
113
-
114
-
115
-
116
-
117
-
118
-
119
-
120
-
121
-
122
-
123
-
124
-
125
-
126
-
127
-
128
-
129
-
130
-
131
-
132
-
133
-
134
-
135
-
136
-
137
-
138
-
139
-
140
-
141
-
142
-
143
-
144
-
145
-
146
-
147
-
148
-
149
-
150
-
151
-
152
-
153
-
154
-
155
-
156
-
157
-
158
-
159
-
160
-
161
-
162
-
163
-
164
-
165
-
166
-
167
-
168
-
169
-
170
-
171
-
172
-
173
-
174
-
175
-
176
-
177
-
178
-
179
-
180
-
181
-
182
-
183
-
184
-
185
-
186
-
187
-
188
-
189
-
190
-
191
-
192
-
193
-
194
-
195
-
196
-
197
-
198
-
199
-
200
-
201
-
202
-
203
-
204
-
205
-
206
-
207
-
208
-
209
-
210
-
211
-
212
-
213
-
214
-
215
-
216
-
217
-
218
-
219
-
220
-
221
-
222
-
223
-
224
-
225
-
226
-
227
-
228
-
229
-
230
-
231
-
232
-
233
-
234
-
235
-
236
-
237
-
238
-
239
-
240
-
241
-
242
-
243
-
244
-
245
-
246
-
247
-
248
-
249
-
250
-
251
-
252
-
253
-
254
-
255
-
256
-
257
-
258
-
259
-
260
-
261
-
262
-
263
-
264
-
265
-
266
-
267
-
268
-
269
-
270
-
271
-
272
-
273
-
274
-
275
-
276
-
277
-
278
-
279
-
280
-
281
-
282
-
283
-
284
-
285
-
286
 |
 |
