HP D5360 User Guide - Page 78
To replace the print cartridges
 |
UPC - 883585233922
View all HP D5360 manuals
Add to My Manuals
Save this manual to your list of manuals |
Page 78 highlights
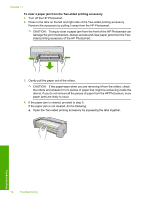
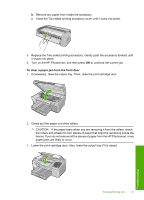
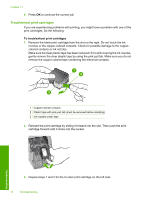
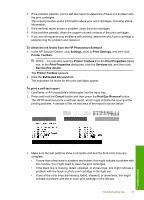
7. Clean only the copper-colored contacts. Allow the print cartridges to dry for approximately ten minutes. 1 Copper-colored contacts 2 Ink nozzles (do not clean) 8. Hold the print cartridge with the HP logo on top, and insert the print cartridge back into the slot. Make sure you push the print cartridge in firmly until it snaps into place. 9. Repeat if necessary for the other print cartridge. 10. Gently close the print cartridge door and plug the power cord into the back of the HP Photosmart. To replace the print cartridges 1. Make sure the HP Photosmart is on. CAUTION: If the HP Photosmart is off when you open the print cartridge door to access the print cartridges, the HP Photosmart will not release the cartridges for changing. You might damage the HP Photosmart if the print cartridges are not docked safely when you try to remove them. 2. Open the print cartridge door. The print carriage moves to the far right side of the HP Photosmart. Troubleshooting Troubleshooting tips 77
-
 1
1 -
2
-
3
-
4
-
5
-
6
-
7
-
8
-
9
-
10
-
11
-
12
-
13
-
14
-
15
-
16
-
17
-
18
-
19
-
20
-
21
-
22
-
23
-
24
-
25
-
26
-
27
-
28
-
29
-
30
-
31
-
32
-
33
-
34
-
35
-
36
-
37
-
38
-
39
-
40
-
41
-
42
-
43
-
44
-
45
-
46
-
47
-
48
-
49
-
50
-
51
-
52
-
53
-
54
-
55
-
56
-
57
-
58
-
59
-
60
-
61
-
62
-
63
-
64
-
65
-
66
-
67
-
68
-
69
-
70
-
71
-
72
-
 73
73 -
 74
74 -
 75
75 -
 76
76 -
 77
77 -
 78
78 -
 79
79 -
 80
80 -
 81
81 -
 82
82 -
 83
83 -
84
-
85
-
86
-
87
-
88
-
89
-
90
-
91
-
92
-
93
-
94
-
95
-
96
-
97
-
98
-
99
-
100
-
101
-
102
-
103
-
104
-
105
-
106
-
107
-
108
-
109
-
110
-
111
-
112
-
113
-
114
-
115
-
116
-
117
-
118
-
119
-
120
-
121
-
122
-
123
-
124
-
125
-
126
-
127
-
128
-
129
-
130
-
131
-
132
-
133
-
134
-
135
-
136
-
137
-
138
-
139
-
140
-
141
-
142
-
143
-
144
-
145
-
146
-
147
-
148
-
149
 |
 |
