HP Designjet 350c HP Designjet 330 and 350C Plotters - Users Guide - Page 109
SIMM a memory module, then you must first remove it, in order
 |
View all HP Designjet 350c manuals
Add to My Manuals
Save this manual to your list of manuals |
Page 109 highlights
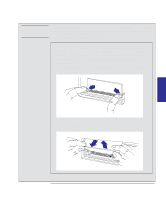
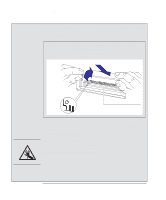
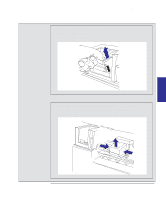
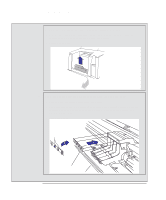
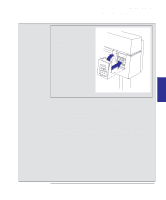
Reconfiguring your plotter To upgrade the HP DesignJet 330 with color CAUTION Before handling a memory module, either put on a grounding wrist strap and attach the end to the metal chassis of the plotter, or touch the outer metal surface of the plotter with your hand. Otherwise, static electricity from your body could damage the memory module. 3 There are two slots for SIMMs in the plotter. The SIMM containing the upgrade goes in the slot furthest from you. If both slots are free, skip this step and go straight to step 5. If the slot nearest to you already contains a SIMM (a memory module), then you must first remove it, in order to access the other slot. 1 Gently push aside the two clips that hold the memory module in place. RECONFIG- 6 URATION 1909 2 Holding it only by the edges, carefully pull the top of the module toward you and lift it out. 1 2 1738b 6-7
-
 1
1 -
2
-
3
-
4
-
5
-
6
-
7
-
8
-
9
-
10
-
11
-
12
-
13
-
14
-
15
-
16
-
17
-
18
-
19
-
20
-
21
-
22
-
23
-
24
-
25
-
26
-
27
-
28
-
29
-
30
-
31
-
32
-
33
-
34
-
35
-
36
-
37
-
38
-
39
-
40
-
41
-
42
-
43
-
44
-
45
-
46
-
47
-
48
-
49
-
50
-
51
-
52
-
53
-
54
-
55
-
56
-
57
-
58
-
59
-
60
-
61
-
62
-
63
-
64
-
65
-
66
-
67
-
68
-
69
-
70
-
71
-
72
-
73
-
74
-
75
-
76
-
77
-
78
-
79
-
80
-
81
-
82
-
83
-
84
-
85
-
86
-
87
-
88
-
89
-
90
-
91
-
92
-
93
-
94
-
95
-
96
-
97
-
98
-
99
-
100
-
101
-
102
-
103
-
 104
104 -
 105
105 -
 106
106 -
 107
107 -
 108
108 -
 109
109 -
 110
110 -
 111
111 -
 112
112 -
 113
113 -
 114
114 -
115
-
116
-
117
-
118
-
119
-
120
-
121
-
122
-
123
-
124
-
125
-
126
-
127
-
128
-
129
-
130
-
131
-
132
-
133
-
134
-
135
-
136
-
137
-
138
-
139
-
140
-
141
-
142
-
143
-
144
-
145
-
146
-
147
-
148
-
149
-
150
-
151
-
152
-
153
-
154
-
155
-
156
-
157
-
158
-
159
-
160
-
161
-
162
-
163
-
164
-
165
-
166
-
167
-
168
-
169
-
170
-
171
-
172
-
173
-
174
-
175
-
176
-
177
-
178
-
179
-
180
-
181
-
182
-
183
-
184
 |
 |
