HP Designjet 350c HP Designjet 330 and 350C Plotters - Users Guide - Page 112
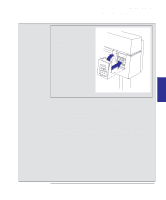
cartridge is out of its stall, as shown below.
 |
View all HP Designjet 350c manuals
Add to My Manuals
Save this manual to your list of manuals |
Page 112 highlights
Reconfiguring the plotter To upgrade the HP DesignJet 330 plotter with color 11 Remove the cover from the three left-hand cartridge selectors. 1 Release the clip on the right side of the cover, at the bottom. This is easiest to see when looking down into the plotter. 2 Lift the cover off. 2 1913 1 12 From the upgrade kit, take the label containing four colored dots. 1 Remove the protective strip from the back. 2 Stick the label onto the vertical panel above the cartridge stalls while the cartridge is out of its stall, as shown below. Note that the yellow dot must be on the left. 3 Close the cover 6-10
-
 1
1 -
2
-
3
-
4
-
5
-
6
-
7
-
8
-
9
-
10
-
11
-
12
-
13
-
14
-
15
-
16
-
17
-
18
-
19
-
20
-
21
-
22
-
23
-
24
-
25
-
26
-
27
-
28
-
29
-
30
-
31
-
32
-
33
-
34
-
35
-
36
-
37
-
38
-
39
-
40
-
41
-
42
-
43
-
44
-
45
-
46
-
47
-
48
-
49
-
50
-
51
-
52
-
53
-
54
-
55
-
56
-
57
-
58
-
59
-
60
-
61
-
62
-
63
-
64
-
65
-
66
-
67
-
68
-
69
-
70
-
71
-
72
-
73
-
74
-
75
-
76
-
77
-
78
-
79
-
80
-
81
-
82
-
83
-
84
-
85
-
86
-
87
-
88
-
89
-
90
-
91
-
92
-
93
-
94
-
95
-
96
-
97
-
98
-
99
-
100
-
101
-
102
-
103
-
104
-
105
-
106
-
 107
107 -
 108
108 -
 109
109 -
 110
110 -
 111
111 -
 112
112 -
 113
113 -
 114
114 -
 115
115 -
 116
116 -
 117
117 -
118
-
119
-
120
-
121
-
122
-
123
-
124
-
125
-
126
-
127
-
128
-
129
-
130
-
131
-
132
-
133
-
134
-
135
-
136
-
137
-
138
-
139
-
140
-
141
-
142
-
143
-
144
-
145
-
146
-
147
-
148
-
149
-
150
-
151
-
152
-
153
-
154
-
155
-
156
-
157
-
158
-
159
-
160
-
161
-
162
-
163
-
164
-
165
-
166
-
167
-
168
-
169
-
170
-
171
-
172
-
173
-
174
-
175
-
176
-
177
-
178
-
179
-
180
-
181
-
182
-
183
-
184
 |
 |

6–10
11
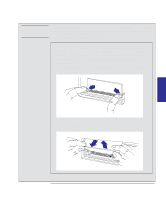
Remove the cover from the three left-hand cartridge selectors.
1
Release the clip on the right side of the cover, at the bottom.
This is
easiest to see when looking down into the plotter.
2
Lift the cover off.
2
1913
1
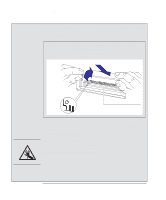
12
From the upgrade kit, take the label containing four colored dots.
1
Remove the protective strip from the back.
2
Stick the label onto the vertical panel above the cartridge stalls while the
cartridge is out of its stall, as shown below.
Note that the yellow dot
must be on the left.
3
Close the cover
Reconfiguring the plotter
To upgrade the HP DesignJet 330 plotter with color