HP Designjet 350c HP Designjet 330 and 350C Plotters - Users Guide - Page 122
It is not necessary to return the selectors to their original positions.
 |
View all HP Designjet 350c manuals
Add to My Manuals
Save this manual to your list of manuals |
Page 122 highlights
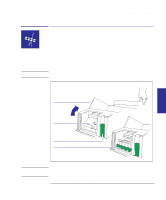
350C Maintaining your plotter Cleaning the cartridge nozzles (priming) 3 Press the small green selector in front of the cartridge which you want to prime. 1745 4 Firmly press the large green plunger fully down once, and then release it. The plunger should return to its original position. 350C r1755 5 Repeat steps 3 and 4 for any other cartridges to be primed. Note. It is not necessary to return the selectors to their original positions. 6 Lower the cover. 7 If you interrupted the print, the plotter now resumes it. Ignoring that part of the drawing immediately after the interruption (where print quality cannot be guaranteed), check the rest of the print to see if the problem has been resolved. 7-8
-
 1
1 -
2
-
3
-
4
-
5
-
6
-
7
-
8
-
9
-
10
-
11
-
12
-
13
-
14
-
15
-
16
-
17
-
18
-
19
-
20
-
21
-
22
-
23
-
24
-
25
-
26
-
27
-
28
-
29
-
30
-
31
-
32
-
33
-
34
-
35
-
36
-
37
-
38
-
39
-
40
-
41
-
42
-
43
-
44
-
45
-
46
-
47
-
48
-
49
-
50
-
51
-
52
-
53
-
54
-
55
-
56
-
57
-
58
-
59
-
60
-
61
-
62
-
63
-
64
-
65
-
66
-
67
-
68
-
69
-
70
-
71
-
72
-
73
-
74
-
75
-
76
-
77
-
78
-
79
-
80
-
81
-
82
-
83
-
84
-
85
-
86
-
87
-
88
-
89
-
90
-
91
-
92
-
93
-
94
-
95
-
96
-
97
-
98
-
99
-
100
-
101
-
102
-
103
-
104
-
105
-
106
-
107
-
108
-
109
-
110
-
111
-
112
-
113
-
114
-
115
-
116
-
 117
117 -
 118
118 -
 119
119 -
 120
120 -
 121
121 -
 122
122 -
 123
123 -
 124
124 -
 125
125 -
 126
126 -
 127
127 -
128
-
129
-
130
-
131
-
132
-
133
-
134
-
135
-
136
-
137
-
138
-
139
-
140
-
141
-
142
-
143
-
144
-
145
-
146
-
147
-
148
-
149
-
150
-
151
-
152
-
153
-
154
-
155
-
156
-
157
-
158
-
159
-
160
-
161
-
162
-
163
-
164
-
165
-
166
-
167
-
168
-
169
-
170
-
171
-
172
-
173
-
174
-
175
-
176
-
177
-
178
-
179
-
180
-
181
-
182
-
183
-
184
 |
 |

350C
350C
7–8
3
Press the small green selector in front of the cartridge which you want to
prime.
1745
4
Firmly press the large green
plunger fully down once, and
then release it.
The plunger should return to its
original position.
r1755
5
Repeat steps 3 and 4 for any other cartridges to be primed.
Note.
It is not necessary to return the selectors to their original positions.
6
Lower the cover.
7
If you interrupted the print, the plotter now resumes it.
Ignoring that part of the
drawing immediately after the interruption (where print quality cannot be
guaranteed), check the rest of the print to see if the problem has been resolved.
Maintaining your plotter
Cleaning the cartridge nozzles (priming)