HP Designjet 350c HP Designjet 330 and 350C Plotters - Users Guide - Page 110
Replace the cover plate and screws.
 |
View all HP Designjet 350c manuals
Add to My Manuals
Save this manual to your list of manuals |
Page 110 highlights
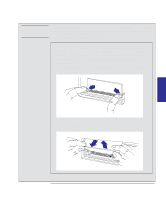
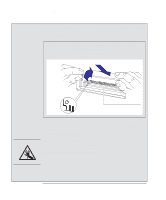
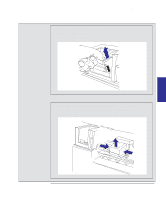
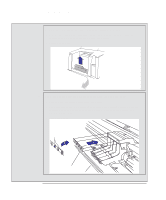
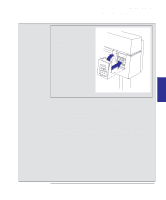
Reconfiguring the plotter To upgrade the HP DesignJet 330 plotter with color 4 Temporarily place the module on a conductive pad, for example the one containing the new SIMM. 5 Take the new SIMM out of its bag, holding it only by the edges. 6 With the SIMM's small notch on the left and the metallic edge away from you, load the SIMM into the slot furthest from you. To do this, first hold the module at an angle, place the bottom edge in the slot and then push the top away from you until the module clicks into place. 1 2 1910 Slot furthest from you WARNING 7 If you removed a memory module from the slot nearest to you, re-install it in the same way. 8 Replace the cover plate and screws. In steps 9, 10 and 11, pay special attention to this warning. Don't touch the stainless steel strip that runs the length of the plotter behind the cartridge carriage; its edge is very sharp. Keep hair, jewelry, clothing, and foreign objects away from the plotter mechanisms. 6-8
-
 1
1 -
2
-
3
-
4
-
5
-
6
-
7
-
8
-
9
-
10
-
11
-
12
-
13
-
14
-
15
-
16
-
17
-
18
-
19
-
20
-
21
-
22
-
23
-
24
-
25
-
26
-
27
-
28
-
29
-
30
-
31
-
32
-
33
-
34
-
35
-
36
-
37
-
38
-
39
-
40
-
41
-
42
-
43
-
44
-
45
-
46
-
47
-
48
-
49
-
50
-
51
-
52
-
53
-
54
-
55
-
56
-
57
-
58
-
59
-
60
-
61
-
62
-
63
-
64
-
65
-
66
-
67
-
68
-
69
-
70
-
71
-
72
-
73
-
74
-
75
-
76
-
77
-
78
-
79
-
80
-
81
-
82
-
83
-
84
-
85
-
86
-
87
-
88
-
89
-
90
-
91
-
92
-
93
-
94
-
95
-
96
-
97
-
98
-
99
-
100
-
101
-
102
-
103
-
104
-
 105
105 -
 106
106 -
 107
107 -
 108
108 -
 109
109 -
 110
110 -
 111
111 -
 112
112 -
 113
113 -
 114
114 -
 115
115 -
116
-
117
-
118
-
119
-
120
-
121
-
122
-
123
-
124
-
125
-
126
-
127
-
128
-
129
-
130
-
131
-
132
-
133
-
134
-
135
-
136
-
137
-
138
-
139
-
140
-
141
-
142
-
143
-
144
-
145
-
146
-
147
-
148
-
149
-
150
-
151
-
152
-
153
-
154
-
155
-
156
-
157
-
158
-
159
-
160
-
161
-
162
-
163
-
164
-
165
-
166
-
167
-
168
-
169
-
170
-
171
-
172
-
173
-
174
-
175
-
176
-
177
-
178
-
179
-
180
-
181
-
182
-
183
-
184
 |
 |
