HP LaserJet P4014 HP LaserJet P4010 and P4510 Series - User Guide - Page 131
See the enclosed recycling guide for recycling instructions., For additional help, go
 |
View all HP LaserJet P4014 manuals
Add to My Manuals
Save this manual to your list of manuals |
Page 131 highlights
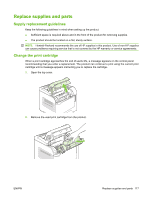
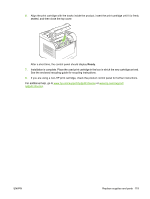
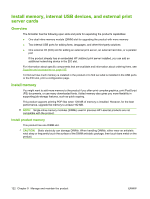
6. Align the print cartridge with the tracks inside the product, insert the print cartridge until it is firmly seated, and then close the top cover. After a short time, the control panel should display Ready. 7. Installation is complete. Place the used print cartridge in the box in which the new cartridge arrived. See the enclosed recycling guide for recycling instructions. 8. If you are using a non-HP print cartridge, check the product control panel for further instructions. For additional help, go to www.hp.com/support/hpljp4010series or www.hp.com/support/ hpljp4510series. ENWW Replace supplies and parts 119
-
 1
1 -
2
-
3
-
4
-
5
-
6
-
7
-
8
-
9
-
10
-
11
-
12
-
13
-
14
-
15
-
16
-
17
-
18
-
19
-
20
-
21
-
22
-
23
-
24
-
25
-
26
-
27
-
28
-
29
-
30
-
31
-
32
-
33
-
34
-
35
-
36
-
37
-
38
-
39
-
40
-
41
-
42
-
43
-
44
-
45
-
46
-
47
-
48
-
49
-
50
-
51
-
52
-
53
-
54
-
55
-
56
-
57
-
58
-
59
-
60
-
61
-
62
-
63
-
64
-
65
-
66
-
67
-
68
-
69
-
70
-
71
-
72
-
73
-
74
-
75
-
76
-
77
-
78
-
79
-
80
-
81
-
82
-
83
-
84
-
85
-
86
-
87
-
88
-
89
-
90
-
91
-
92
-
93
-
94
-
95
-
96
-
97
-
98
-
99
-
100
-
101
-
102
-
103
-
104
-
105
-
106
-
107
-
108
-
109
-
110
-
111
-
112
-
113
-
114
-
115
-
116
-
117
-
118
-
119
-
120
-
121
-
122
-
123
-
124
-
125
-
 126
126 -
 127
127 -
 128
128 -
 129
129 -
 130
130 -
 131
131 -
 132
132 -
 133
133 -
 134
134 -
 135
135 -
 136
136 -
137
-
138
-
139
-
140
-
141
-
142
-
143
-
144
-
145
-
146
-
147
-
148
-
149
-
150
-
151
-
152
-
153
-
154
-
155
-
156
-
157
-
158
-
159
-
160
-
161
-
162
-
163
-
164
-
165
-
166
-
167
-
168
-
169
-
170
-
171
-
172
-
173
-
174
-
175
-
176
-
177
-
178
-
179
-
180
-
181
-
182
-
183
-
184
-
185
-
186
-
187
-
188
-
189
-
190
-
191
-
192
-
193
-
194
-
195
-
196
-
197
-
198
-
199
-
200
-
201
-
202
-
203
-
204
-
205
-
206
-
207
-
208
-
209
-
210
-
211
-
212
-
213
-
214
-
215
-
216
-
217
-
218
-
219
-
220
-
221
-
222
-
223
-
224
-
225
-
226
-
227
-
228
-
229
-
230
-
231
-
232
-
233
-
234
-
235
-
236
-
237
-
238
-
239
-
240
-
241
-
242
-
243
-
244
-
245
-
246
 |
 |

6.
Align the print cartridge with the tracks inside the product, insert the print cartridge until it is firmly
seated, and then close the top cover.
After a short time, the control panel should display
Ready
.
7.
Installation is complete. Place the used print cartridge in the box in which the new cartridge arrived.
See the enclosed recycling guide for recycling instructions.
8.
If you are using a non-HP print cartridge, check the product control panel for further instructions.
For additional help, go to
www.hp.com/
support/hpljp4010series
or
www.hp.com/
support/
hpljp4510series
.
ENWW
Replace supplies and parts
119