HP LaserJet P4014 HP LaserJet P4010 and P4510 Series - User Guide - Page 161
X Permanent Storage Write Fail, To Continue Press Ok, X Storage Error Settings, Changed
 |
View all HP LaserJet P4014 manuals
Add to My Manuals
Save this manual to your list of manuals |
Page 161 highlights
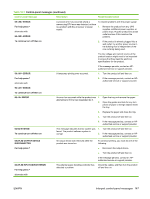
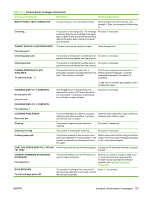
Table 10-1 Control-panel messages (continued) Control panel message Description Recommended action 68.X PERMANENT STORAGE WRITE FAIL To continue press OK The storage device is failing to write. Printing can continue, but there might be some unexpected behaviors because an error occurred in permanent storage. Press OK to continue. If the error does not clear, turn the product off then on. If the message persists, contact an HP-authorized service or support provider. 68.X STORAGE ERROR SETTINGS CHANGED For help press alternates with 68.X STORAGE ERROR SETTINGS CHANGED To continue press OK An error occurred in the product permanent storage and one or more product settings has been reset to its factory default. Press OK to resume printing. Print a configuration page and check the product settings to determine which values have changed. If the error does not clear, turn the product off and then on. If the message persists, contact an HP-authorized service or support provider. 69.X ERROR A printing error occurred. 1. Turn the product off and then on. For help press alternates with 2. If the message persists, contact an HPauthorized service or support provider. 69.X ERROR To continue press OK 79.XXXX ERROR To continue turn off then on The product detected a critical hardware error. 1. Press the stop button to clear the print job from the product memory. Turn the product off and then on. 2. Try printing a job from a different program. If the job prints, go back to the first program and try printing a different file. If the message appears only with a certain program or print job, contact the software vendor for assistance. If the message persists with different programs and print jobs, try these steps. 1. Turn the product off. 2. Disconnect all cables to the product that connect it to the network or computer. 3. Remove all the memory DIMMs or thirdparty DIMMs from the product. Then reinstall the memory DIMM. 4. Remove the EIO device from the product. 5. Turn the product on. ENWW Interpret control-panel messages 149
-
 1
1 -
2
-
3
-
4
-
5
-
6
-
7
-
8
-
9
-
10
-
11
-
12
-
13
-
14
-
15
-
16
-
17
-
18
-
19
-
20
-
21
-
22
-
23
-
24
-
25
-
26
-
27
-
28
-
29
-
30
-
31
-
32
-
33
-
34
-
35
-
36
-
37
-
38
-
39
-
40
-
41
-
42
-
43
-
44
-
45
-
46
-
47
-
48
-
49
-
50
-
51
-
52
-
53
-
54
-
55
-
56
-
57
-
58
-
59
-
60
-
61
-
62
-
63
-
64
-
65
-
66
-
67
-
68
-
69
-
70
-
71
-
72
-
73
-
74
-
75
-
76
-
77
-
78
-
79
-
80
-
81
-
82
-
83
-
84
-
85
-
86
-
87
-
88
-
89
-
90
-
91
-
92
-
93
-
94
-
95
-
96
-
97
-
98
-
99
-
100
-
101
-
102
-
103
-
104
-
105
-
106
-
107
-
108
-
109
-
110
-
111
-
112
-
113
-
114
-
115
-
116
-
117
-
118
-
119
-
120
-
121
-
122
-
123
-
124
-
125
-
126
-
127
-
128
-
129
-
130
-
131
-
132
-
133
-
134
-
135
-
136
-
137
-
138
-
139
-
140
-
141
-
142
-
143
-
144
-
145
-
146
-
147
-
148
-
149
-
150
-
151
-
152
-
153
-
154
-
155
-
 156
156 -
 157
157 -
 158
158 -
 159
159 -
 160
160 -
 161
161 -
 162
162 -
 163
163 -
 164
164 -
 165
165 -
 166
166 -
167
-
168
-
169
-
170
-
171
-
172
-
173
-
174
-
175
-
176
-
177
-
178
-
179
-
180
-
181
-
182
-
183
-
184
-
185
-
186
-
187
-
188
-
189
-
190
-
191
-
192
-
193
-
194
-
195
-
196
-
197
-
198
-
199
-
200
-
201
-
202
-
203
-
204
-
205
-
206
-
207
-
208
-
209
-
210
-
211
-
212
-
213
-
214
-
215
-
216
-
217
-
218
-
219
-
220
-
221
-
222
-
223
-
224
-
225
-
226
-
227
-
228
-
229
-
230
-
231
-
232
-
233
-
234
-
235
-
236
-
237
-
238
-
239
-
240
-
241
-
242
-
243
-
244
-
245
-
246
 |
 |