HP LaserJet P4014 HP LaserJet P4010 and P4510 Series - User Guide - Page 138
Check DIMM installation, Save resources (permanent resources)
 |
View all HP LaserJet P4014 manuals
Add to My Manuals
Save this manual to your list of manuals |
Page 138 highlights
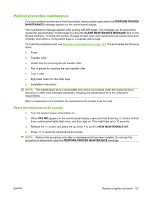
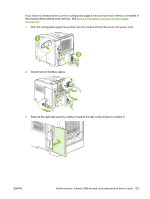
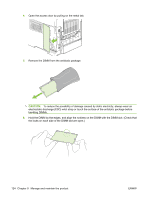
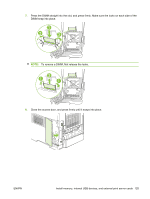
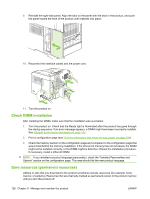
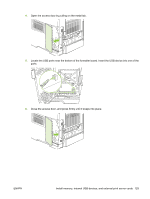
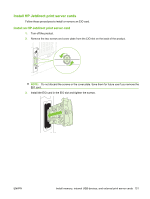
9. Reinstall the right-side panel. Align the tabs on the panel with the slots in the product, and push the panel toward the front of the product until it latches into place. 10. Reconnect the interface cables and the power cord. 11. Turn the product on. Check DIMM installation After installing the DIMM, make sure that the installation was successful. 1. Turn the product on. Check that the Ready light is illuminated after the product has gone through the startup sequence. If an error message appears, a DIMM might have been incorrectly installed. See Interpret control-panel messages on page 143. 2. Print a configuration page (see Print the information and show-me-how pages on page 104). 3. Check the memory section on the configuration page and compare it to the configuration page that was printed before the memory installation. If the amount of memory has not increased, the DIMM might not be installed correctly, or the DIMM might be defective. Repeat the installation procedure. If necessary, install a different DIMM. NOTE: If you installed a product language (personality), check the "Installed Personalities and Options" section on the configuration page. This area should list the new product language. Save resources (permanent resources) Utilities or jobs that you download to the product sometimes include resources (for example, fonts, macros, or patterns). Resources that are internally marked as permanent remain in the product memory until you turn the product off. 126 Chapter 9 Manage and maintain the product ENWW
-
 1
1 -
2
-
3
-
4
-
5
-
6
-
7
-
8
-
9
-
10
-
11
-
12
-
13
-
14
-
15
-
16
-
17
-
18
-
19
-
20
-
21
-
22
-
23
-
24
-
25
-
26
-
27
-
28
-
29
-
30
-
31
-
32
-
33
-
34
-
35
-
36
-
37
-
38
-
39
-
40
-
41
-
42
-
43
-
44
-
45
-
46
-
47
-
48
-
49
-
50
-
51
-
52
-
53
-
54
-
55
-
56
-
57
-
58
-
59
-
60
-
61
-
62
-
63
-
64
-
65
-
66
-
67
-
68
-
69
-
70
-
71
-
72
-
73
-
74
-
75
-
76
-
77
-
78
-
79
-
80
-
81
-
82
-
83
-
84
-
85
-
86
-
87
-
88
-
89
-
90
-
91
-
92
-
93
-
94
-
95
-
96
-
97
-
98
-
99
-
100
-
101
-
102
-
103
-
104
-
105
-
106
-
107
-
108
-
109
-
110
-
111
-
112
-
113
-
114
-
115
-
116
-
117
-
118
-
119
-
120
-
121
-
122
-
123
-
124
-
125
-
126
-
127
-
128
-
129
-
130
-
131
-
132
-
 133
133 -
 134
134 -
 135
135 -
 136
136 -
 137
137 -
 138
138 -
 139
139 -
 140
140 -
 141
141 -
 142
142 -
 143
143 -
144
-
145
-
146
-
147
-
148
-
149
-
150
-
151
-
152
-
153
-
154
-
155
-
156
-
157
-
158
-
159
-
160
-
161
-
162
-
163
-
164
-
165
-
166
-
167
-
168
-
169
-
170
-
171
-
172
-
173
-
174
-
175
-
176
-
177
-
178
-
179
-
180
-
181
-
182
-
183
-
184
-
185
-
186
-
187
-
188
-
189
-
190
-
191
-
192
-
193
-
194
-
195
-
196
-
197
-
198
-
199
-
200
-
201
-
202
-
203
-
204
-
205
-
206
-
207
-
208
-
209
-
210
-
211
-
212
-
213
-
214
-
215
-
216
-
217
-
218
-
219
-
220
-
221
-
222
-
223
-
224
-
225
-
226
-
227
-
228
-
229
-
230
-
231
-
232
-
233
-
234
-
235
-
236
-
237
-
238
-
239
-
240
-
241
-
242
-
243
-
244
-
245
-
246
 |
 |
