HP LaserJet P4014 HP LaserJet P4010 and P4510 Series - User Guide - Page 147
Use FTP to upgrade the firmware on a network connection, Enable folder view for FTP sites, PORT1
 |
View all HP LaserJet P4014 manuals
Add to My Manuals
Save this manual to your list of manuals |
Page 147 highlights
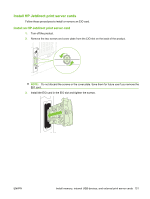
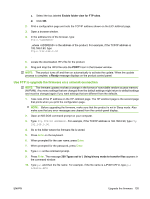
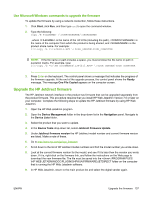
c. Select the box labeled Enable folder view for FTP sites. d. Click OK. 2. Print a configuration page and note the TCP/IP address shown on the EIO Jetdirect page. 3. Open a browser window. 4. In the address line of the browser, type ftp:// , where is the address of the product. For example, if the TCP/IP address is 192.168.0.90, type ftp://192.168.0.90 . 5. Locate the downloaded .RFU file for the product. 6. Drag and drop the .RFU file onto the PORT1 icon in the browser window. NOTE: The product turns off and then on automatically to activate the update. When the update process is complete, a Ready message displays on the product control panel. Use FTP to upgrade the firmware on a network connection NOTE: The firmware update involves a change in the format of nonvolatile random-access memory (NVRAM). Any menu settings that are changed from the default settings might return to default settings and must be changed again if you want settings that are different from the defaults. 1. Take note of the IP address on the HP Jetdirect page. The HP Jetdirect page is the second page that prints when you print the configuration page. NOTE: Before upgrading the firmware, make sure that the product is not in Sleep mode. Also make sure that any error messages are cleared from the control-panel display. 2. Open an MS-DOS command prompt on your computer. 3. Type: ftp TCP/IP ADDRESS>. For example, if the TCP/IP address is 192.168.0.90, type ftp 192.168.0.90. 4. Go to the folder where the firmware file is stored. 5. Press Enter on the keyboard. 6. When prompted for the user name, press Enter. 7. When prompted for the password, press Enter. 8. Type bin at the command prompt. 9. Press Enter. The message 200 Types set to I, Using binary mode to transfer files appears in the command window. 10. Type put and then the file name. For example, if the file name is LJP4015.RFU, type put LJP4015.RFU. ENWW Upgrade the firmware 135
-
 1
1 -
2
-
3
-
4
-
5
-
6
-
7
-
8
-
9
-
10
-
11
-
12
-
13
-
14
-
15
-
16
-
17
-
18
-
19
-
20
-
21
-
22
-
23
-
24
-
25
-
26
-
27
-
28
-
29
-
30
-
31
-
32
-
33
-
34
-
35
-
36
-
37
-
38
-
39
-
40
-
41
-
42
-
43
-
44
-
45
-
46
-
47
-
48
-
49
-
50
-
51
-
52
-
53
-
54
-
55
-
56
-
57
-
58
-
59
-
60
-
61
-
62
-
63
-
64
-
65
-
66
-
67
-
68
-
69
-
70
-
71
-
72
-
73
-
74
-
75
-
76
-
77
-
78
-
79
-
80
-
81
-
82
-
83
-
84
-
85
-
86
-
87
-
88
-
89
-
90
-
91
-
92
-
93
-
94
-
95
-
96
-
97
-
98
-
99
-
100
-
101
-
102
-
103
-
104
-
105
-
106
-
107
-
108
-
109
-
110
-
111
-
112
-
113
-
114
-
115
-
116
-
117
-
118
-
119
-
120
-
121
-
122
-
123
-
124
-
125
-
126
-
127
-
128
-
129
-
130
-
131
-
132
-
133
-
134
-
135
-
136
-
137
-
138
-
139
-
140
-
141
-
 142
142 -
 143
143 -
 144
144 -
 145
145 -
 146
146 -
 147
147 -
 148
148 -
 149
149 -
 150
150 -
 151
151 -
 152
152 -
153
-
154
-
155
-
156
-
157
-
158
-
159
-
160
-
161
-
162
-
163
-
164
-
165
-
166
-
167
-
168
-
169
-
170
-
171
-
172
-
173
-
174
-
175
-
176
-
177
-
178
-
179
-
180
-
181
-
182
-
183
-
184
-
185
-
186
-
187
-
188
-
189
-
190
-
191
-
192
-
193
-
194
-
195
-
196
-
197
-
198
-
199
-
200
-
201
-
202
-
203
-
204
-
205
-
206
-
207
-
208
-
209
-
210
-
211
-
212
-
213
-
214
-
215
-
216
-
217
-
218
-
219
-
220
-
221
-
222
-
223
-
224
-
225
-
226
-
227
-
228
-
229
-
230
-
231
-
232
-
233
-
234
-
235
-
236
-
237
-
238
-
239
-
240
-
241
-
242
-
243
-
244
-
245
-
246
 |
 |
