HP Officejet 7000 User Guide - Page 40
To share the device on a locally shared network, Network connection - printer driver
 |
View all HP Officejet 7000 manuals
Add to My Manuals
Save this manual to your list of manuals |
Page 40 highlights
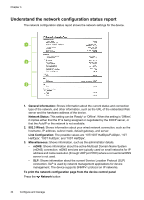
Chapter 3 1. In the Found New Hardware dialog box that displays methods for locating the printer driver, select the Advanced option, and then click Next. NOTE: Do not allow the Found New Hardware wizard to perform an automatic search for the printer driver. 2. Select the check box for specifying the driver location, and ensure that the other check boxes are clear. 3. Insert the installation CD into the CD drive. If the CD menu appears, close it. 4. Browse to locate the root directory on the installation CD (for example, D), and then click OK. 5. Click Next and follow the onscreen instructions. 6. Click Finish to close the Found New Hardware wizard. The wizard automatically starts the installation program (this might take a short while). 7. Complete the installation process. NOTE: You can also share the device with other computers using a simple form of networking known as locally shared networking. For more information, see To share the device on a locally shared network. To share the device on a locally shared network In a locally shared network, the device is connected directly to the USB connector of a selected computer (known as the server) and is shared by other computers (clients). NOTE: When sharing a directly connected device, use the computer with the newest operating system as the server. Use this configuration only in small groups or when usage is low. The connected computer is slowed down when many users print to the device. 1. Click Start, then click Printers or Printers and Faxes. - Or Click Start, click Control Panel, and then double-click Printers. 2. Right-click the device icon, click Properties, and then click the Sharing tab. 3. Click the option to share the device, and give it a share name. Network connection If the device has network capability, it can be shared in a network environment by connecting it directly to the network. This type of connection offers the ability to manage the device using the embedded Web server from any computer on the network. NOTE: Microsoft Internet Explorer 6.0 or higher must be installed on the computer system to run the installation program. 36 Configure and manage
-
 1
1 -
2
-
3
-
4
-
5
-
6
-
7
-
8
-
9
-
10
-
11
-
12
-
13
-
14
-
15
-
16
-
17
-
18
-
19
-
20
-
21
-
22
-
23
-
24
-
25
-
26
-
27
-
28
-
29
-
30
-
31
-
32
-
33
-
34
-
 35
35 -
 36
36 -
 37
37 -
 38
38 -
 39
39 -
 40
40 -
 41
41 -
 42
42 -
 43
43 -
 44
44 -
 45
45 -
46
-
47
-
48
-
49
-
50
-
51
-
52
-
53
-
54
-
55
-
56
-
57
-
58
-
59
-
60
-
61
-
62
-
63
-
64
-
65
-
66
-
67
-
68
-
69
-
70
-
71
-
72
-
73
-
74
-
75
-
76
-
77
-
78
-
79
-
80
-
81
-
82
-
83
-
84
-
85
-
86
-
87
-
88
-
89
-
90
-
91
-
92
-
93
-
94
-
95
-
96
-
97
-
98
-
99
-
100
-
101
-
102
-
103
-
104
-
105
-
106
-
107
-
108
-
109
-
110
-
111
-
112
-
113
-
114
-
115
-
116
-
117
-
118
-
119
-
120
-
121
-
122
-
123
-
124
-
125
-
126
-
127
-
128
-
129
-
130
-
131
-
132
-
133
-
134
-
135
-
136
-
137
-
138
-
139
-
140
-
141
-
142
-
143
-
144
-
145
-
146
-
147
-
148
 |
 |